2D and 3D Animation Together: A Practical Pipeline Guide
You've got a storyboard that looks right, a client who loves the flat character designs, and a hero product that needs to rotate, open up and catch real light. Someone says, "We'll just put the 2D over the 3D," and production starts. Eight weeks later the character slides against the floor, the shadows don't match, and every camera move needs fixing by hand. That's the usual failure point when you use 2D and 3D animation together. The styles aren't incompatible. The hand-offs are undefined. I would spend the argument early, on what gets drawn, what gets built, which camera and colour settings are locked, and whether one difficult shot works before anyone builds the rest.
Decide Which Elements Stay 2D and Which Go 3D
3D earns its cost where space, scale or repeated viewpoints matter. 2D earns its place where style, expression and linework carry the meaning. Ask two questions of every element. Does it need real perspective or a camera moving through space? Does its value sit in a drawn gesture, a graphic shape or readable text? The first points to 3D, the second to 2D. If both answers are yes, you've found a hybrid element and you need to say how the two halves meet. Most projects settle quickly. Characters and graphic language stay drawn. Vehicles, products, mechanisms and simulations get built. Backgrounds often sit between the two, painted in layers and placed inside a 3D layout so a slow push-in produces parallax without modelling every wall, tree and window.
| Element | Best approach | Why |
|---|---|---|
| Stylised characters with expressive linework | 2D | Line weight and hand-drawn gesture carry the personality and read clearly at small sizes |
| Backgrounds with gentle camera drift | 2D layered parallax | Separate depth layers fake movement without modelling every environment |
| Vehicles, machines or products that rotate | 3D | One model gives consistent form, lighting and camera orbits |
| Camera moves through a space | 3D layout with 2D on top | Real perspective and parallax, with 2D graphics composited over the render |
| Simulations such as cloth, smoke or water | 3D | Physics-based effects are hard to fake convincingly in flat artwork |
| Diagrams, UI and text overlays | 2D | Vector graphics stay sharp at any resolution and are quick to revise |
| Mechanisms shown from inside | 3D | Cutaway and internal views need true geometry |
Watch the in-between elements
A flat character who must stand on a 3D floor looks like a 2D decision, but the contact shadow, foot placement and perspective belong to 3D layout. Treat it as hybrid. Place the drawn character in the laid-out scene, add a shadow pass, and check the feet during the camera move, not in a still frame. Tag every item on the shot list as 2D, 3D or hybrid before asset work starts. Then check that list against the storyboard shot by shot. If a board depends on an element nobody has assigned, you've found next month's delay while it's still cheap.
Build the Hybrid Pipeline in Seven Stages
A hybrid pipeline fails when departments work in a sensible local order but lock shared decisions too late. The sequence below forces those decisions forward. It also follows the progression described in the University for the Creative Arts animation course, where storyboarding and visual development precede 3D production and compositing completes the work.
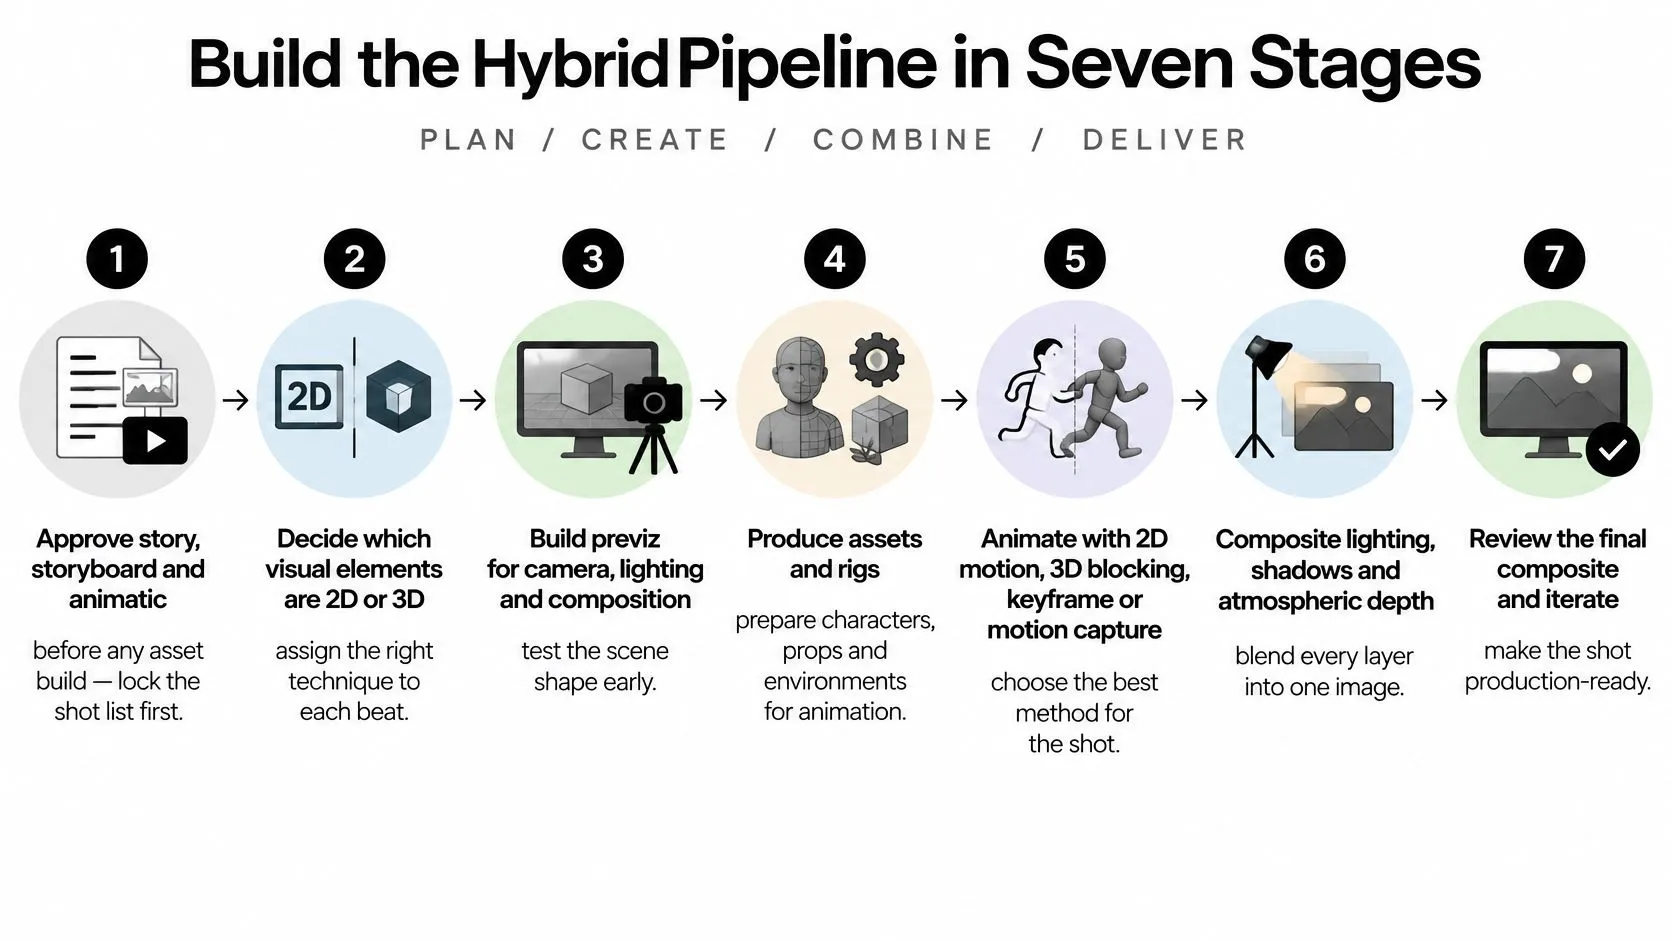
The seven stages
- Approve story, storyboard and animatic. Lock the shot list, timing and editorial intent before anyone builds assets.
- Decide what stays hand-drawn or graphic. Name the linework, characters, diagrams and textures that must not become geometry.
- Separate 2D artwork into depth-bearing layers. Give foreground, midground and background enough separation to survive the planned camera move.
- Set the 3D camera and layout. Lock frame rate, lens, colour-management standard and delivery resolution for every shot.
- Build only the principal 3D assets. Model or projection-map what the camera directly interrogates, and leave the rest as layered artwork.
- Rig and animate the 3D elements. Approve movement against the animatic before adding surface detail or secondary passes.
- Add 2D passes, then light, render and composite. Finish with effects, linework, textures or character passes, followed by quality control at delivery size.
Practical rule: Lock the camera, lens, frame rate and colour pipeline during layout. Everything drawn after that has a fixed target.The biggest time saver is refusing unnecessary modelling. A layered 2D projection can replace a fully built background whenever the shot needs parallax rather than a camera travelling around objects. It's cheaper to repaint or extend a layer than to model, texture and light scenery the audience only glimpses. Our fuller animation production pipeline guide sets out how those stages connect across a complete production. For short-form variants, the same discipline helps you reuse approved masters without rebuilding shots for every crop. These video workflow tips for short-form creators are useful when you're planning versioning alongside the main pipeline. Judge the pipeline by one test. Does the animatic's staging, depth and graphic language survive review without shot-level redesign? Polygon counts and render times matter to the schedule, but they don't tell you whether the combined image works. A technically impressive model that forces every 2D element to be redrawn isn't an asset. It's a liability with good topology.
Test One Representative Shot Before You Scale
Finding a lighting clash in week one costs a test render. Finding it in week eight can mean relighting scenes, redrawing overlays and recompositing finished shots. That's why I'd make one representative pilot shot before scaling the pipeline, and I'd choose the shot that's most likely to break. It should contain a real camera move, 3D perspective, 2D character or effects animation, cast shadows, atmospheric depth and the final composite. Don't pick the easiest establishing shot. Pick the one with contact between dimensions, moving edges and the fullest range of colour and light.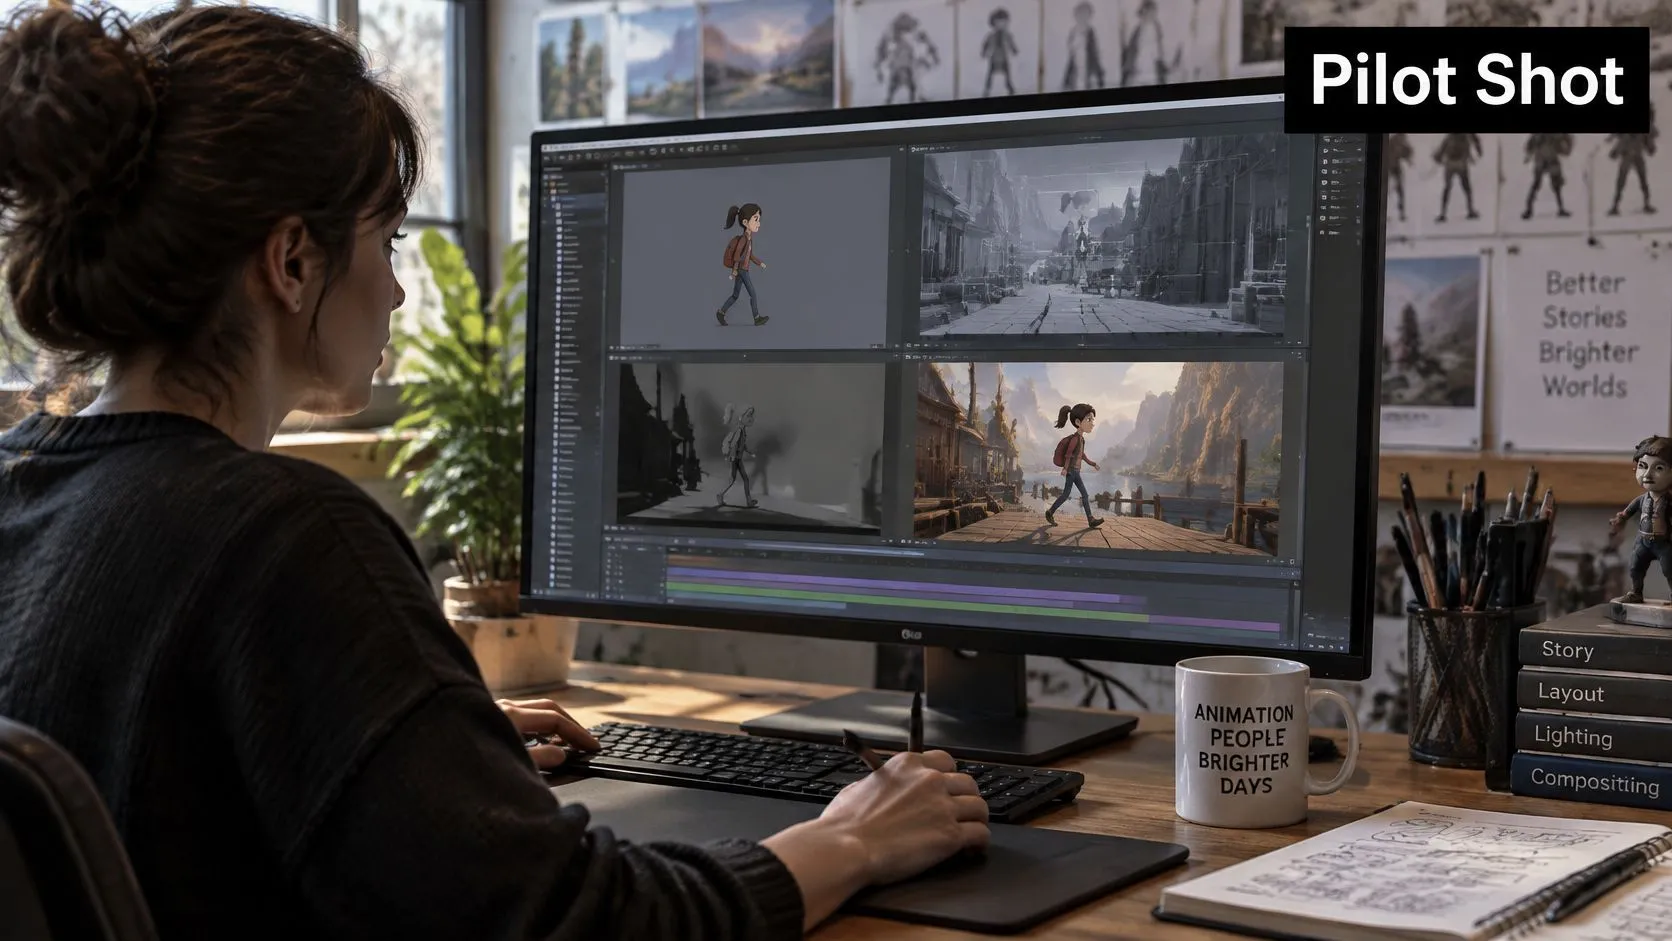
What to inspect at final size
- •Motion blur and antialiasing: Check whether drawn edges soften at the same rate as moving 3D edges.
- •Grain: Match texture across both passes so one layer doesn't look clinically clean against the other.
- •Line stability: Step through frames and look for shimmering or crawling lines on moving contours.
- •Alpha edges: Inspect fringing, halos and semi-transparent overlaps on every composited element.
Render the test at final delivery size, not a convenient working resolution. Problems hide when you scale images down, especially thin lines and coloured fringes. Time each revision round as well. That number predicts the production schedule better than an optimistic estimate based on shot count. Three pitfalls show up repeatedly. Physically accurate 3D lighting fights deliberately flat 2D art. Different exposure or colour transforms make the same brand colour shift between passes. Teams postpone line-art decisions until after animation, then discover the approved movement needs redrawing. The hand-off risk is just as practical. A Studio Liddell overview of 3D animation in film cites £73 million in production spend in 2021 across 30 animation programmes, with approximately 1,000 direct employees, 52% of whom were freelance. With that many external contributors, naming, colour, rig and compositing conventions need writing down. For client reviews, you can also share animated GIF previews with clients so timing comments attach to a lightweight version before the full-resolution review. Set the gate before production begins. Editorial, art direction and technical supervision approve the pilot, or asset build-out doesn't start. Record the conventions agreed in that review, because the pilot is only useful if the next fifty shots can reproduce it.
Match Camera, Light and Line Across Both Dimensions
Lighting is usually the first mismatch a client notices, even if they describe it as the character "not sitting in the scene." A 3D render with accurate reflections, soft shadows and complex bounce light makes flat artwork look pasted on. You don't always need less realism, but you do need a deliberate decision about how much of that lighting the 2D elements should appear to receive. Camera matching comes next. The 3D lens, position and path define the perspective that every overlay must follow. If the drawn artwork was designed against a different focal length, verticals lean differently and tracked graphics drift. Lock the camera first, then draw to it. Reversing that order creates correction work on every move. Colour needs the same discipline. Use one colour-management standard and one exposure approach across drawn, rendered and composited passes. Different transforms can make identical source colours separate on screen, and the compositor ends up chasing a problem that began in export settings. Our guide to animation compositing from layers to final frame covers how those passes should be organised before final assembly.
| Technique | Use it when | Watch for |
|---|---|---|
| Layered 2D parallax over a 3D camera | Backgrounds need depth but not full geometry | Layers need enough separation or edges go flat on camera moves |
| Cel-shaded or non-photorealistic 3D | 3D motion must match a flat illustrated style | Shading values need hand tuning or the render looks too real |
| Hand-drawn line overlay on 3D renders | Linework is part of the brand look | Line stability frame to frame, especially on moving edges |
| Painted textures on 3D models | Surfaces need brushwork but models must rotate | UV seams and texture resolution at close camera distances |
| 2D effects added in compositing | Light, smoke or glows must sit on top of 3D renders | Exposure and colour transforms that differ between 2D and 3D passes |
| Physically accurate 3D lighting | Product shots need real shadows and reflections | Clashes with flat 2D art unless the look is toned down |
Choose from the simplest technique upward
Layered parallax and painted textures preserve an illustrated surface while giving you controlled depth. Cel shading and hand-drawn overlays ask more of the render and clean-up teams, because the line has to remain intentional as forms turn. Fully physical lighting sits at the demanding end when flat characters share the frame. It can work for a product-led shot, but you may need simplified shadow shapes or a reduced lighting range on the drawn elements. Settle line weight, line colour and clean-up rules before animation starts. Changing them later isn't a global style tweak if the lines are hand-drawn. It's redraw work, shot by shot. Keep only the techniques that hold through a full camera move at final size.
Assign Roles and Pick Tools for Each Stage
The bottleneck is rarely a missing software feature. It's finding people who understand both sides of the hand-off. Written evidence to Parliament summarised in this ScreenSkills-related submission on creative skills identifies shortages involving both 2D and 3D animators and designers, especially at entry and mid-levels, with demand outstripping the supply of experienced workers. That shortage makes role clarity more valuable, not less. Name one owner for each stage. A 2D designer owns drawn assets and linework. A 3D generalist owns layout and principal models. A compositor signs off the combined passes. A supervisor runs review gates and stops unresolved look decisions from entering full production. Small teams can combine jobs, but they shouldn't combine accountability until nobody knows who approves a change.
Software proficiency doesn't fix an undocumented hand-off. A clean file from the wrong colour space is still the wrong file.
Write the hand-off standards into the production documents: file naming, colour space, rig conventions, layer structure and render-pass names. Include which files are editable sources and which are approved outputs. That distinction prevents a well-meaning artist from rebuilding a shot from an old export.
| Tool | Pipeline stage | Strength in a mixed pipeline |
|---|---|---|
| Toon Boom Harmony | 2D animation and rigging | Rigged cutout and frame-by-frame animation with vector and raster drawing |
| Adobe Photoshop | 2D painting and texture work | Painted textures and matte art for 3D models and layered backgrounds |
| Blender | 3D modelling, rigging and layout | Open-source 3D with Grease Pencil for drawn strokes inside a 3D scene |
| Unreal Engine | Real-time 3D and cinematic rendering | Fast previews of hybrid shots with real-time lighting and camera work |
| Unity | Real-time 3D for interactive delivery | Game-engine pipelines for animation, XR and interactive outputs |
| Adobe After Effects | 2D and 3D compositing | Layered compositing of 2D artwork over 3D passes with motion graphics |
| Foundry Nuke | High-end compositing | Node-based compositing for complex passes, colour and depth |
Choose the fewest tools that cover the job. Every extra package adds export, conversion and version risks. If you plan to draw inside a 3D scene, test the complete export path first. Confirm that line weight, colour and alpha edges survive the move into compositing before the whole project depends on it.
Plan Budget and Lead Time for Mixed Projects
Price the dimensions separately, then pay for the join. The Studio Liddell UK buyer's guide to corporate animation places 2D at approximately £3,500 to £8,000 per finished minute over 4 to 6 weeks, and 3D at roughly £6,000 to more than £20,000 per minute over 8 to 16 weeks. The same benchmark puts motion graphics at about £1,500 to £5,000 per minute over 2 to 4 weeks.
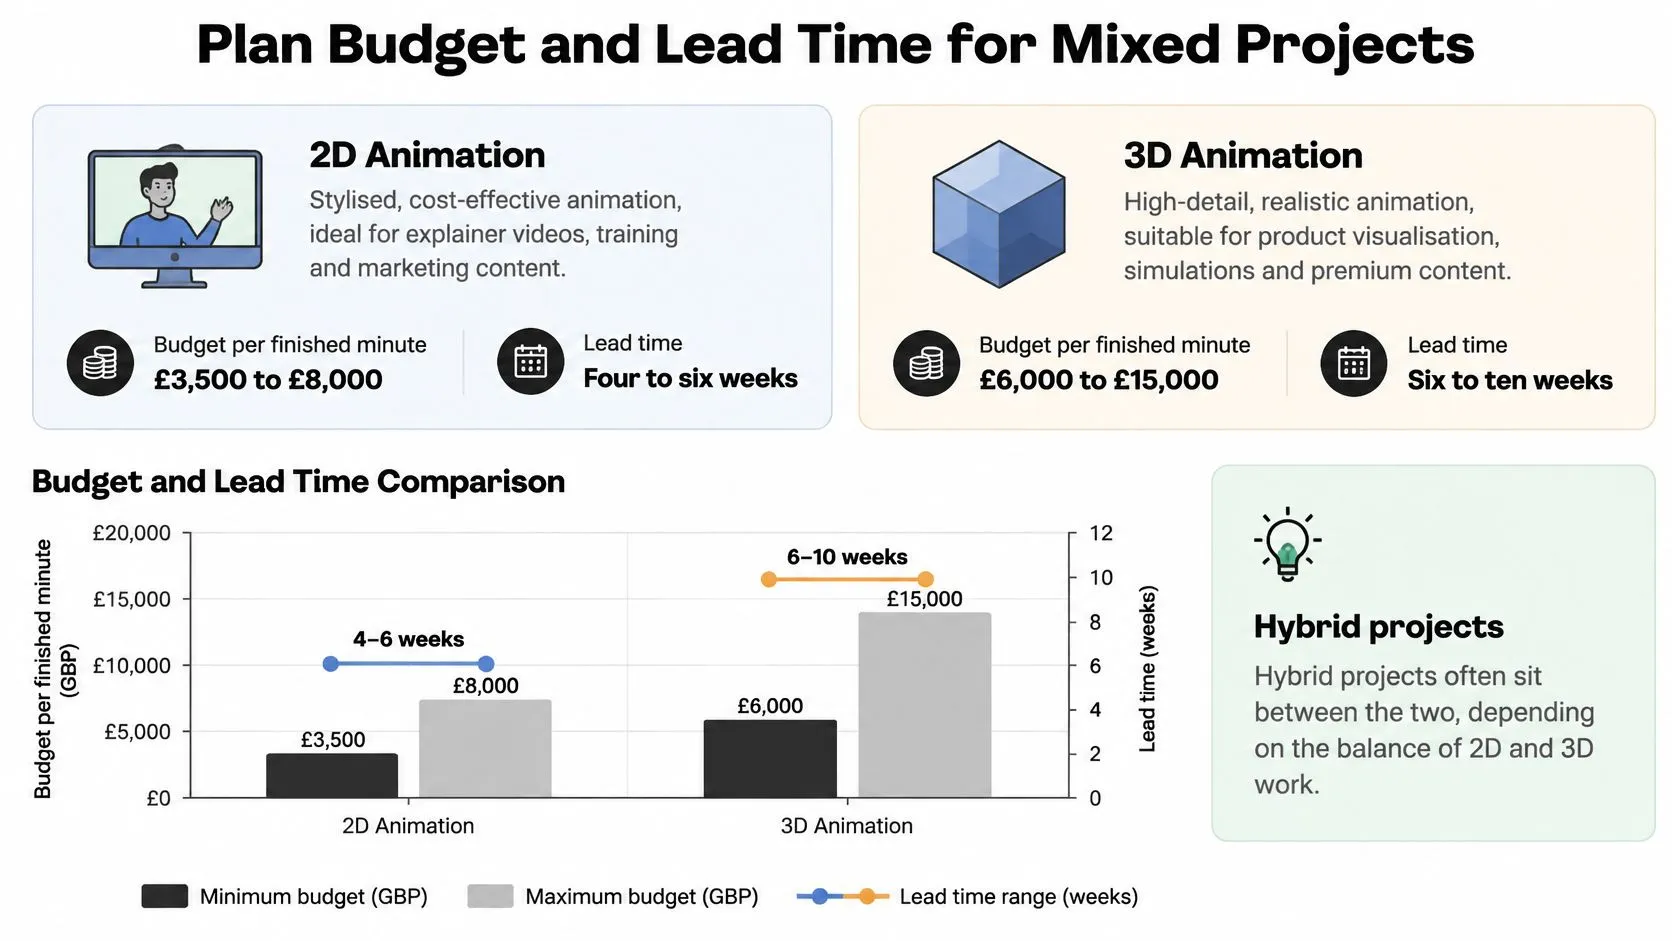
| Approach | Cost per finished minute | Typical lead time |
|---|---|---|
| 2D animation | £3,500, £8,000 | 4, 6 weeks |
| 3D animation | £6,000 to more than £20,000 | 8, 16 weeks |
| Motion graphics | £1,500, £5,000 | 2, 4 weeks |
| Mixed 2D and 3D project | 2D share at 2D rate plus 3D share at 3D rate, plus composite | Set by the longest 3D asset path, plus pilot approval |
There's no honest single rate for hybrid work because the mix changes the work. Estimate each element at its own rate and list compositing separately. Our 2D vs 3D animation cost guide gives buyers a starting point for comparing the pure approaches before they price a combination. Say you're making a 60-second film with 20 seconds of 3D hero product and 40 seconds of 2D explainer art. One third of the 3D range gives £2,000 to £6,667. Two thirds of the 2D range gives £2,333 to £5,333. Together that's roughly £4,333 to £12,000 before the composite line. The example is useful because it exposes the drivers rather than pretending the blend has a fixed market price. Three things push the figure upward: more 3D hero assets, more camera moves that need matching, and more contractual rework rounds. Put the pilot shot in the schedule at the start. It consumes time early to protect the expensive part later. Use 2D where speed and campaign variants matter, and reserve 3D for shots that depend on space, scale, assembly, material behaviour or an unseen process.
Confirm the Broadcast Spec Before You Sign Off
A failed delivery isn't an administrative inconvenience. The technical guidelines for broadcast delivery state that a programme failing formal QC may be rejected and returned for repair. Confirm the delivery frame rate first. Where 24 fps material converts to the UK 25 fps standard, the guidelines identify speed change as the preferred method. Check movement for smoothness and continuity, without distortion, breakup or major resolution changes. Prepare captions, subtitles, graphics, voiceovers and audio mixes for viewers with hearing or visual impairments. Master audio to the broadcaster's specified loudness framework, and run QC on the actual delivery files at final size. If you're preparing non-broadcast platform versions too, this guide to the best video formats for MLS listings shows why format choices should be settled before export rather than improvised at upload. We work with freelance animators on client projects, so the same checklist has to travel with every hand-off. Our motion graphic designers and graphic designers also work collaboratively on each design project, which helps keep graphics and accessibility assets aligned. Sign off the pilot against the checklist before the full build starts. --- If you're planning a project that needs drawn character work, real spatial movement and a delivery pipeline that won't unravel at compositing, we can help you scope the split, test the hardest shot and build the production around it. Visit Studio Liddell to discuss your script, storyboard or brief with a UK-based team that creates 2D and 3D animation for clients worldwide.