Animation Compositing Explained from Layers to Final Frame
You're in a review and the producer's asking a simple question that doesn't have a simple answer. One shot needs a tiny light change, another needs the background cleaned up, and a third only works if the whole stack is rebuilt. That's where animation compositing stops being a finishing touch and becomes the place where time, cost, and continuity are managed. In practice, compositing is where separate visual elements are assembled into one finished shot, but the true job is judgment. A compositor has to make assets from different sources read like one photographed moment, which is why shadow integrity, motion-blur consistency, edge quality, and colour behaviour matter so much. UK production standards describe compositing as digitally assembling individual components into the final animated sequence, including drawings, rendered assets, titles, overlays, and visual effects merged into live-action footage, while ScreenSkills describes the compositor as the person who combines animations, background plates, graphics, and effects into a believable final image UK National Occupational Standard, ScreenSkills compositor profile. That means compositing isn't the point where the foundational work is already done. It's the integration point where continuity gets locked, and where upstream decisions either save money or make reviews drag. Falmouth University's animation material puts it plainly, compositing combines all visual elements from separate layers so they feel like they belong to the same scene, and once that's done the scene is rendered as a movie or image sequence Falmouth University animation brochure.
What Animation Compositing Does on a Production
A producer often meets compositing at the moment a shot has already been blocked, lit, and rendered once, and someone notices the hero prop still feels detached. The immediate question is whether the fix belongs in 3D or in comp. That question is the reason compositing matters as a planning discipline, because it decides whether a change is a quick frame-level adjustment or a rebuild that spreads through the pipeline.
Integration, not decoration
Animation compositing is controlled assembly. UK standards describe compositing as digitally assembling individual components into the final animated sequence, including drawings, rendered assets, titles, overlays, and VFX merged into live-action footage UK National Occupational Standard. ScreenSkills describes the compositor as the person who combines animations, background plates, graphics, and effects so the final image reads as one continuous shot ScreenSkills compositor profile. A useful producer rule is simple. If a shot only needs the relationship between elements adjusted, comp is often the right place to solve it. If the geometry, simulation, or animation itself is wrong, comp can hide the problem for a while, but it cannot cleanly fix the source. That is why matte edges, grain, lens distortion, and defocus matter. They are not decorative extras. They are the cues the viewer uses to believe one frame came from a single camera setup, even when the image was built from several separate parts. Falmouth University describes compositing as the process of combining separate visual layers so they create the illusion that they belong in the same scene, which is the same illusion a producer is paying for when a review note says the shot needs to sit better Falmouth University animation brochure. The planning question is where that control should live. If a change can be handled in comp without breaking continuity, the schedule stays calmer and the team keeps room for review notes. If the change requires rebuilding the underlying render, the budget story changes at once, because the work moves back upstream instead of staying in shot assembly. For a wider view of how that sits inside an end-to-end workflow, the animation production pipeline guide from Studio Liddell is a useful companion.
The Core Building Blocks of a Composite
Think of the render engine as the kitchen, and the compositor as the person plating the meal. The kitchen cooks the ingredients into usable parts, but the plate is where timing, balance, and presentation get decided. In compositing terms, those ingredients are render passes, AOVs, mattes, and channels, and if a producer doesn't know those words, review conversations get vague very fast.
Passes and channels in plain English
A render pass is a separated render output for a specific property of the shot. Common examples include beauty, diffuse, specular, reflection, refraction, subsurface scattering, emission, and shadow. The point is control, because if one highlight is too hot, the compositor can often rebalance that pass instead of asking for a new full render. AOVs, or Arbitrary Output Variables, are named exports from the render. They let a team pull out useful information such as cryptomatte, position, normals, and Z-depth so the compositor can manipulate only the part of the image that matters. A matte is the cut-out shape that says where something appears, while the RGBA channels are the image layers the compositor manipulates.
Useful shortcut for producers: if a note sounds like “just isolate the jacket” or “give me more control over the face,” that usually means the shot needed the right pass or matte earlier.
Why depth and surface data matter
Z-depth gives the compositor depth information, which helps recreate defocus after the render. Normals describe surface direction, and position passes describe where pixels live in space, which helps with relighting-style adjustments and better integration of CG into the plate. If those passes aren't available, the compositor loses flexibility and the shot becomes much more dependent on re-rendering.
For a non-technical visual on how layers become a finished image, even a simple transformation workflow like MyImageUpscaler cartoon to realistic workflow makes the idea easier to explain to junior staff. The detail that matters is that compositing is built from separable information, and the more intelligently the shot is rendered, the more selectively the shot can be fixed.
How a Composite Gets Built From Shot to Master
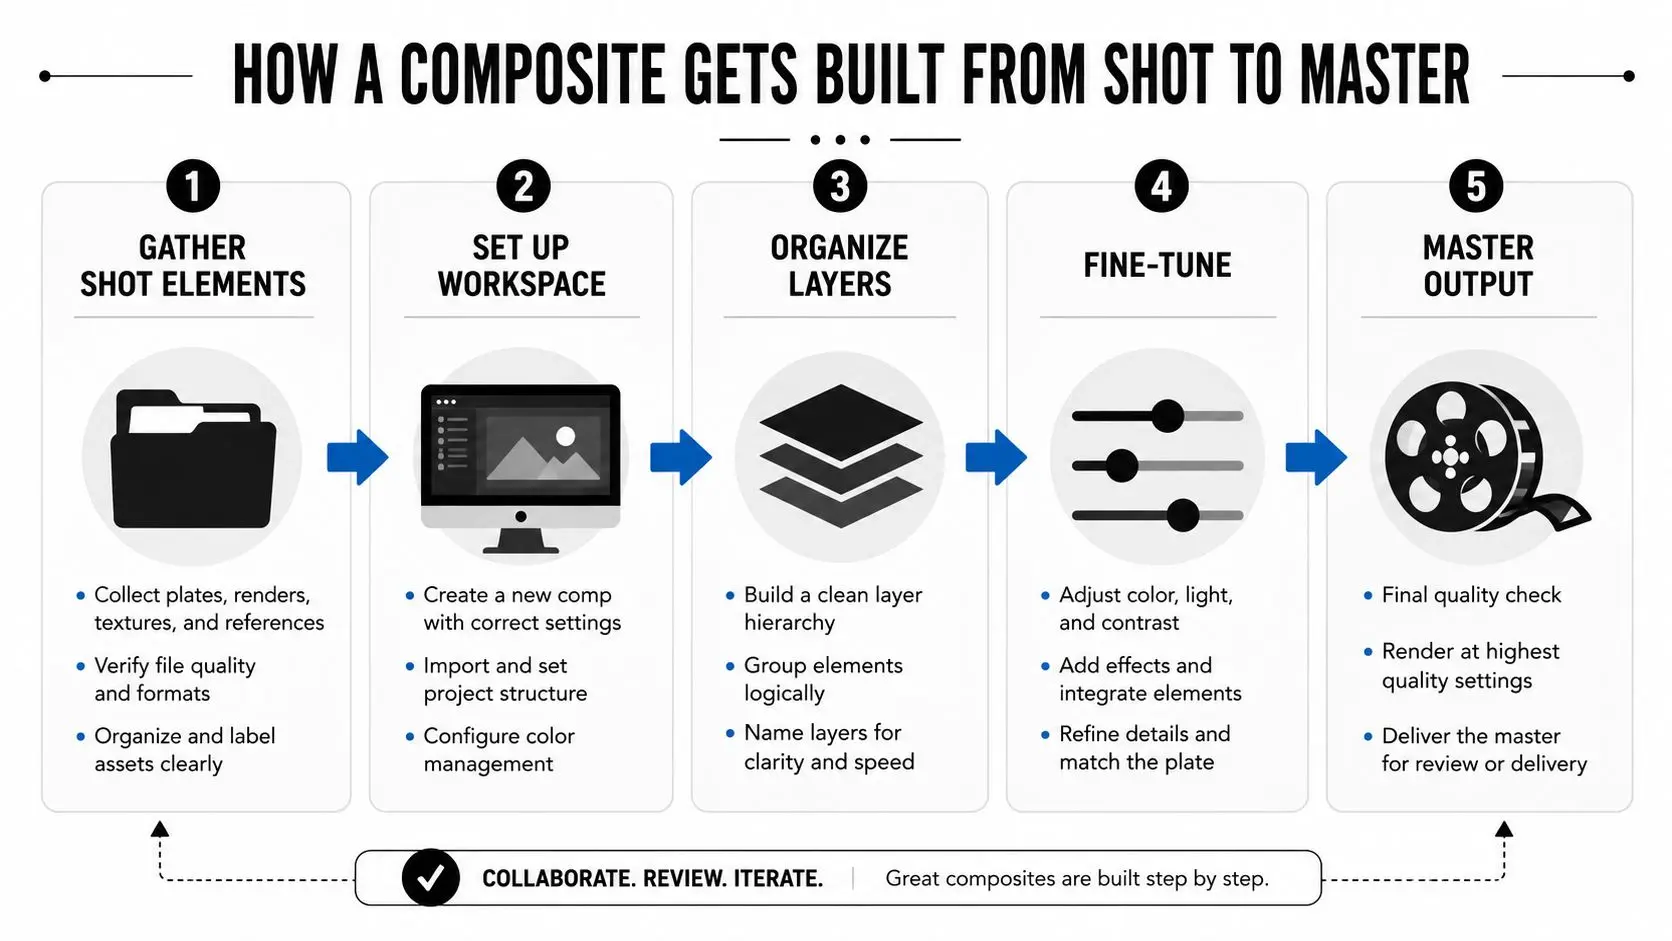
A shot can look straightforward in dailies and still hide a long chain of decisions. By the time a composite reaches the master, the team has already sorted out what must be built in the render, what can be held back for comp, and what needs to stay flexible for notes. CG Wire breaks the task into gathering shot elements, setting up the digital workspace, organising layers in the right order, fine-tuning through retakes, and rendering the final output as one image or image sequence CG Wire compositing workflow.
Where review time goes
The first review point is usually the shot elements. A producer should expect to see plates, CG passes, mattes, and any cleanup elements that will travel through the shot. If the delivery list is incomplete, the compositor spends time waiting instead of comping, and the review queue starts to stall. The second point is the workspace setup. That is where the compositor builds the shot structure, names layers, and makes sure the render inputs are readable. At this stage, the producer is not looking for polish, they are looking for whether the shot is ready to absorb notes without getting messy.
The stage where mistakes compound
Layer ordering is where costs can climb fast. If the matte is wrong, or a foreground element sits in front of something it should not, the whole stack can unravel. Once a render has been cached and the order is wrong, fixes can take hours because every dependent layer may need to be rebuilt or rebalanced.
A clean comp is easier to revise than a perfect render, but only if the stack was organised properly from the start.
The final stages are retakes and output. Retakes are where the compositor tightens edge work, colour, timing, and integration details. For producers, this is also where colour correction for animation can settle a shot into the plate without forcing a costly rebuild upstream, which is why comp should keep room for those adjustments rather than baking every choice into the render. The final render should be a single master image or sequence that no longer exposes the individual parts. That is the point at which the producer should stop thinking about layers and start thinking about delivery confidence.
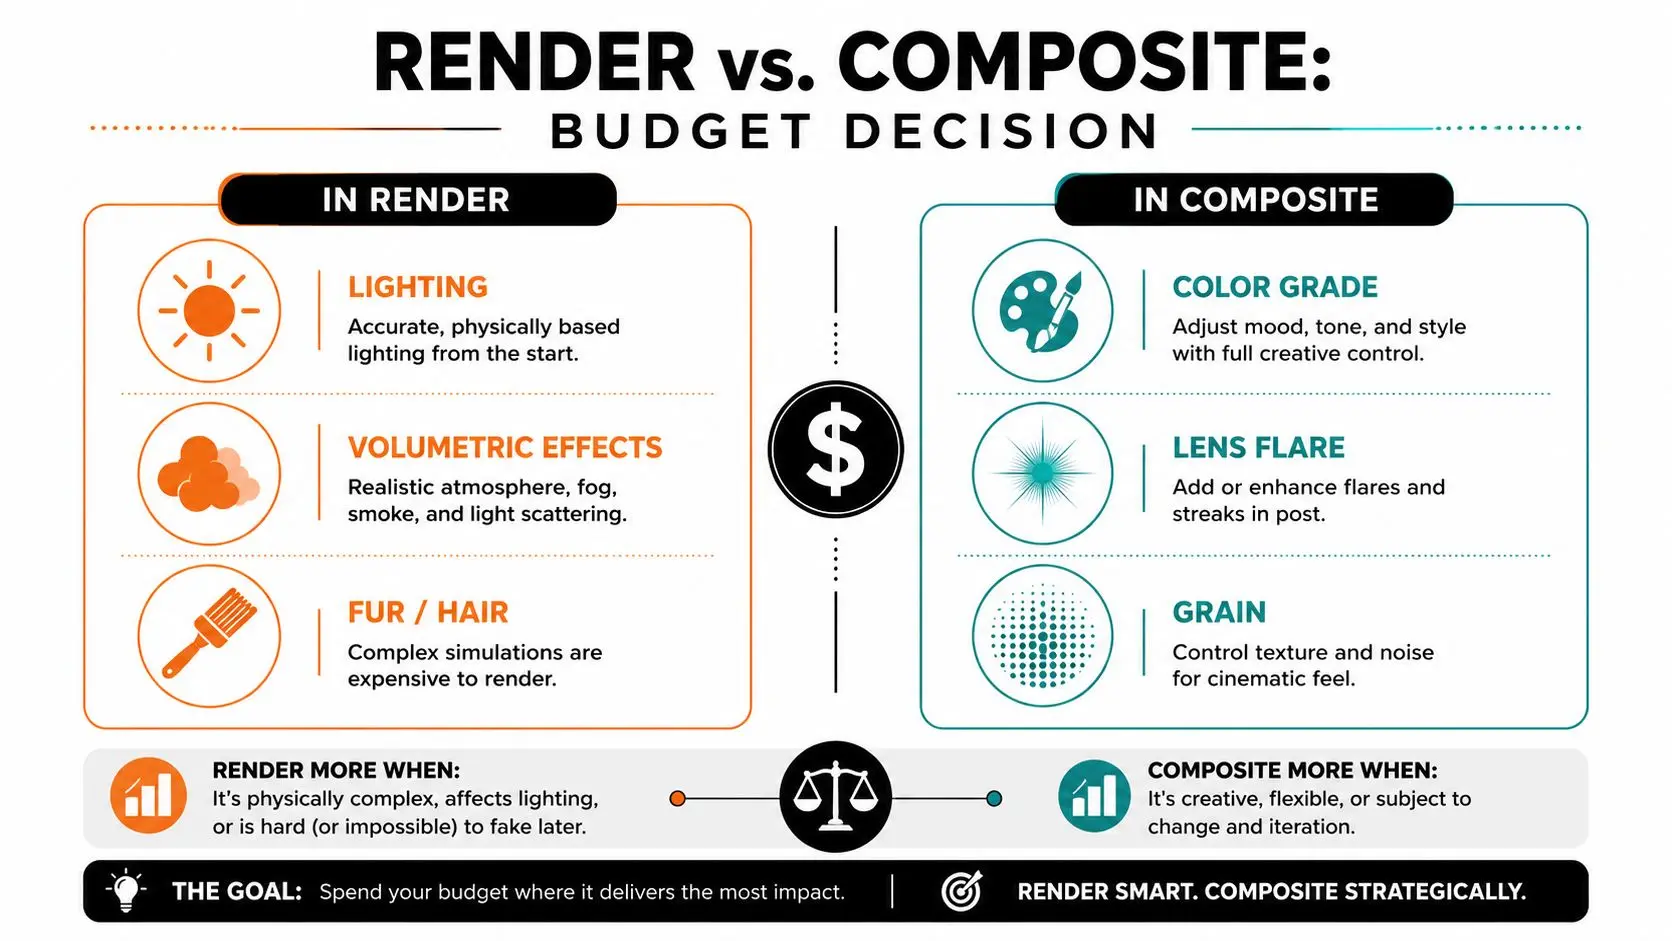
The useful planning question is not “can comp fix it?” but “should comp fix it?” That distinction is where budgets stay sane, because the comp stage is cheaper to iterate on a single frame than rebuilding a heavy render across a sequence. It also helps teams decide what belongs in the render engine and what should stay in comp, so notes can be handled where the cost and iteration risk are lowest.
What Belongs in the Render Versus in the Composite
The boundary between 3D and comp is a production decision, not a taste test. Chris Brejon's compositing framing is helpful here, because it treats the comp stage as the line between what render engines cannot do, and what time or budget will not allow in 3D Chris Brejon on compositing. That's the frame a producer needs when notes start stacking up.
Use the engine for what comp can't fake well
A heavy fluid simulation belongs in 3D because comp can't invent that level of volume and interaction convincingly. The same goes for effects that depend on actual scene behaviour, because the more physically specific the event is, the more it belongs in the render. If the shot depends on real interaction between objects, pushing it into comp usually creates a weaker result.
Use comp when the change is controlled and local
A one-off relight on a hero character is a different story. If re-rendering would blow the schedule, comp can often shift the balance of a frame more efficiently than the 3D team can rebuild it. Producers need to think in terms of iteration risk, because a small comp fix on one shot is very different from a re-render that touches many shots. For a practical way to think about production cost as a planning question, the cost discussion in production cost for agencies is a useful budgeting lens. The lesson isn't that comp is “cheaper”, it's that comp can protect schedule when the change is local, reversible, and easy to review.
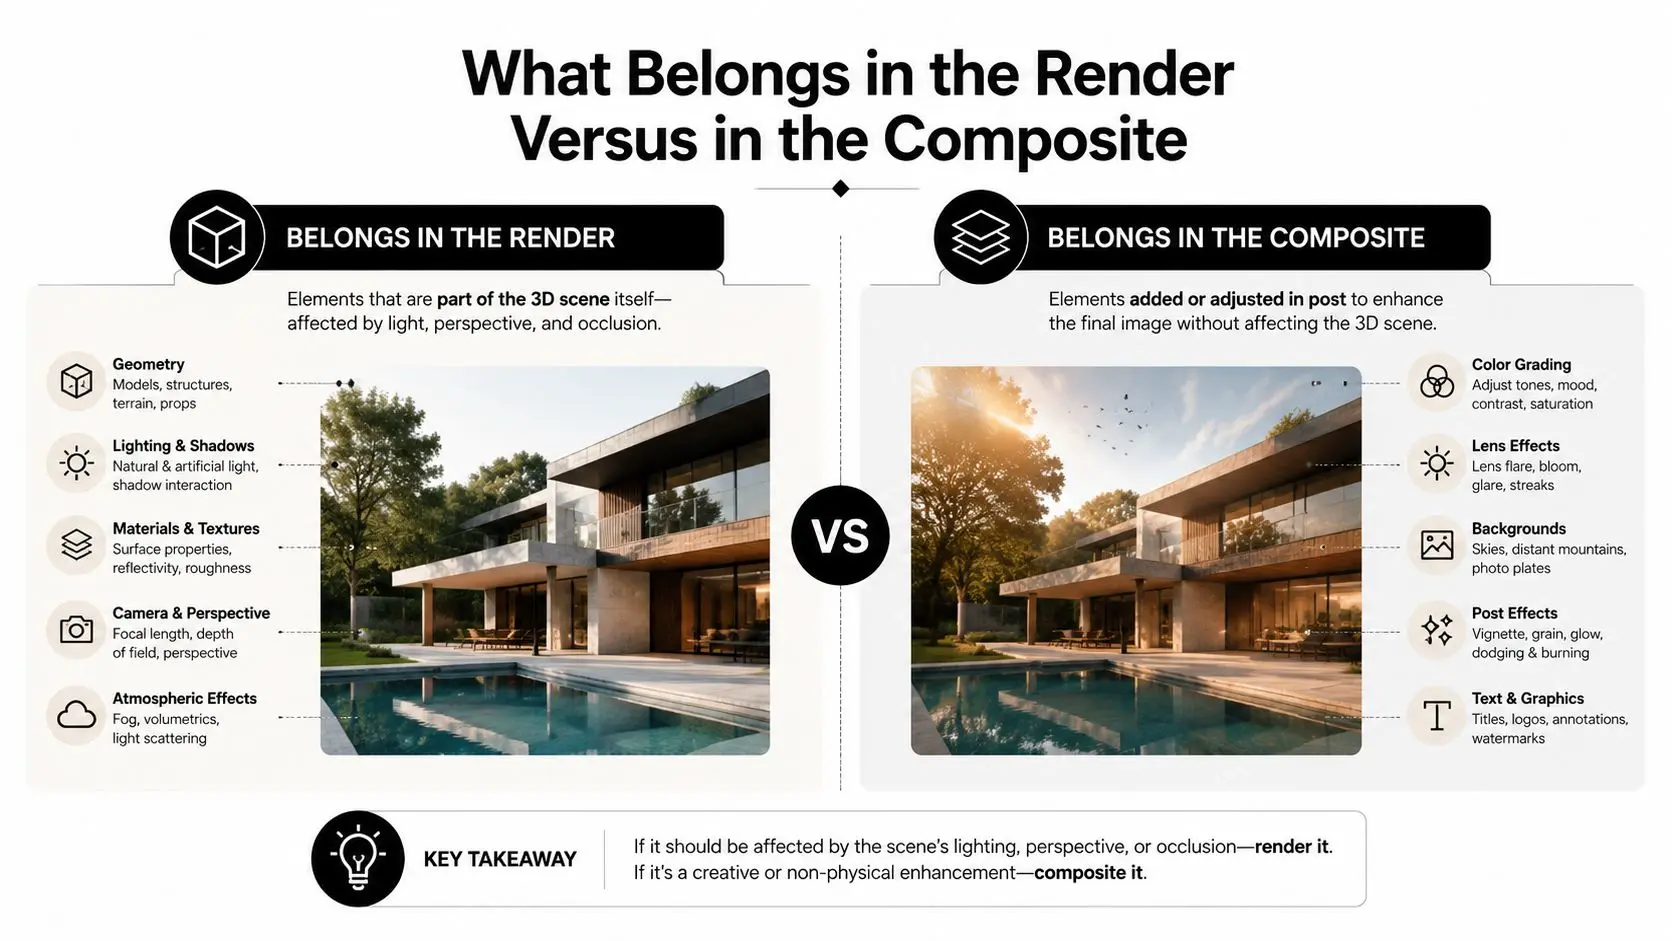
A producer who understands this boundary can ask better questions in dailies. Instead of “can you just fix that?”, the better question is “is this a comp fix, or are we buying a render event?”
Common Compositing Techniques You Will See in Dailies
A shot can look nearly finished in dailies and still need quite a lot of comp work. Producers who can read the notes do better budget planning, because each note usually points to a specific part of the pipeline, not a vague “finish it later” task. The safest way to understand the toolkit is to connect each technique to the visual problem it solves.
The fixes people ask for most often
- •Colour grading and look development: This pulls the shot into the same tonal range as the rest of the sequence, so one frame does not feel borrowed from another project. It is also the point where the production's colour decisions need to stay consistent, which is why teams often pair comp notes with a producer-facing colour workflow guide.
- •Depth of field from Z-depth: This gives foreground and background blur that follows the image depth already built into the render. Without it, CG can look cut out, even if the model and lighting are strong.
- •Motion blur from velocity passes: This keeps movement reading naturally when objects or camera moves are fast. If it is missing, the shot can feel too sharp in the wrong places, which makes the action look synthetic.
- •Relighting from normals and position passes: This lets the compositor adjust how light sits on a surface after the render has been approved. Used well, it can rescue a shot that feels flat or slightly detached from the plate.
- •Particle integration: Smoke, sparks, dust, and magic effects need to sit inside the image plane rather than hover over it. If they are not integrated properly, they read like stickers on top of the frame.
- •Keying, rotoscoping, and clean-plate work: These are the unglamorous tasks that make a shot usable in the first place. Rough edges, spill, or a background that has not been cleaned properly will show up immediately once the shot is viewed at delivery quality.
The UK technical checklist for compositors also emphasises frame-by-frame verification, checking RGB channels separately, and matching exposure across a two-stop up/down range because matte edge problems, defocus issues, and channel grain show up immediately in the final shot VFS compositor tech check. A producer should treat that as a planning cue, because these are the checks that catch problems before a review turns into a rework cycle. The same thinking belongs in pipeline planning. Teams that want to compare compositing tools and build a stack around the work they deliver can start with the best 3D animation software guide, then decide which fixes should happen in render, which should stay in comp, and which will create the least risk when notes change.
Choosing Your Compositing Stack for the UK Market
Tool choice matters less than people think until a team has to hire, train, and ship work across multiple formats. After Effects, DaVinci Resolve Fusion, and Nuke all sit in the conversation for a reason, but they serve different production shapes. The right choice depends on what your team already knows, what work you make, and how often you'll be integrating CG into complex shots.
Matching software to the job
After Effects fits motion graphics and lighter 2D compositing well, especially when the work is layered, design-led, or template-heavy. Fusion is the node-based option that gives teams a more budget-friendly route into 2D and 3D compositing. Nuke is the common choice when shots involve heavier CG integration, deeper plate work, or more demanding broadcast and film deliverables. That decision is not just about features. UK teams also have to think about talent availability and how quickly an existing team can be upskilled. The screen sector is concentrated in a few hubs and relies heavily on specialist post-production skills, so a tool that your team can staff around is often more valuable than a tool that looks perfect on paper Studio Liddell XR and workflow discussion.
One pipeline, multiple formats
For a studio handling animation, XR, and offline CG side by side, a consistent compositing stack cuts friction. Studio Liddell is one example of a company that works across those formats while using compositing inside an end-to-end pipeline, which is the sort of setup where tool consistency matters more than fashion. The point is not to chase novelty, it's to avoid retraining every project. AI-assisted compositing tools can help with masking, object selection, and repetitive cleanup, but they're an efficiency layer, not a craft substitute. The shot still needs a compositor who can judge edges, continuity, and integration. Tool choice should support that judgment, not replace it.
A Producer's Compositing Checklist for Cleaner Delivery
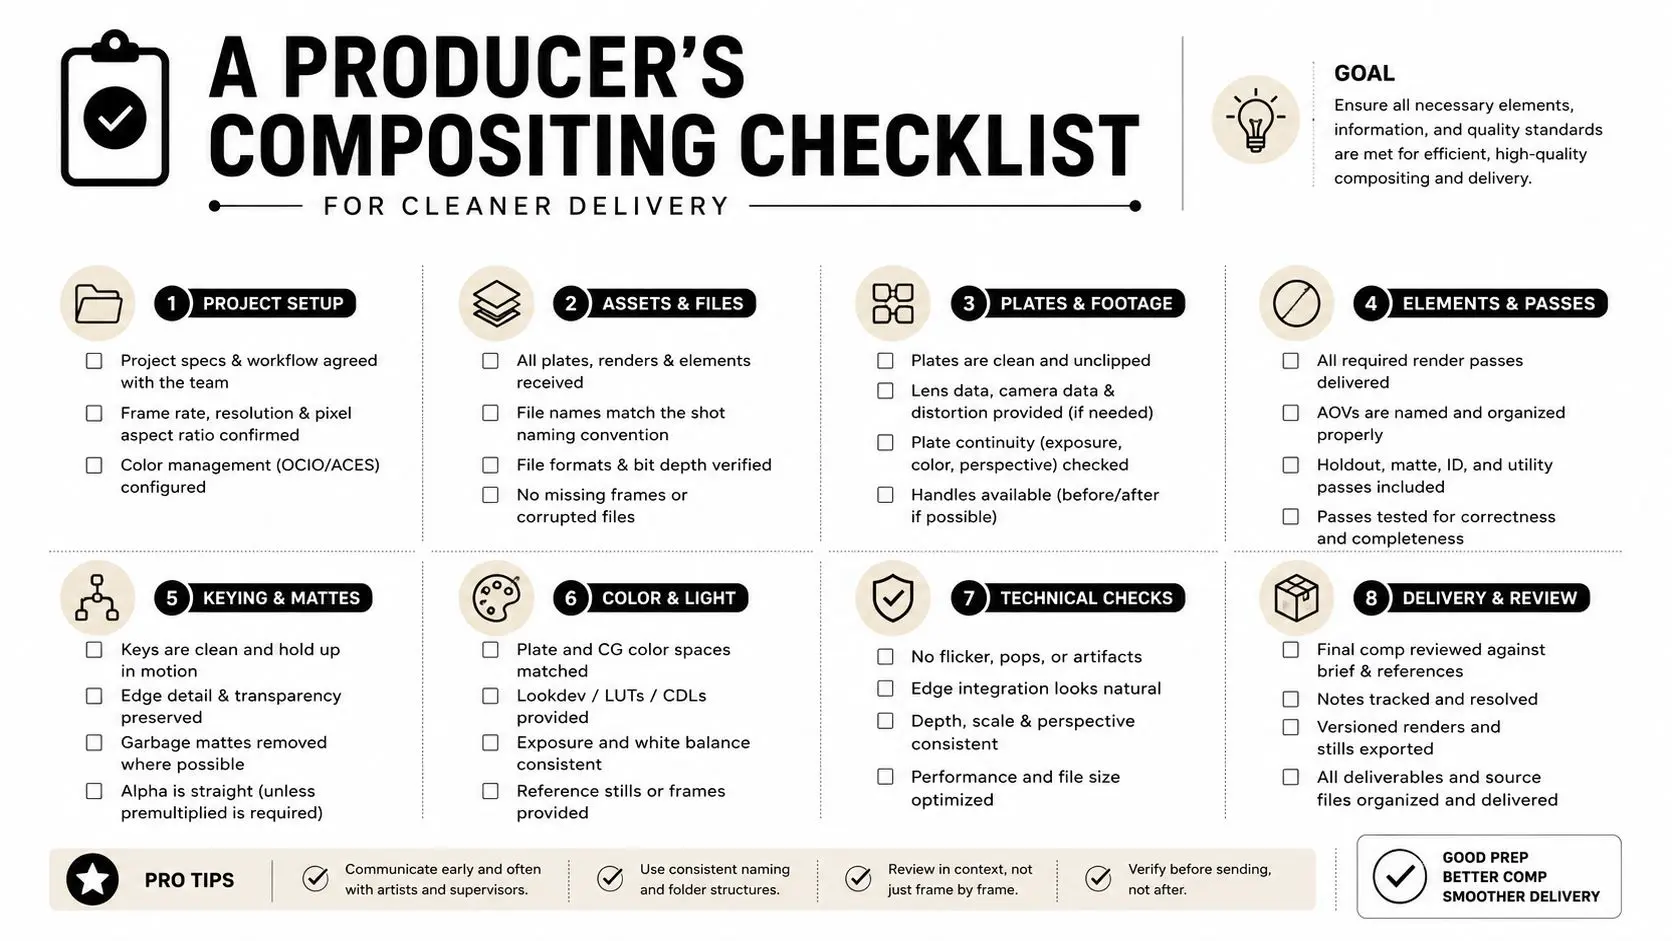
When a project is running well, compositing questions are boring in the best way. The assets are clear, the passes are listed, and no one is arguing about where a fix belongs. A producer can keep it that way by asking for the right answers before review starts.
Before the work starts
- •Pass list confirmed: Ask which render passes, mattes, and AOVs will be delivered.
- •Revision path agreed: Confirm who approves comp notes and how fast a turnaround is expected.
- •AI use defined: Make sure AI-assisted tools are allowed for cleanup or masking, but not used to skip review.
Before delivery
- •Sequence continuity checked: Shots should match across the cut, not just individually.
- •Motion blur and edges reviewed: Greenscreen pulls, roto edges, and CG integration need to survive full-size playback.
- •Colour-managed master approved: The final output should be ready for the intended broadcast or social delivery path.
That checklist is the practical version of the whole discipline. Compositing sits inside the wider pipeline, from brief and previz through to final delivery, and the cleaner the handoff into comp, the easier it is to stay on budget and on schedule. If you're planning a shot, a sequence, or a full project, visit Studio Liddell to scope the compositing and animation workflow with a team that can look at the brief, the renders, and the delivery route together.