Animation Texturing in Production Pipelines: A 2026 Guide
A character can pass modelling, rigging and layout review, then fail the first serious animation test. A shoulder seam opens during a walk cycle. A normal map shimmers as the arm turns through the key light. A painted highlight that looked convincing in a still image slides across the face because the shader, UVs and deformation were never considered together. That's why animation texturing isn't a software step. It's a production decision that connects art direction, rig behaviour, lighting, rendering and delivery. In a UK pipeline shaped by the move from 2D to computer-generated production during the late 1990s and early 2000s, texturing became embedded in asset building alongside modelling, rigging and animation, as described in the ScreenSkills production skills research. The practical question isn't just how to paint a surface. It's whether that surface will remain readable, stable and affordable when the asset moves through shots, engines, renderers and hand-offs.
Why Animation Texturing Makes or Breaks the Final Frame
A texture artist makes commitments earlier than many production teams realise. UV seams, padding, texel density and map resolution can lock an asset into a memory and quality budget before the shader is wired or the first shot is animated. Changing those decisions later often means rebaking, repacking UVs, revisiting materials and asking lighting or animation teams to retest work they thought was finished.
The still-image trap
A still render can hide weaknesses. A seam may sit outside the camera view, a stretched island may be invisible on a relaxed pose, and a normal map may look clean under one light direction. Animation removes that protection. The shoulder bends, the cheek compresses, the costume folds and the camera moves close enough to expose every shortcut. The first review should therefore include motion, not just a beauty render:
- •Silhouette rotation: Turn the asset through the poses that define its role. Look for texture stretching that changes the perceived form.
- •Deformation lighting: Test hard and soft light across shoulders, elbows, knees and facial features. Shimmering normals often appear only as highlights travel.
- •Contact and compression: Squash, stretch and flex the asset before shot work begins. Painted details that ignore deformation can make a joint look broken even when the rig is technically correct.
- •Camera distance: Check the asset at its intended framing. A background character doesn't need hero treatment, but a close-up can reveal insufficient padding, weak breakup or compressed maps.
Decisions that travel downstream
Texturing sits inside a wider chain of pre-production, production and post-production. In a typical 3D pipeline, modelling, texturing, rigging, layout, animation, lighting, effects and rendering feed into compositing, sound, colour, mastering and delivery checks, as outlined in this animation production pipeline guide.
Practical rule: If a texture decision affects deformation, lighting or delivery memory, make it with the rigger, lighting artist and technical director in the room.
UK training programmes reflect this dependency. London Metropolitan University pairs UV layouts, material and texture maps, shading and rendering, while asking students to keep texture counts low without sacrificing asset detail on its games, animation, modelling and effects course. That's the production trade-off. Texture fidelity has to serve the moving asset, not the other way around.
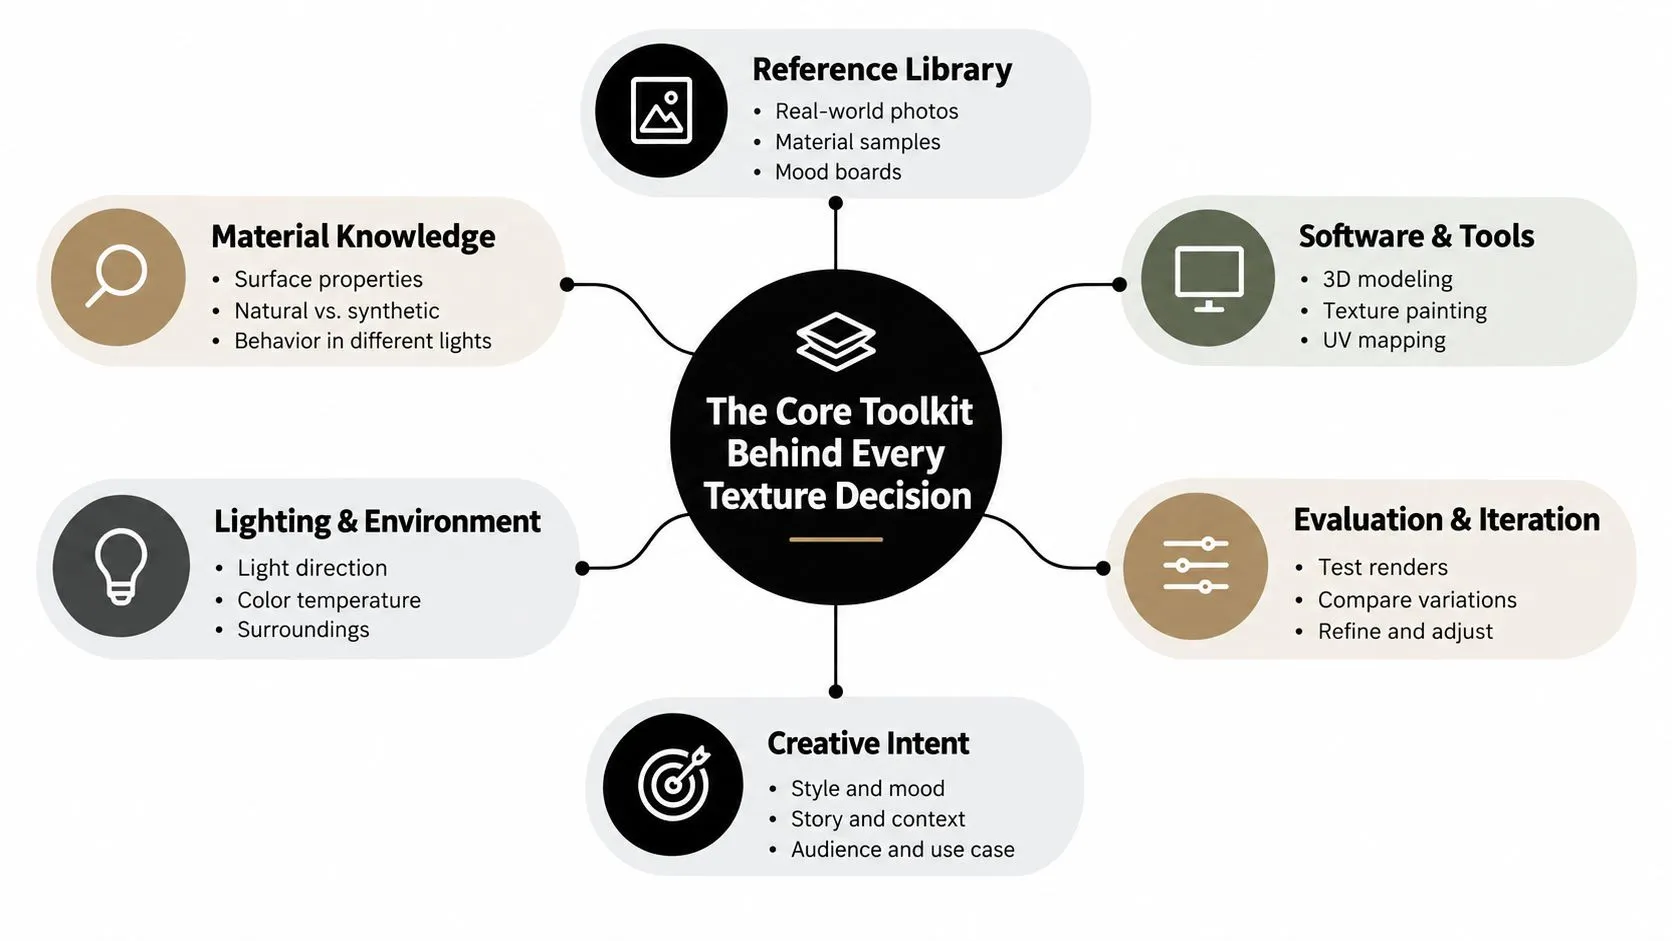
The Core Toolkit Behind Every Texture Decision
Think of a textured asset as a painted object under controlled light. UVs are the canvas, PBR maps are layers of pigment and surface information, and the shader is the varnish that decides how those layers respond to illumination. If the canvas is distorted, the paint stretches. If the varnish interprets the layers incorrectly, a good map still looks wrong.
What each map is responsible for
- •Albedo: The base colour of the material, without painted lighting, shadows or specular highlights. If those elements are baked into albedo, the surface can look lit from the wrong direction when the character moves.
- •Normal: Small-scale surface direction. It can suggest pores, seams, panel breaks or brush marks without changing the silhouette, but it depends on a consistent tangent basis.
- •Roughness: The spread and softness of reflections. A face, polished prop and wool costume can share the same colour while looking completely different because roughness controls highlight behaviour.
- •Metallic: The material's energy response. Metal should reflect its environment differently from skin, wood or painted plastic, so this map needs disciplined values rather than decorative noise.
- •Ambient occlusion: Contact darkening in creases and intersections. It can add useful grounding, but excessive AO baked into colour tends to look dirty under changing lights.
- •Displacement: Actual surface movement. Unlike a normal map, displacement can alter the silhouette where the renderer or engine supports the required geometry detail.
UV space and texture density
A conventional 0-1 UV layout keeps an asset inside one texture space. UDIMs divide a larger asset across numbered tiles, which can give a hero character more room for face, costume and prop detail, but also increases management and streaming demands. UV islands need consistent proportions. A long, narrow island may offer efficient packing, yet it can stretch a painted stripe across a bending limb. Texel density should follow the camera and the asset's role. A hero asset may require an 8K texture target, while a background asset may be planned around 2K, but those figures are production choices, not universal rules. They affect memory residency, loading and the number of assets a sequence can carry. For artists working from an older source or a lower-resolution bake, tools that help you upscale game textures easily can support exploration. They don't replace material judgement, clean UVs or deformation testing. A larger file with stretched detail is still a weak texture. Before handing an asset to look development, test every layer against the movement that exposed the original failure. Albedo should remain visually anchored, normal detail should stay stable, roughness should preserve the material read and displacement should earn its geometry cost. A tidy Blender add-on guide for studios can help standardise parts of that hand-off, but the review still belongs to the production team.
Real-Time vs Offline Rendering and What That Means for Texture Choices
The same asset behaves differently when it moves through Unity or Unreal than when it reaches Arnold or RenderMan. The artistic reference may remain identical, but the delivery constraints change: compression, mip streaming, memory residency, shader complexity and the availability of true displacement all become practical concerns. Real-time animation often favours packed channels, efficient atlases and carefully authored mip behaviour. Offline rendering gives the team more freedom to use larger source maps, EXR data, displacement and separate shading networks, but that freedom doesn't remove the need for disciplined UVs or consistent material logic.
| Texture Aspect | Real-Time (Unity/Unreal) | Offline (Arnold/RenderMan) |
|---|---|---|
| Map storage | Compressed maps, channel packing and atlas planning are common | Larger maps and separate channels are easier to accommodate |
| Surface relief | Normal and detail maps carry much of the work | True displacement can contribute to the rendered silhouette |
| Streaming | Mip selection and memory residency affect visible quality | Frame rendering usually tolerates heavier texture access |
| Normal format | The target engine and tangent convention must be confirmed early | Renderer and export settings still need to agree |
| Shading | Per-instance variation has a direct runtime cost | Layered networks and AOV-specific setups are more flexible |
| Delivery risk | A technically correct map can fail through compression or mip loss | A high-quality map can still fail through shader, colour or render configuration |
The bake target is a delivery decision
A normal map baked for one tangent convention can produce inverted detail in another. DirectX and OpenGL normal formats aren't interchangeable by assumption, and a rig or export change can alter the tangent basis enough to make previously stable details drift. Real-time pipelines also expose the cost of repetition. A small roughness variation may be cheap in an offline shader but expensive if it requires complex per-instance logic across many animated assets. Channel packing can save memory, but it reduces flexibility when one channel needs a different resolution or filtering treatment.
“Choose the delivery path before you finalise the bake.”
That advice matters more as UK teams work across film, games, advertising and interactive content. Course descriptions such as Birmingham City University's digital animation programme connect texturing with production-ready assets, modelling, rigging, lighting and rendering. The asset isn't finished when the map looks attractive. It's finished when the intended renderer, engine and downstream team can use it without rebuilding the surface.
Building Deformation-Safe Textures for Character Work
Deformation-safe texturing begins with the rig, not the paint layer. A senior artist should brief a junior on where the mesh stretches, compresses and rotates before assigning a single seam or material break.
Start with movement zones
Shoulders, elbows, knees, wrists, mouths and eyelids deserve different treatment from rigid props. A seam that survives a static inspection can crack open when a shoulder rotates through a walk cycle. Edge padding must reflect the risk of that movement. A tight 4px margin may be inadequate for a frequently bending shoulder, especially when mip reduction or filtering pulls neighbouring colours into the seam. Use padding that matches the final map, filtering and camera demands. Keep visible cuts away from areas that repeatedly deform, and place them where costume construction or natural form can disguise them. A tileable fabric pattern or carefully controlled tri-planar projection can be safer than forcing one continuous UV island through an extreme pose.
Build against the pose library
Normal and curvature detail should be checked against the poses that drive the asset's performance. If a blend shape changes the cheek, shoulder or costume volume, the texture and normal response need to remain coherent after that correction. Painting only against the bind pose leaves the animator to discover the mismatch later.
A first-pass deformation review should include:
- Neutral pose inspection: Confirm that seams, material boundaries and directional details read correctly before movement.
- Rotation tests: Turn the limbs and head through the expected range, with lighting that reveals normal changes.
- Squash and stretch: Test the most exaggerated animation poses, not only the approved acting range.
- Corrective checks: Apply blend shapes and corrective sculpts, then inspect whether texture detail follows the new form.
- Close camera review: Look for swimming pores, broken stripes, tangent flips and visible padding contamination.
Baking and Retopology as the Texture Hand-off
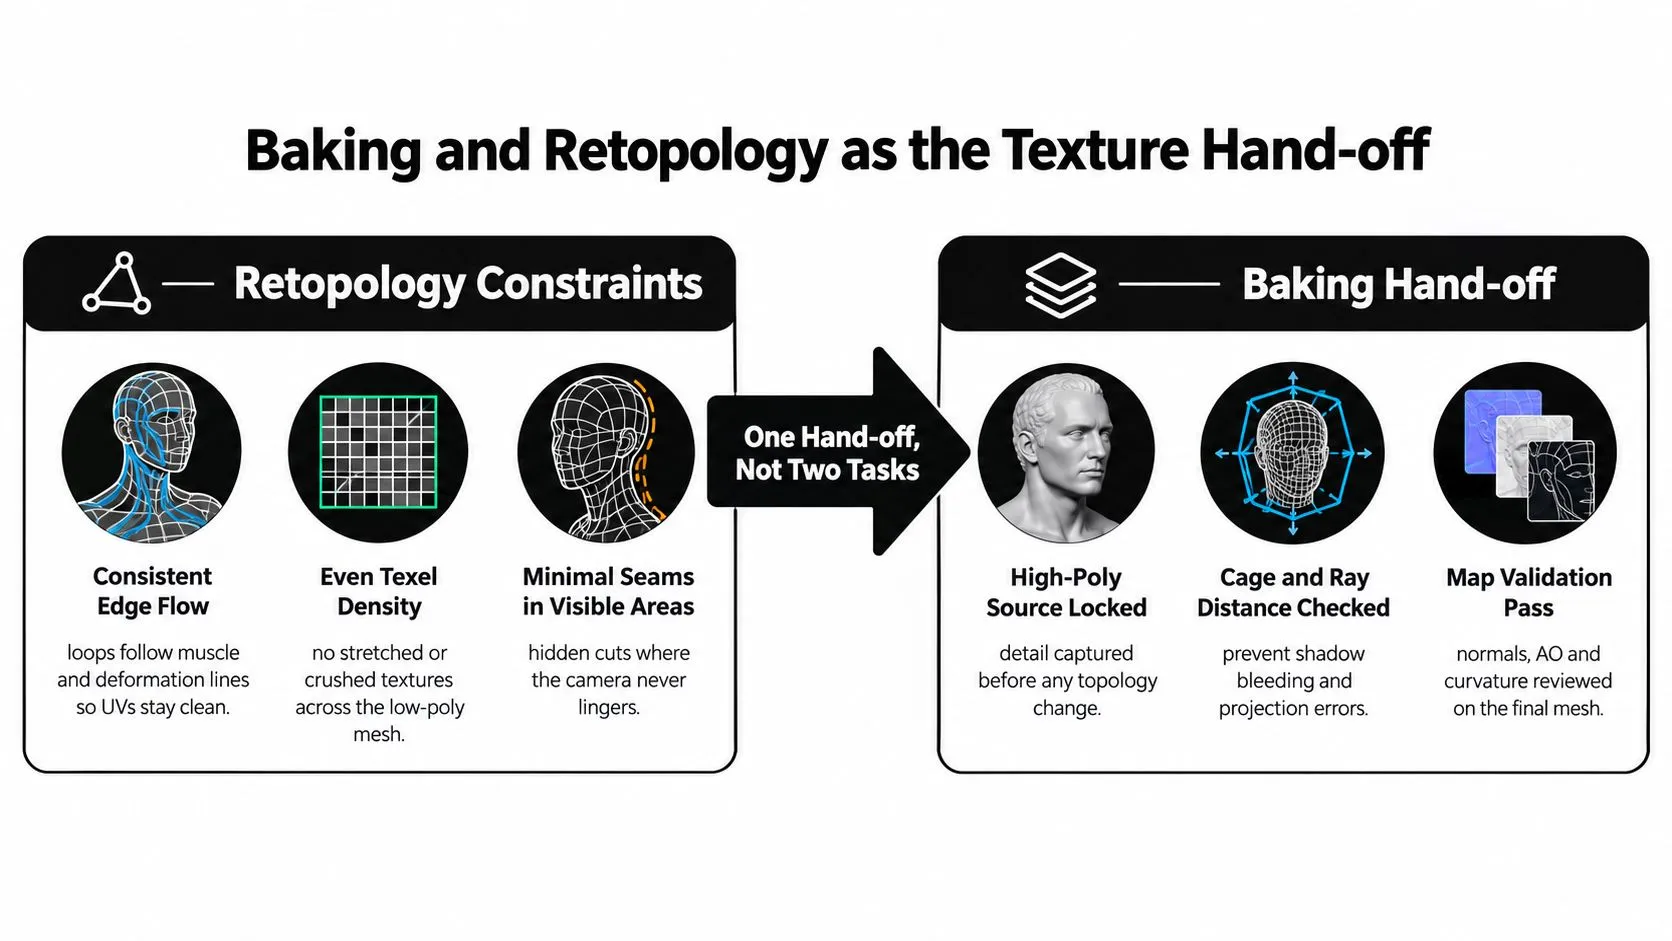
Retopology and baking should be treated as two halves of one hand-off. Retopology determines whether the low-poly mesh can carry deformation and receive detail predictably. Baking transfers the approved high-poly information into that structure. Separating the tasks too aggressively creates gaps that show up as projection errors, broken normals and rework.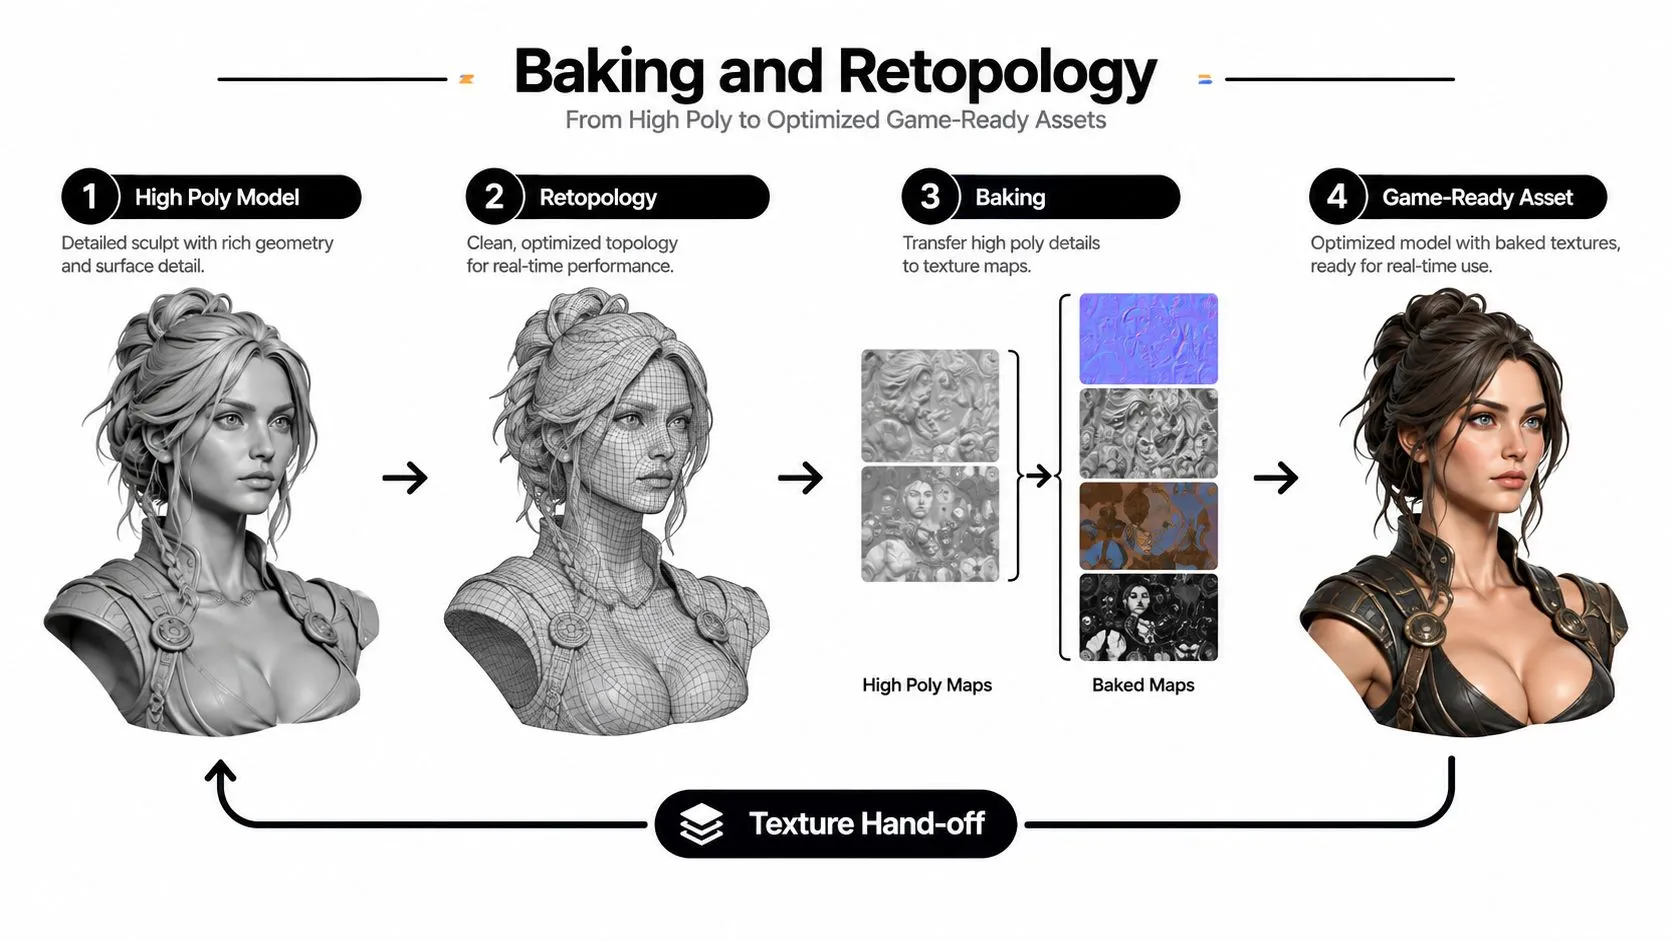
Retopology controls the quality ceiling
Consistent edge flow gives the cage predictable deformation and projection. Loops should follow muscle, facial and costume movement rather than just tracing the sculpt's surface. Even texel density prevents one body region from looking blurred while another carries unnecessary detail. Pole placement matters too. A pole hidden in a low-visibility area is easier to manage than one sitting beside an eye, mouth or sharply curved highlight. The low-poly mesh must preserve the forms the normal map is expected to describe, otherwise the bake asks a texture to compensate for a topology problem.A reliable bake hand-off
Before baking, lock the high-poly source and record the intended material or attribute sets. The low-poly mesh needs final UVs, named parts and a checked cage. Thin geometry may require different ray distances from broad surfaces, while skin often benefits from a tighter projection relationship than a thick costume piece. Common failure points include:- •Overlapping source geometry: Hidden intersections can project dark or unexpected information into the bake.
- •Insufficient ray distance: Thin edges and layered parts may miss the high-poly surface.
- •Excessive cage expansion: The ray can capture neighbouring forms and create bleeding.
- •Mirrored tangent changes: Mirrored islands can produce direction inconsistencies if the export convention isn't controlled.
- •Unvalidated map sets: A normal map can look acceptable while AO or curvature reveals a broken projection.
The hand-off should include the locked high-poly source, final low-poly mesh, UV layout, cage settings, material IDs, map naming, colour-space notes and validation renders. Teams also need a clear record of the intended renderer or engine. A practical guide to file formats for production hand-offs helps, but the naming and validation rules must belong to the show.
Shader and Material Setup Across Unity and Unreal
Unity and Unreal can both deliver strong animated surfaces, but their material workflows create different production pressures. The useful comparison isn't which engine has more features. It's how quickly a team can keep materials coherent while assets, rigs, instances and lighting conditions change.
| Attribute | Unity (HDRP/URP Lit) | Unreal (Material Editor) |
|---|---|---|
| Tangent handling | The project's import, shader and mesh settings must remain aligned | The material and mesh tangent basis must be validated together |
| Detail normal blending | Shader Graph provides control, but graph organisation affects iteration | Material functions can package reusable normal logic |
| Subsurface | HDRP offers richer surface controls than simpler URP setups | Subsurface profiles and material inputs provide a dedicated route |
| Anisotropy | Available where the chosen pipeline and shader support it | Available through material settings and relevant shading models |
| Per-instance variation | Flexible, but graph complexity and runtime setup need monitoring | Material instances make repeated variation straightforward |
| Team hand-off | Graph conventions and exposed properties need documentation | Function libraries and instance standards need documentation |
| Common failure | Import settings, channel assumptions and pipeline differences | Tangent changes, slot mismatches and inconsistent function inputs |
Reuse versus iteration speed
Unreal's material functions can make repeated surface logic easy to distribute across characters and props. A studio can standardise a fabric response or facial detail function, expose the variables that artists need and keep shot variation inside material instances. Unity's Shader Graph can offer a clear visual network, particularly for teams already working in HDRP or URP. The cost appears when every asset grows its own graph, property naming drifts and artists spend time debugging project-specific assumptions instead of authoring texture detail. A lean graph with controlled inputs often beats a clever graph no one else can maintain. The same rule applies in both engines. Confirm whether the normal map is interpreted in the expected tangent space, check the subsurface mask slot and test the asset after rig or import changes. The role of normal mapping in real-time 3D is easy to understand in isolation, but production failures usually happen at the boundary between mesh, export settings and shader. Choose the stack that matches the team's existing material discipline. An engine with a powerful shader system won't rescue a show that lacks naming rules, review renders and an owner for shared functions.
AI-Assisted Texturing Inside a Human-Led Pipeline
AI can remove repetitive labour from animation texturing, but it doesn't remove responsibility. Generative fills, automated UV tools, ML denoisers and procedural variation can accelerate exploration, yet a texture artist still has to decide whether the result matches the design, survives deformation and remains consistent from shot to shot. UK workforce evidence makes the distinction important. A 2026 ScreenSkills survey found 55% of respondents had difficulty recruiting in animation, VFX and post-production over the previous 12 months, while 64% reported difficulty recruiting for any role. Separate creative-industry skills research reports skills gaps in 30% of workplaces, and says specialist skills are lacking for 68% of employers with a skills gap in the screen sector context described by the Creative Industries Skills Audits report.
Where automation earns its place
Use AI and machine learning where the input and acceptance criteria are clear:
- •Material exploration: Generate rough surface directions, then rebuild the approved result with controlled PBR channels.
- •Texture extension: Fill a border or repair a missing area, followed by colour, tiling and seam checks.
- •UV assistance: Produce an initial unwrap, then let an experienced artist correct density, seams and deformation risk.
- •Denoising and cleanup: Accelerate preview renders, while preserving a trusted final-quality review.
- •Procedural variation: Create controlled differences across repeated props without losing the show's material language.
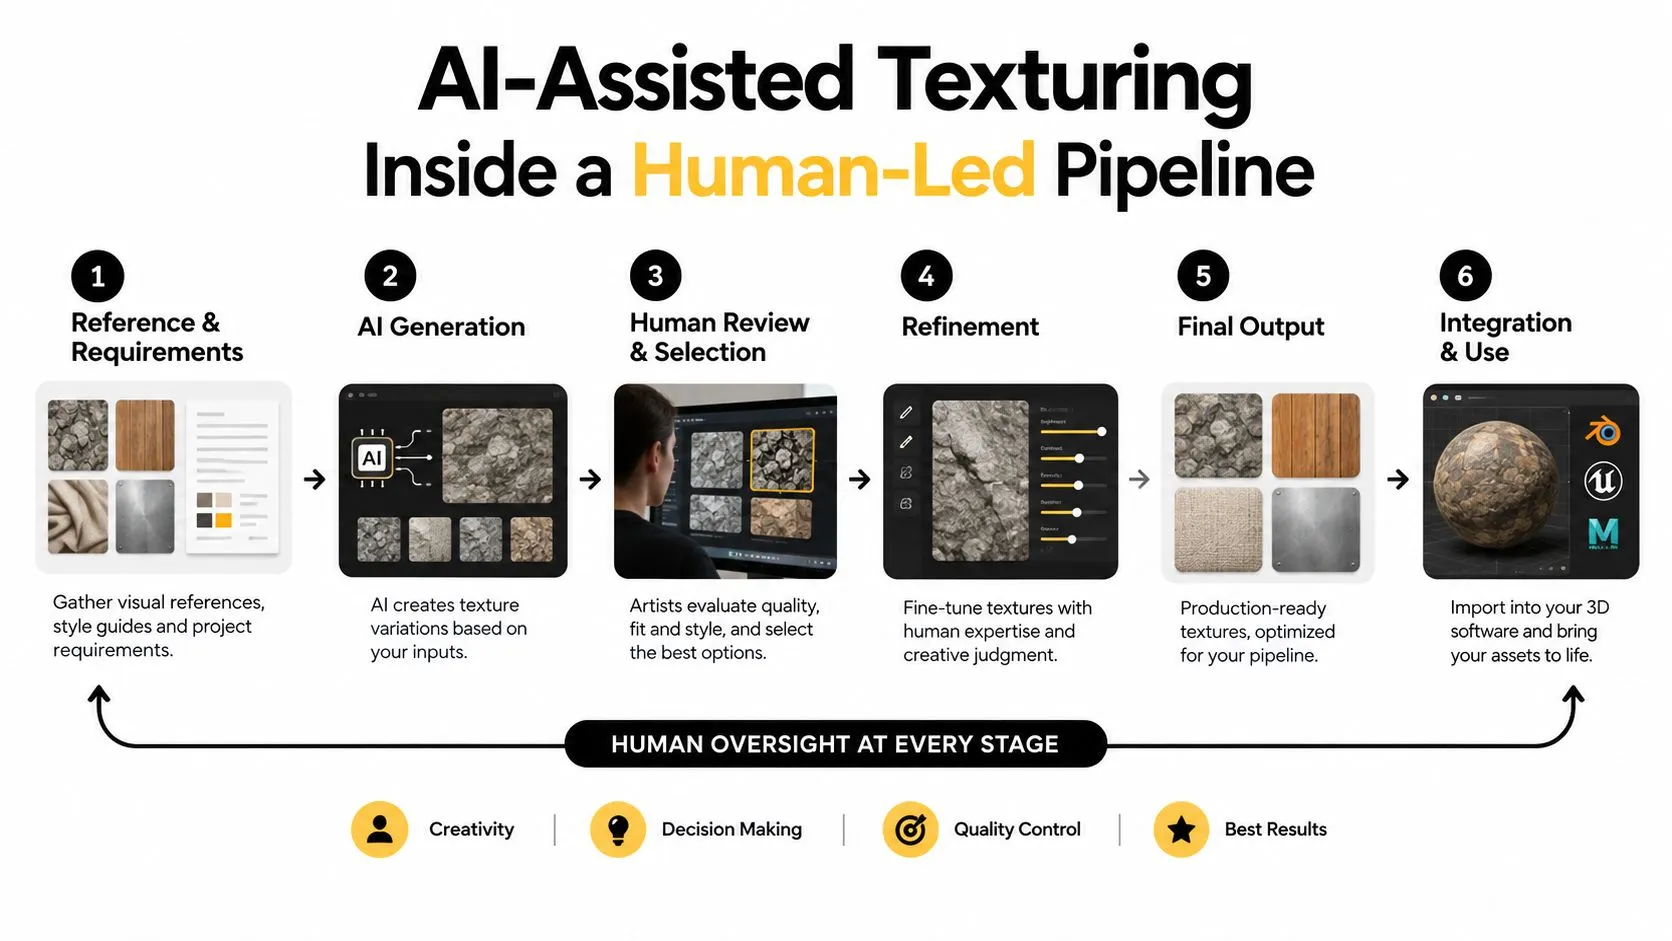
The human-led pipeline needs explicit gates. Record the source image or prompt, check whether the team has rights to use the material, inspect dataset provenance where relevant and avoid sending confidential client assets into an unapproved service. Then validate the output as you would any other map: colour space, channel meaning, seams, padding, tangent response, roughness behaviour and animation stability. The contrarian position is practical. Fully automated texturing may produce a convincing still, but a smaller human-led workflow often delivers the dependable asset because an artist owns continuity, style control and corrective decisions.
A Studio Production Checklist for Animation Texturing
A useful checklist turns texture quality into a production habit. It should give the lead artist and producer decisions they can make before the asset enters shot work, rather than a collection of ideal outcomes that nobody owns.
Before the first paint pass
- •Define the asset role: Record whether the model is hero, supporting, background, interactive or reusable across delivery paths.
- •Set the camera expectation: Identify the closest framing, lighting conditions and likely animation range.
- •Agree map responsibilities: Separate base colour, roughness, metallic, normal, AO, displacement and any engine-specific channels.
- •Confirm the target: Choose the intended renderer or engine, then document normal convention, colour management, compression and streaming expectations.
- •Mark deformation zones: Ask the rigger for shoulders, elbows, facial shapes, costume folds and other areas that require special seam planning.
Before animation begins
- •Lock the hand-off: Approve the high-poly source, retopology, UV layout, material IDs, cage and map names.
- •Run motion tests: Rotate, flex, squash and stretch the asset under representative lighting.
- •Check engine behaviour: Review mip levels, compressed channels, material instances and runtime variation before the asset is duplicated across shots.
- •Sign off AI assistance: Keep a human approval stage for generated or automated outputs, with provenance and IP notes attached.
- •Archive alternatives: Preserve the source maps and editable material setup so the team can adjust quality without starting again.
| Failure Mode | Where It Appears | Checklist Step | Owner |
|---|---|---|---|
| UV seams pop under blend shapes | Face, shoulders, elbows and costume joints | Mark deformation zones and run corrective pose tests | Texture lead and rigger |
| Normal map direction drifts | Rotating limbs, mirrored islands and engine imports | Confirm tangent convention and validate after export | Technical artist |
| Texture detail stretches | Uneven UV islands and extreme poses | Review texel density and run silhouette rotation tests | Texture artist |
| Bake captures neighbouring geometry | Thin parts, layered costumes and crowded sculpts | Check cage distance and named source sets | Baker or texture lead |
| Material loses its identity in motion | Roughness, metallic or AO setup | Inspect under changing light and approved shader inputs | Look-development artist |
| Runtime budget overshoots | Repeated characters, props and interactive scenes | Confirm map resolution, packing, mip and instance rules | Producer and technical artist |
| AI output breaks continuity | Repeated assets or shot-specific repairs | Record provenance and require human style review | Texture lead |
Studio Liddell can support animation, real-time and XR production where modelling, texturing, rigging, lighting and delivery need to stay connected. For a pipeline review focused on deformation-safe assets, material setup and practical hand-offs, visit Studio Liddell and start a conversation about the production requirements.