A Producer's Guide to Virtual Reality Application Development
Building a virtual reality application is about more than just code; it's about crafting an immersive, interactive world from the ground up.
A Producer's Guide to Virtual Reality Application Development
Building a virtual reality application is about more than just code; it's about crafting an immersive, interactive world from the ground up. The journey from a raw concept to a polished digital space blends creative world-building with sharp technical execution. Success hinges on a clear vision, the right engine—like Unity* or **Unreal Engine**—and a relentless focus on creating a seamless, comfortable experience for the user. This guide walks you through the essential stages of *virtual reality application development, from initial strategy to post-launch growth.
Defining Your VR Vision and Tech Stack
Before writing a single line of code, you need a solid blueprint. Jumping straight into development without a clear plan is the fastest way to burn through your time and budget. The first, most crucial step in virtual reality application development is to crystallise your core idea, define your target user, and decide on the technical foundation. This early strategic work ensures every subsequent decision serves your ultimate goal.
The commercial opportunity is massive. The UK virtual reality market hit USD 1.8 billion in 2024* and is projected to climb to an incredible *USD 6 billion by 2033. This growth is driven by a growing appetite for immersive applications in everything from gaming and entertainment to high-stakes corporate training and medical simulations.
Pinpointing Your Target Audience and Platform
Who is this VR app for? Answering this question shapes everything, from interaction design to the hardware you’ll target. Are you building a photorealistic training simulation for an enterprise client, or is it a fun, casual game for the mass market on the Meta Quest Store?
* PC-Tethered VR (e.g., Valve Index, HTC Vive): This is your best bet for experiences that demand serious graphical horsepower and precision. Think complex architectural visualisations, high-fidelity training simulators, or graphically intense games where performance is non-negotiable.
* Standalone VR (e.g., Meta Quest 3): These headsets offer incredible accessibility and freedom of movement, making them perfect for mainstream games, social apps, and educational tools. Developing for standalone means you must be laser-focused on performance optimisation to ensure everything runs smoothly on mobile hardware.
Your platform choice sets the rules of the game, defining your constraints and opportunities right from the start.
This flowchart illustrates how performance requirements should guide your initial decisions on hardware and development tools.
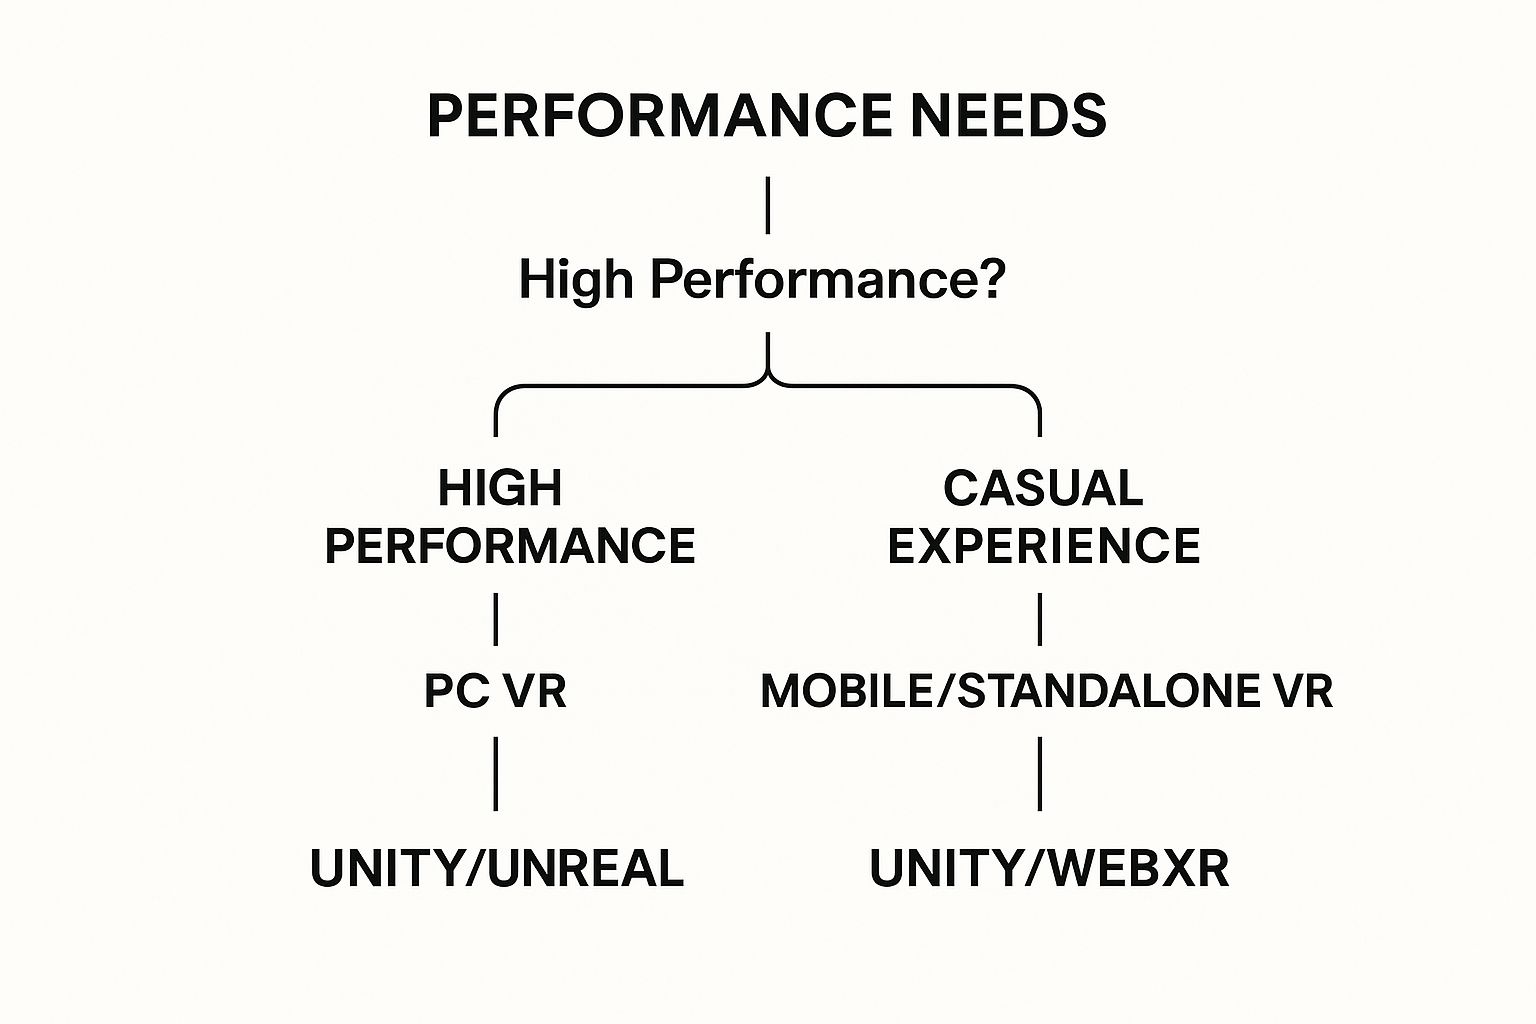
As you can see, if high performance is your top priority, you’ll naturally lean towards PC VR. But if you’re aiming for widespread accessibility, standalone devices are the way to go, which then influences which development engine makes the most sense.
Choosing Your VR Development Engine: Unity vs Unreal
The biggest technical decision you'll face is picking your game engine. This choice will ripple through your entire project, affecting your workflow, the skills you need on your team, and the final look and feel of your app. The two giants in this space are Unity and Unreal Engine.
> Unity is often seen as the more accessible entry point, especially for mobile and standalone VR. It’s loved for its fantastic documentation and enormous asset store. On the other hand, Unreal Engine is famous for its jaw-dropping graphical power and its Blueprint visual scripting system, which can make prototyping incredibly fast.
There’s no single "best" engine; it’s all about what your project needs. A team with deep C# expertise might feel right at home in Unity. A project that needs to look as real as possible will probably be a better fit for Unreal.
Unity vs Unreal Engine: A Head-to-Head Comparison
Picking between Unity and Unreal Engine is a defining moment for any VR project. To help you weigh your options, here’s a high-level comparison of what each platform brings to the table. This should give you a clearer picture of which engine aligns best with your team's skills and your app's goals.
| Factor | Unity | Unreal Engine |
|---|---|---|
| Primary Language | C# | C++ and Blueprint (Visual Scripting) |
| Graphical Fidelity | Strong, highly customisable. Can achieve photorealism with effort. | World-class, photorealistic rendering out-of-the-box. |
| Ease of Use | Generally considered to have a gentler learning curve, especially for beginners. | Steeper learning curve for C++, but Blueprint is very accessible. |
| Asset Store | Massive and mature, with a huge library of free and paid assets. | Good marketplace, but smaller than Unity's. Focus on high-quality assets. |
| Target Platforms | Excellent for standalone (Quest) and mobile VR due to performance on lower-end hardware. | Traditionally stronger for high-end PC VR, but improving for standalone. |
| Community & Docs | Extensive documentation and a vast, active community. | Strong community and good documentation, particularly for high-end features. |
Ultimately, both are incredibly powerful tools. Your choice will depend on whether you prioritise ease of entry and cross-platform flexibility (Unity) or bleeding-edge graphics and rapid prototyping with visual scripting (Unreal).
For a deeper technical dive, check out our guide on using Unreal Engine 5 for virtual reality, which gets into its latest features and performance. Whichever path you choose, this decision sets the stage for your entire development journey.
Designing for True VR Immersion
Designing for a VR headset is a world away from creating for a flat screen. Genuine immersion isn't just about flashy graphics; it's a careful mix of believability, intuitive controls, and—above all—user comfort. One wrong move can shatter the illusion and, even worse, make your user feel physically ill. Nailing these core principles is what separates a forgettable tech demo from a truly captivating VR experience.
The biggest demon you'll face in VR design is physiological: motion sickness. It creeps in when there's a disconnect between what a user's eyes are seeing and what their inner ear is feeling. When the virtual world glides past while the user’s body is still, the brain gets confused, and nausea can set in. Tackling this isn't just a technical problem; it's the single most important design constraint in any serious virtual reality application development project.
Nailing Locomotion Without the Nausea
Figuring out how a player moves through your virtual space is one of the first and most critical design decisions. The smooth, first-person camera movement we're all used to from traditional video games is often the most jarring for new users and a notorious trigger for VR sickness.
Thankfully, the industry has settled on a few tried-and-tested locomotion methods that prioritise comfort.
* Teleportation: This is the gold standard for safety. The user simply points to a spot and instantly appears there. It completely sidesteps the sensation of artificial movement, making it the default choice for countless applications.
Snap Turning:** Instead of a smooth, continuous turn with a joystick, the view "snaps" in fixed increments, like **30** or *45 degrees. This cuts down on the peripheral visual flow that so often makes people feel queasy.
* Vignetting (Tunnel Vision): When you absolutely need smooth movement, applying a subtle dark vignette to the edges of the user's vision can work wonders. This technique narrows the field of view during movement, giving the brain less peripheral motion to process.
Combining these techniques is often the best approach, giving users the power to choose what feels right for them. That level of control is key to making an experience accessible and enjoyable for everyone.
Crafting Intuitive Interactions
Once you’ve solved how people get around, you need to decide how they interact with everything. In VR, the controllers are the user's hands. Interactions must feel natural and responsive, otherwise the feeling of presence crumbles. Nothing breaks immersion faster than seeing your virtual hand slip right through an object you were trying to grab.
This is where diegetic UI becomes your best friend. Instead of having floating menus and health bars, a diegetic interface weaves those elements directly into the game world itself. Think of a health monitor built onto the player's wrist instead of a HUD element, or an ammo counter displayed right on the side of a weapon. This keeps the user grounded in your virtual reality.
> The core principle here is to make the virtual feel tangible. If a user sees a lever and instinctively reaches out to pull it, that virtual lever had better respond with believable physics and feedback. That believability is the very bedrock of immersion.
The Power of Rapid Prototyping
Let's be clear: you won't get these mechanics right on the first try. Virtual reality application development is an intensely iterative process. An idea that sounds brilliant on paper can feel clunky, awkward, or nauseating once you're inside the headset. That's why rapid prototyping isn't just a good idea; it's an absolute necessity.
Before spending a single minute on detailed 3D models or complex code, build a "greybox" environment. This is a simple, untextured level made of basic shapes. In this playground, you can focus entirely on testing and refining your core mechanics:
1. Locomotion: Does teleporting feel snappy and precise? Is the snap-turn angle comfortable or disorienting?
2. Interaction: Does picking up an object feel right? Is the force needed to throw something intuitive?
3. Scale and Space: Does the player feel the right height for this world? Are doorways big enough? Do objects feel correctly proportioned?
This "fail fast, fail cheap" approach lets you quickly find out what works and what doesn't, without sinking countless hours into an idea that's doomed from the start. You can burn through dozens of concepts in a day, zeroing in on the controls and interactions that feel truly natural before committing to full-scale production.
Building Your Interactive Virtual World

This is where the magic really starts to happen. You’ve got your blueprints and you’ve chosen your tools. Now it's time to take those concepts and build a tangible, interactive space. Whether you're scripting in C# with Unity or using a mix of C++ and Blueprints in Unreal Engine, we’re officially moving from theory to practice.
The goal now is to script the systems that make your virtual world feel alive. We’re talking about the foundational mechanics—how users move around, how they reach out and touch things. It's a careful process of layering one system on top of another, starting simple and adding complexity, all while keeping your project neat and tidy.
Implementing Core VR Mechanics
Your first job is to bring those prototypes for movement and interaction to life with solid, reliable code. This means scripting player movement, handling controller inputs, and sorting out the physics of object interaction. These elements are the absolute bedrock of immersion.
* Player Movement and Teleportation: Kick things off by scripting your locomotion system. If you're going with teleportation, you'll need a system that casts a ray from the controller, checks if the target spot is valid, and then instantly shifts the player's position. For smooth movement, you must be incredibly careful with speed and acceleration to avoid making your user feel sick.
* Object Interaction and Grabbing: This is what makes a virtual world feel real. The task here is to write scripts that know when a virtual hand is close enough to grab something, attach that object to the hand when the button is pressed, and release it with believable physics. It sounds simple, but getting the feel just right takes a lot of tweaking.
* Input Management: Your code needs to be flexible enough to handle inputs from different VR controllers, like the Meta Quest Touch controllers or Valve Index Knuckles. This involves mapping actions—grabbing, teleporting, activating an item—to the right button presses or joystick movements.
Getting these fundamentals right is completely non-negotiable. A clunky grab or a jarring teleport can completely shatter the illusion and ruin an otherwise fantastic idea.
Structuring Your Project for Success
As your project gets bigger, it gets more complex. Fast. A disorganised project folder is a recipe for disaster, leading to bugs, wasted hours, and a lot of frustration. Good organisational habits from day one are absolutely critical for any serious virtual reality application development.
Start with a logical folder structure. It's your first line of defence against chaos. Create dedicated folders for Scripts, 3D Models, Textures, Materials, Prefabs, and Audio. It’s a simple step that makes it infinitely easier to find what you're looking for and see how everything connects.
Beyond just files, think about writing modular, reusable code. Don't cram all your logic into one monster script. Break it down. Have one script that just handles being "grabbable," another for player health, and a third for managing the overall game state. This makes debugging a breeze and means you can reuse components across your project.
> As soon as you create your project, get it into a version control system like Git. Think of it as your safety net. It tracks every change, lets you roll back if something breaks, and is essential for working with a team without stepping on each other's toes. It's an indispensable professional tool.
The need for professional practices is only growing. The UK immersive virtual reality market was valued at USD 1.24 billion in 2024* and is projected to hit an incredible *USD 5.25 billion by 2030. This boom, mostly driven by hardware sales, just goes to show the massive demand for well-built, stable VR apps. You can discover more insights about the UK immersive VR market and its rapid growth.
By nailing these foundational mechanics with clean code and smart project management, you’re building a stable base. From here, you can start layering on all the richer, more complex parts of your immersive experience.
Optimising VR Performance for a Flawless Experience
In virtual reality, performance isn't just a nice-to-have; it's the very foundation of a good experience. A bit of stutter in a regular game is a minor annoyance. In VR, a single dropped frame can shatter the illusion and trigger motion sickness.
Your target isn't just "smooth performance." It's a rock-solid, unwavering framerate—usually 90 frames per second (FPS)* or higher. Getting there is all about optimisation, a continuous hunt for performance bottlenecks that stop your app from being smooth, comfortable, and captivating. This is where the technical craft of *virtual reality application development truly meets user-centric design.
Profiling Your App to Find the Bottlenecks
You can't fix what you can't measure. The very first step in any optimisation push is to fire up a profiler. Both Unity and Unreal Engine have phenomenal built-in profiling tools that give you a frame-by-frame breakdown of exactly what your application is doing. These tools are your new best friends.
A profiler will quickly tell you if you're GPU-bound* (meaning you're trying to render graphics that are too complex) or *CPU-bound (bogged down by heavy code and calculations). High render times are a classic sign of a GPU bottleneck, whereas a CPU bottleneck often rears its head as spikes in physics calculations or script execution.
> The whole point is to get a crystal-clear picture of where your performance budget is being spent. Are you drawing too many objects at once? Is a specific script running inefficiently? The profiler gives you the hard data you need to stop guessing and start fixing the real problems.
Once you know what's slowing you down, you can start applying the right solutions. For some more specific techniques, especially for standalone headsets, you can check out our guide on improving Oculus app developer performance.
Key Strategies for GPU Optimisation
If the profiler is screaming "GPU bottleneck," your mission is to reduce the rendering workload. Essentially, you need to make your scene simpler for the graphics card to draw every single frame.
Slash That Polygon Count:** High-poly models look incredible, but they are incredibly taxing to render. Use decimation tools to strip away unnecessary polygons without wrecking the visual quality. The performance leap from a **50,000** polygon character to a *15,000 polygon one can be absolutely massive. * Embrace Level of Detail (LOD): LOD systems are a lifesaver. They automatically swap in lower-polygon versions of an object when it's further from the camera. This means the GPU only bothers rendering the super-detailed models when the player is close enough to actually see the difference. * Compress Your Textures: Huge, high-resolution textures eat up video memory (VRAM) for breakfast. Use modern texture compression formats like ASTC for standalone VR to drastically shrink their memory footprint without a noticeable drop in quality.These techniques all work together to bring down the rendering cost of each frame, helping you claw your way back to that golden 90 FPS target.
Mastering CPU Optimisation Techniques
When the CPU is the culprit, the problem usually lies with overly complex calculations, physics simulations, or just inefficient code. Here, your focus shifts to simplifying these processes.
Baking Lighting and Occlusion CullingTwo of the most powerful tools in your CPU optimisation arsenal are light baking and occlusion culling. Both work by pre-calculating complex data in the editor, so the CPU doesn't have to sweat over it in real-time.
| Technique | Description | Impact on Performance |
|---|---|---|
| Light Baking | Pre-calculates how light and shadows fall on static objects, "baking" this data into a texture. | Dramatically reduces real-time lighting calculations, which are one of the most CPU-intensive tasks. |
| Occlusion Culling | Works out which objects are hidden behind other objects and tells the engine not to render them. | Significantly cuts down the number of objects the CPU has to process and send to the GPU each frame. |
By using these methods, you offload a huge amount of work that would otherwise have to happen every single frame. This frees up your CPU's resources for the things that really matter: smooth gameplay and instant, responsive interactions. True optimisation isn't about cutting corners; it's about working smarter to build an experience that feels fluid and utterly immersive.
Getting Your VR App Out Into the World
You’ve finished core development. That’s a huge milestone, but don't pop the champagne just yet. The real work is often just beginning. Now, the challenge isn't about building an immersive world anymore; it's about getting that world into the hands of your audience. A successful launch is a carefully planned operation, blending technical know-how, sharp marketing, and a solid plan for what comes next.
This final push means navigating the specific, and often tricky, requirements of digital storefronts like the Meta Quest Store and SteamVR. Each platform has its own rulebook for submissions, technical checks, and the assets you’ll need. Getting a head start on this can save you from weeks of frustrating back-and-forth.
Prepping for Platform Submission
Before you can hit ‘submit’, you need to bundle up your app in a package that meets each platform’s strict guidelines. This is way more than just uploading your build file. It's a comprehensive checklist of technical details and marketing materials, all designed to ensure every app on the store meets a certain quality bar.
Your submission package will nearly always need:
* Compelling Marketing Assets: High-resolution screenshots, a killer trailer, and a store description that hooks people in. These are your first impression and your best shot at convincing someone to download your app.
* Technical Compliance Documents: You’ll need to provide solid details on your app's performance, comfort ratings (a big deal in VR), and any necessary content warnings. Platforms take this very seriously—they have to protect users from poor or nauseating experiences.
* A Rock-Solid Final Build: Your app needs to be polished, stable, and completely free of any game-breaking bugs. The review process is thorough, and a glitchy submission will get rejected in a heartbeat.
You have to be meticulous here. A single missing screenshot or a failed performance check can send you right back to the end of the submission queue.
Life After Launch: Strategy and Community
A launch isn't just one day on the calendar; it's the beginning of your app’s real life. What you do in the weeks and months that follow will make or break its long-term success. The focus shifts from virtual reality application development to support, listening, and engaging with the people actually using your creation.
This is where you put your ear to the ground and listen. User feedback is the most precious resource you have for figuring out what to build, fix, or improve next.
> Your launch day is just Day One. A truly successful VR app evolves with its community. Implementing analytics and actively gathering user feedback aren't optional extras—they are the core activities that will guide your roadmap and keep your audience engaged for the long haul.
It’s important to know your audience is out there. In the UK, for instance, awareness is already high, with around 75% of people aged 16 to 44* knowing about AR/VR tech. It's not just consumers; *88% of medium-sized UK companies are already using AR/VR in some way, showing a huge appetite for immersive tech. A ready and waiting audience exists for well-made apps. You can discover more UK virtual reality statistics to get a better sense of the market.
Using Analytics and Feedback to Grow
To make smart decisions, you need data. Integrating analytics into your app right from the start lets you see how people are actually using it. Track key metrics like how long they play, which features they use most, and where they tend to stop. This hard data will tell you exactly what’s working and what isn’t, pointing you straight to the areas that need attention.
But don't just rely on numbers. Combine that data with real, qualitative feedback. Set up channels where your community can talk to you—a Discord server, a subreddit, or dedicated social media pages work wonders. Actively listen to their ideas, bug reports, and wish lists. Not only does this give you priceless insights, but it also builds a loyal community that feels genuinely invested in your app's future. This continuous loop of feedback, data, and updates is what turns a decent launch into a lasting success story.
Answering Your Big VR Development Questions
Diving into VR development for the first time can feel like you’re staring at a huge, complex map with no clear starting point. It's normal to have a ton of questions before you write a single line of code. To wrap things up, we’ve answered the most common questions we get from clients and partners starting their journey.
How Much Does VR Application Development Cost?
This is always the first question, and the honest answer is: it varies enormously. There's no flat rate for creating a virtual world. Think of it like building a house—a simple one-room cabin is vastly different from a custom-built mansion.
A basic prototype or a simple 360-degree video app might land in the low thousands. But if you’re looking at a complex training simulation with bespoke assets or a commercial game with multiple levels, you could easily be looking at a six-figure budget.
The real cost comes down to a few key factors:
* Team & Time: How many developers, artists, and designers do you need, and for how long? This is your biggest expense.
* Asset Creation: Are you buying off-the-shelf 3D models or do you need custom animations, characters, and sound design? Custom work is incredible but labour-intensive.
* Platform & Polish: A graphically intense PC VR app for a high-end headset requires more optimisation horsepower than a streamlined app for a standalone headset like the Quest.
* Depth of Interaction: A guided, on-rails tour is far simpler (and cheaper) to build than a free-roaming sandbox world full of complex physics and smart AI characters.
Which Is Better For VR: Unity or Unreal Engine?
Ah, the great debate. The truth is, there’s no single “best” engine. The right choice is all about your project goals and your team's existing skills. Both Unity and Unreal Engine are absolute powerhouses for virtual reality application development, but they have different strengths.
> Think of it this way: Unity is the versatile workhorse, especially for mobile and standalone VR like the Meta Quest. It's incredibly flexible, has a massive asset store, and the C# talent pool is deep. Unreal Engine, on the other hand, is the undisputed king of jaw-dropping graphics right out of the box. Its Blueprint system also makes visual scripting and rapid prototyping a dream.
So, what’s the takeaway? If your team is full of C# wizards or you're aiming squarely for the Quest, Unity is an incredibly efficient and powerful choice. If your project’s success hinges on achieving the most breathtaking visual fidelity possible for a high-end PC VR experience, you'll probably want to lean towards Unreal.
What Are The Biggest Challenges in VR Development?
Building for VR isn't just standard software development with a headset slapped on top. It comes with its own unique, and very tricky, set of challenges. Getting these three things right is often what separates a genuinely immersive VR app from a clumsy tech demo that makes people feel sick.
Here are the hurdles that consistently demand the most attention:
1. Performance Is Everything:* You *must* maintain a silky smooth *90+ frames per second. Anything less, and you risk making your users nauseous. This isn't a "nice-to-have"; it's a fundamental requirement that demands constant, ruthless optimisation of every model, texture, and script.
2. Making Interactions Feel Natural: Designing controls that feel intuitive without looking at your hands is a massive challenge. An idea that seems brilliant on a whiteboard can feel awkward and frustrating inside the headset. This takes a lot of trial, error, and real-user testing to get right.
3. Justifying the "Why VR?": The biggest trap is making something that could have just been a regular 2D game or app. The real challenge—and opportunity—is to build an experience that truly uses the sense of presence, scale, and hands-on interaction that only VR can deliver.
---
Ready to turn your questions into a concrete plan? Studio Liddell* has been creating immersive worlds since *1996. We can help you navigate these challenges and bring your vision to life. Book a production scoping call with us today.