3d Animation Unity
A Friday afternoon client review is where many Unity animation pipelines reveal their real weakness. The scene runs smoothly at 60fps on a developer PC, then the same build reaches a Meta Quest headset and the frame rate collapses as soon as the crowd, lighting, cameras, and interactive elements arrive together. The producer must decide which visual detail survives, which animation gets simplified, and whether the schedule can absorb another round of optimisation. That decision rarely comes down to one clever Animator setting. It depends on how the team scopes the brief, builds the rig, imports assets, assigns ownership across Animator and Timeline, and tests on the hardware that matters. 3D animation in Unity works best when production planning and technical discipline begin together, rather than when optimisation is left for the final review build.
Why Unity Has Become the Default for Real-Time 3D Animation
Unity has earned its place in real-time production because the same project can support very different outputs. A character rig may feed a game build, an XR experience, an interactive configurator, or a cinematic sequence without forcing the team to recreate the entire animation pipeline for every platform. That flexibility matters commercially because clients increasingly want content that can move between screens, devices, events, and services. For a producer, the benefit isn't just having a familiar editor. Shared scenes, reusable animation clips, retargeting, Timeline sequences, and virtual cameras allow specialists to work from a common source. A change to a character pose can be reviewed in a cinematic shot, tested in an interactive scene, and carried into an event build without translating the creative intent into several unrelated toolchains. The trade-off is that Unity makes it easy to accept technical debt. A scene can look finished in the editor while its imported meshes, Animator graphs, render textures, and camera systems steadily consume the frame budget. A production team needs secure production workflows around versioning, review, approvals, and handoff, because real-time flexibility becomes expensive when nobody owns the source of truth.
One pipeline, several commercial outcomes
Unity's reach across games, linear content, XR, and visualisation changes how studios estimate work. The question isn't only whether a team can animate a character. It's whether that character can be delivered as a dependable asset, reused across shots, and adapted to the target platform without a late rebuild. This is particularly relevant in the UK. The BFI's 2024 mapping of animation activity across the UK economy treats animation as a distinct creative-industry discipline. Industry-facing summaries connected to that work indicate that the wider value chain supports about 15,390 jobs, while the core workforce is around 1,000 people, with roughly 52% freelancers. That profile helps explain why UK studios often value reusable real-time workflows and flexible production structures. Specialist capacity matters more than simply adding headcount. Unity therefore belongs in a producer's conversation about risk, not just software preference. Teams comparing engines should also consider the producer's guide to Unreal versus Unity for real-time animation, particularly when the brief spans broadcast, games, and XR. The rest of the production plan should answer one practical question: which system owns each decision, and how cheaply can the team revise it?
The Three Animation Systems Every Producer Should Know
A non-programmer animator doesn't need to memorise Unity's entire API to make good production decisions. The useful mental model is straightforward: Animator owns character motion logic, Timeline owns sequence, and Cinemachine owns camera intent.
Animator
The Animator is the state machine for motion that responds to conditions. It handles transitions between idle, walk, run, jump, attack, and other states, while blend trees combine clips according to parameters such as speed or direction. This is the right home for gameplay-driven movement and reusable character behaviour. Animator becomes costly when teams use it as a universal container for every shot, prop, camera cue, and one-off exception. A controller full of special cases is difficult to review and even harder to revise. Producers should ask whether a change belongs to reusable character logic or to a specific sequence.
Timeline
Timeline is the sequencing layer. It gives directors, editors, animators, and clients a place to arrange clips, activation tracks, audio, signals, camera cuts, and recorded events. For a scripted trailer or a broadcast-style cutscene, Timeline usually makes the revision path clearer than embedding every decision in Animator transitions. Timeline also creates an important ownership boundary. The animation team can maintain clips while the editorial or directing team adjusts timing, shot order, and camera cues. A practical guide to Unity for XR and animation development is useful when a project needs to share that logic between interactive and linear outputs.
Cinemachine
Cinemachine sits above the animated subject as a virtual camera system. It provides priorities, blends, follow and look-at behaviour, camera noise, and procedural framing, so a producer can change camera intent without asking an animator to re-author the character performance.
| System | Best For | Owner | Revision Cost |
|---|---|---|---|
| Animator | Gameplay states, transitions, and blend trees | Technical animator or gameplay engineer | High when overloaded with shot-specific logic |
| Timeline | Scripted sequences, edits, music cues, and camera cuts | Director, editor, or sequence artist | Moderate when tracks are clearly organised |
| Cinemachine | Camera framing, movement, blending, and procedural behaviour | Virtual cinematographer or technical artist | Low for camera-led revisions |
A useful decision rule is Animator for owned motion, Timeline for sequenced scenes, and Cinemachine for camera intent. That rule helps estimate revision cost before production starts. If the client changes a shot, the camera owner should be able to work without breaking the character controller. If the client changes how a character behaves across the whole experience, the Animator owner should make that change once and propagate it safely.
Rigging, Skinning, and Humanoid Retargeting
A reliable character pipeline starts before the first animation clip enters Unity. The team needs to decide whether the character is being built for one bespoke performance or for reuse across several avatars, platforms, and formats.
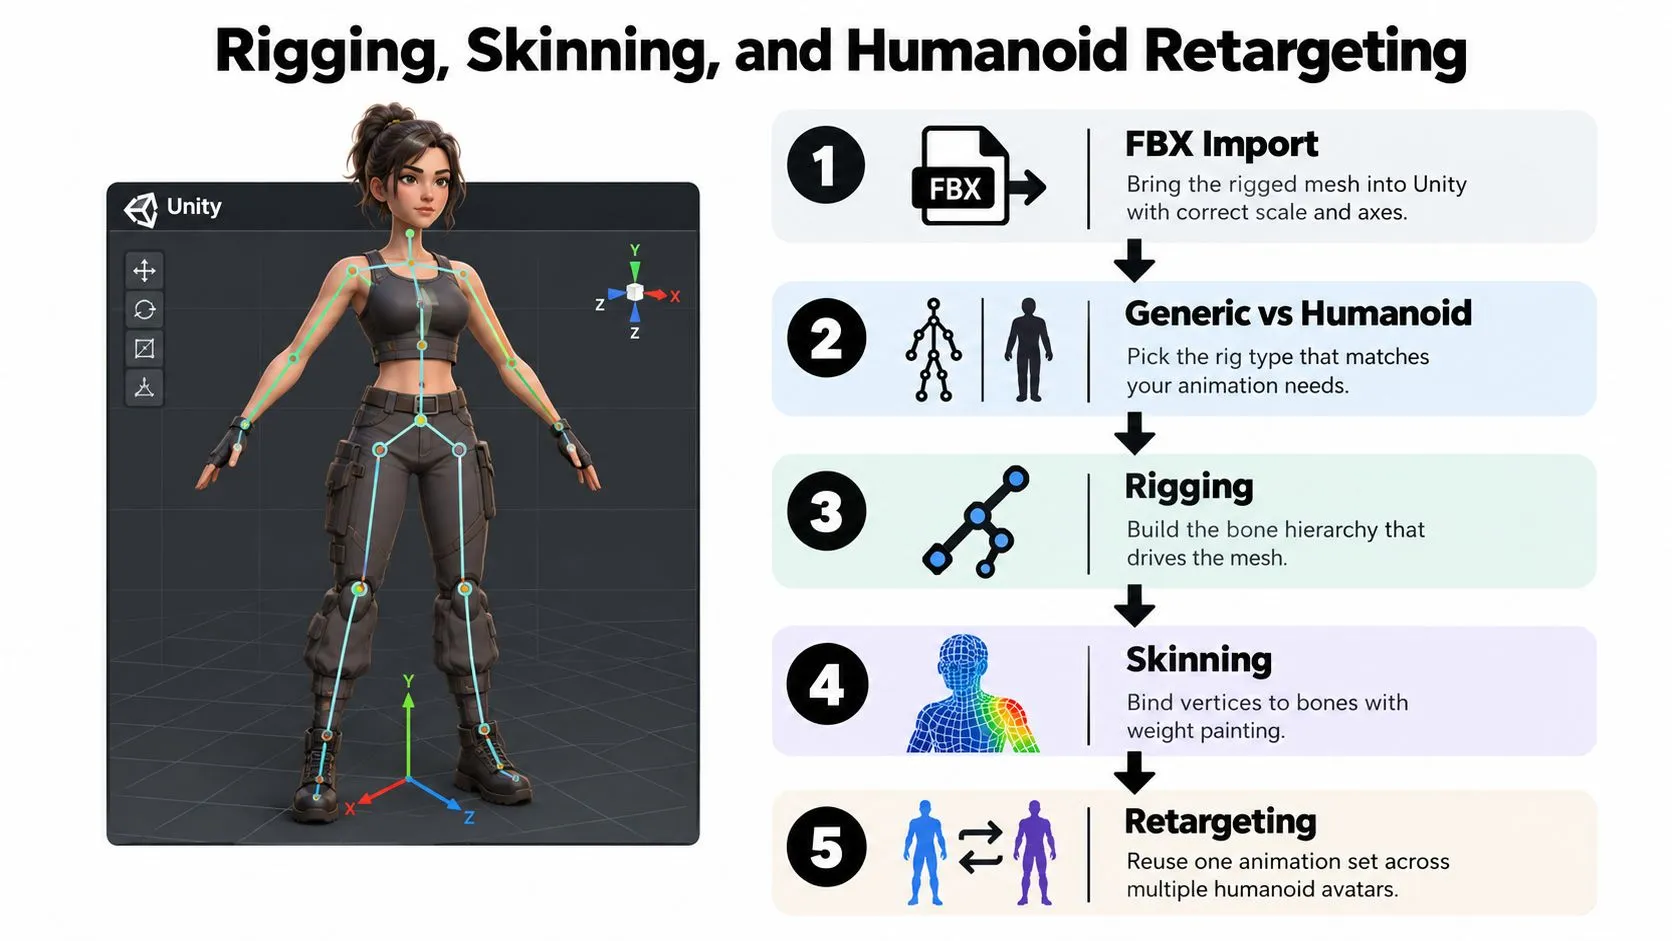
From FBX to a usable avatar
Start with the FBX import. Confirm scale, axis orientation, frame rate assumptions, naming, and whether the root is placed consistently. In the Rig tab, choose Generic when the skeleton is unusual or tightly coupled to a specific creature, mechanical object, or stylised hierarchy. Choose Humanoid when the character follows a human structure and the team needs Unity's retargeting and muscle-space tools. The Avatar window is where the production value of Humanoid becomes visible. Unity maps the imported bones to a standard body definition, and the team must resolve missing, duplicated, or incorrectly assigned bones before approving the avatar. A green-looking mapping isn't enough if the hands, hips, feet, or root behave incorrectly in the actual clip.
Skinning is a visual and technical compromise
Skinning binds mesh vertices to bones through weights. More influences can produce smoother deformation around shoulders, elbows, hips, and faces, but they also increase the work required to evaluate and render the character. The right choice depends on the shot, the target device, and whether the character is close to camera. Push for careful weighting where the audience will see deformation. Accept simpler weighting on distant crowd members, background characters, or parts hidden by clothing. Facial meshes often deserve a separate review because blend shapes can improve performance quality while increasing memory and processing requirements, especially when many characters update at once.
Practical rule: Spend deformation time where the camera spends attention, not evenly across every vertex.
Retargeting needs validation, not optimism
Humanoid retargeting lets one animation set drive multiple compatible characters through a shared muscle representation. That can save substantial re-authoring, but it doesn't remove the need for review. Different proportions, foot placements, root-motion conventions, and hand orientations can turn a clean source clip into floating feet or slipping palms. Before an animation reaches client review, test the clip on the final avatar and inspect the contact points. Check the T-pose, root motion, foot locking, IK behaviour, and extreme poses. A practical character-rigging guide for production teams can help structure that review, but the final authority is always the target character moving inside the active project.
Asset Import Settings That Decide Your Frame Budget
Unity's Inspector contains many options, but only a handful consistently change runtime behaviour. The dangerous defaults are the ones nobody questions because the asset still looks correct in the Scene view. A mesh with unnecessary vertex data, CPU-readable copies, expensive blend shapes, or oversized textures may pass an art review while creating avoidable memory and frame-time pressure on mobile XR. Texture atlasing, compression, and disciplined mesh import settings matter because they reduce draw calls, memory use, and rendering workload, as outlined in Unity's project configuration and asset guidance.
The rows worth interrogating
Read/Write Enabled deserves attention on every imported mesh. It keeps a CPU-side copy available for scripts and runtime modification, but that convenience has a memory cost. If the project doesn't need to alter mesh data at runtime, turn it off and verify that no tool or system depends on it. Mesh compression can reduce storage size, but it isn't a substitute for reducing vertex quantity. Compression may introduce precision changes, while an unnecessarily dense mesh still has to be processed. Blend shapes provide useful facial and corrective deformation, yet teams should avoid importing every sculpted target when the shot only needs a small subset. Normals and tangents affect lighting quality and shader work. Choose the generation method deliberately, especially when assets arrive from several DCC packages. Texture presets should also be platform-specific. Confirm sRGB treatment, mipmaps, streaming, compression, and maximum resolution rather than allowing desktop defaults to pass unchanged into a Quest build.
| Import Setting | Frame-Budget Impact | Recommended Value |
|---|---|---|
| Read/Write Enabled | Can increase memory use through an additional CPU-side mesh copy | Disable unless runtime mesh access requires it |
| Mesh compression | Reduces asset size, with possible precision trade-offs | Test against the target visual standard |
| Blend shapes | Adds deformation data and update work | Import only the targets the performance needs |
| Normals and tangents | Affects lighting quality and vertex processing | Generate consistently for the selected pipeline |
| Texture resolution and compression | Changes memory pressure, bandwidth, and visual sharpness | Use platform presets and inspect on target hardware |
| Texture atlasing | Reduces draw calls and texture overhead | Pack materials where the scene and shader setup support it |
The producer's role isn't to choose every value personally. It's to make sure each choice has an owner, a target platform, and a reason recorded in the asset review.
Optimisation Rules That Survive a Real Build
Optimisation isn't a final-week engineering task. Art, animation, design, and code all draw from the same frame budget, so a producer needs a visible agreement about what the project can afford before the scene becomes beautiful. Unity's character guidance recommends keeping bone counts low, with around 30 bones as a good desktop target and under 30 preferable for mobile. It also gives typical mesh ranges of about 300 to 1,500 polygons for mobile and 1,500 to 4,000 for desktop. Those figures are useful starting points, not permission to ignore the actual device, shader, crowd density, or camera distance. The relevant Unity animation performance guidance should be checked alongside a live profiler capture.
Rules that hold up under pressure
- •Cull invisible animation: Set Animator culling to Based on Renderers or Cull Completely where the design allows it. Disable offscreen updates for Skinned Mesh Renderers when hidden characters don't need to keep evaluating.
- •Prefer simple transform work: Scale curves cost more than translation and rotation curves. Use rotation-based deformation and avoid driving character scale through Animator unless the effect strictly requires it.
- •Reduce draw-call pressure: Use atlases, compressed textures, sensible material grouping, and one Skinned Mesh Renderer per character where appropriate. Unity notes that one renderer helps visibility culling work correctly.
- •Use LODs early: A lower-detail mesh and simpler materials should appear before the audience notices the change. Test the transition through the actual camera, not only in the editor.
- •Profile the target device: The Unity Profiler, Frame Debugger, and platform tools should answer whether the bottleneck is animation, skinning, scripts, overdraw, memory, or rendering.
A TD's pre-flight before a client build should include the heaviest scene, the least forgiving target hardware, offscreen character behaviour, texture memory, render textures, and camera capture settings. If the team can't explain the frame-time spike, the build isn't ready for a client review, however polished the shot looks.
Common Pitfalls Studios Hit Again and Again
Many Unity animation failures look like creative problems during review. The character appears to float, the camera stutters, or the scene feels sluggish. The underlying cause is often a small technical decision that was never assigned an owner.
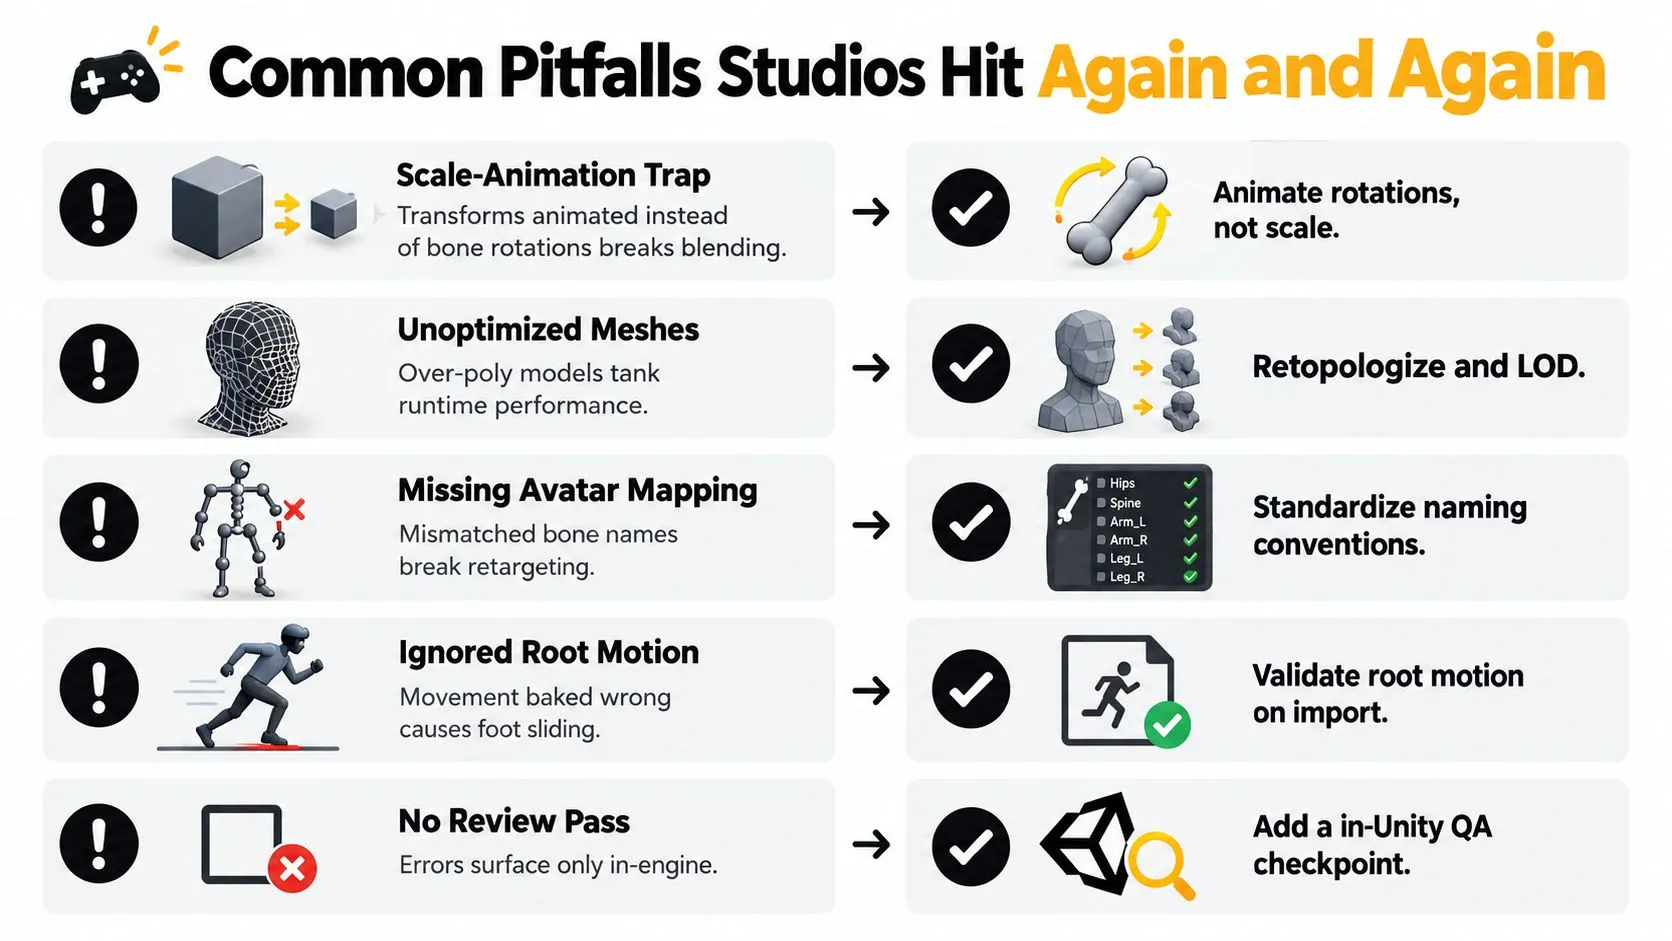
The symptoms producers should recognise
Scale-animation trap. A character stretches or drifts during a blend, and physics contacts become unstable. Scale curves are driving transforms where bone rotations should carry the performance. Ask the animator to remove unnecessary scale animation and validate the blend again. Unity specifically identifies scale curves as more expensive than translation and rotation curves in its performance guidance. Offscreen-render trap. A cinematic render texture updates every frame even when no visible output depends on it. The GPU spends time producing an image that the player or viewer never sees. Ask the technical artist to disable the capture outside the required shot or event and profile the scene with the render texture removed. Humanoid retargeting trap. Hands float, feet slide, or the avatar leaves its T-pose incorrectly. The source and destination avatars don't share compatible mapping, proportions, or root-motion expectations. Ask for a fresh Avatar validation and a target-character test, not another pass on the source clip. Avatar mask trap. An upper-body animation appears to work until a shoulder, hand, or spine segment stops responding. The mask excludes a body part that the animator assumes is active. Ask the team to display the mask and verify the affected hierarchy in the actual layer. Empty Animator Controller trap. A character receives input-driven motion even though Timeline already owns the shot. Two systems are trying to drive the same object. Ask the team to define one authority for the sequence and remove the unused controller or disable its bindings.
The fastest diagnosis is usually a question about ownership: which system is allowed to move this object right now?
A Repeatable Studio Workflow From Brief to Delivery
A dependable Unity production chain makes technical decisions visible before they become expensive. Each stage needs a named owner, a reviewable output, and an exit condition that protects the next stage from avoidable ambiguity.
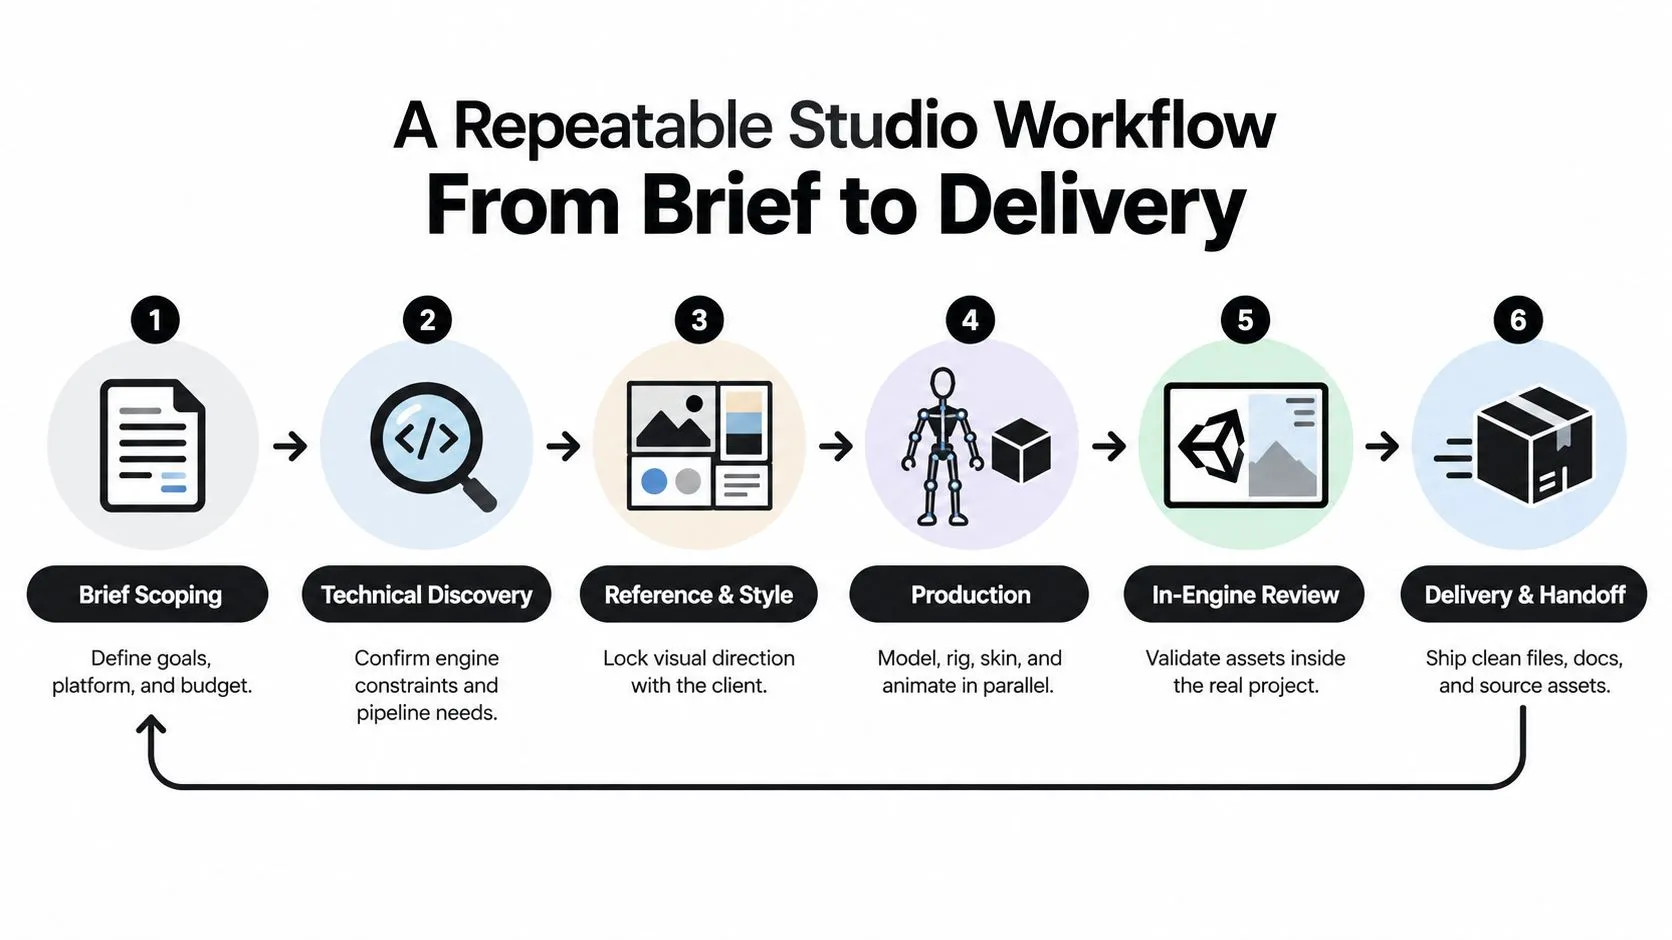
Scope the work before building the scene
Brief scoping defines the audience, output, target platforms, visual ambition, delivery format, and budget boundaries. A broadcast sequence, an interactive XR installation, and a mobile game may share assets, but they don't share the same performance assumptions. Technical discovery then confirms render pipeline, hardware, input requirements, capture needs, source-control expectations, and integration constraints. The team decides at this stage whether an asset needs Humanoid retargeting, whether Timeline will drive the sequence, and whether Cinemachine belongs in the shot workflow. Reference and style locks the visual direction before modelling expands. A moodboard, camera references, material tests, and an approved character pose reduce the risk of creating technically expensive assets that don't serve the final frame.
Production needs a real-project checkpoint
During production, modelling, rigging, skinning, animation, lighting, and sound can move in parallel, but they need shared naming conventions and versioned outputs. A clean folder structure and predictable prefab rules make revisions easier to isolate. The in-engine review is where the team stops trusting offline previews. Test the actual rig, materials, camera, Timeline bindings, lighting, and target hardware. Profile the heaviest shot and check that Animator, Timeline, and Cinemachine aren't competing for control. Delivery and handoff should include the Unity package, source FBX files, textures, animation clips, documentation, known limitations, and a tested build. Weekly builds and source-control branches per deliverable give the client a clear record of what changed and let a specialist partner plug into an existing pipeline without turning the project into an open sandbox. Studio Liddell offers 3D animation, Unity and Unreal real-time production, XR development, TV and branded content, and interactive game work. Visit Studio Liddell to discuss a production scoping call, bring your target hardware and current assets, and establish a Unity workflow that protects both the creative brief and the frame budget.