A Producer's Guide to Game Development with Unreal Engine
Getting your game off the ground in Unreal Engine is about more than just raw creativity. It's about laying a rock-solid foundation from the very first click. A professional studio approach from the start makes your project scalable, easier to maintain, and ready for team collaboration, saving you from a world of technical debt down the road. This means making deliberate, smart choices about project structure and version control _before_ a single asset ever touches the content browser.
Setting Up Your Project Like a Pro Studio
Kicking off a new Unreal project the right way starts long before you place your first mesh. The decisions you make right at the beginning are critical for the long-term health of your project, especially for something complex like an XR experience or a multi-episode animation. How you structure everything on day one sets the tone for the entire production.
Choosing the Right Project Template
Your first real decision is which project template to use. It’s tempting to just hit ‘Blank’ for that feeling of total control, but honestly, Unreal’s pre-built templates can be a massive time-saver.
- •First-Person/Third-Person Templates: These are perfect for character-driven games or interactive experiences. They come with character controllers, input bindings, and camera logic already hooked up, which is a huge head start.
- •Blank Template: This is your best bet for projects with truly unique mechanics where you’ll be building systems from scratch. Think puzzle games or specialised non-gaming applications.
The trick is to match the template to your core gameplay loop. If you're building a shooter, the First-Person template gets you moving and shooting in minutes. If it's a bespoke VR training simulation, a blank canvas is probably better so you aren't spending time ripping out systems you don't need.
Get Version Control Running from Day One
In any professional environment, version control is non-negotiable. It’s what lets your team work on the same project without stomping on each other’s files, and it’s your safety net when something inevitably breaks. The two big players are Git and Perforce.
For studios, Perforce often gets the nod because it’s a beast at handling enormous binary files, we’re talking high-res textures and complex models, much more gracefully than Git. That said, Git (especially with Large File Storage, or LFS) is a fantastic, and often more accessible, choice for smaller teams.
Whatever you choose, get it integrated from the absolute beginning. Trying to slap version control onto a project that's already weeks into development is a recipe for chaos and lost work. Setting it up on day one builds a disciplined workflow that will pay for itself over and over.
Establish Clean Folder Structures and Naming Conventions
A messy project is a slow project. A clean, logical folder structure means anyone on the team can find any asset, fast. A simple, effective top-level structure might look something like this:
- •`/Content/Blueprints`
- •`/Content/Maps`
- •`/Content/Materials`
- •`/Content/Meshes`
- •`/Content/Textures`
From there, you can create subfolders for characters, environments, UI, and whatever else you need. This stops the main `/Content/` folder from turning into a digital junk drawer nobody wants to clean out. When thinking about your studio's workflow, it's also worth looking into methodologies that support this kind of organised, iterative development. For example, understanding an Agile development team structure can seriously streamline production by getting your whole team aligned on clear goals and sprints. Naming conventions are just as vital. A simple prefix system brings instant clarity to the chaos. For example:
- •M\_ for Materials (e.g., `M_Brick_Clay`)
- •T\_ for Textures (e.g., `T_Brick_D` for a Diffuse map)
- •BP\_ for Blueprints (e.g., `BP_PlayerCharacter`)
- •SM\_ for Static Meshes (e.g., `SM_Streetlight`)
This kind of simple discipline makes searching for assets and debugging a million times easier. For a deeper dive into managing production at a studio level, see our thoughts on Unreal vs Unity for real-time animation. A well-organised project foundation isn't just busywork, it's the first real step toward a successful launch.
Building Your Core Production Pipeline
Once your project's foundation is solid, it's time to build the heart of your game: the production pipeline. This is where your assets, code, and design truly start to merge. A well-oiled pipeline isn't just about moving fast; it’s about creating a tough, maintainable system where you can evolve mechanics and systems without the whole thing collapsing. This is where your game really begins to breathe. This visual decision tree maps out some of the critical choices you'll face when setting up the technical side of your project, from the type of project you're building to the version control that will hold it all together.
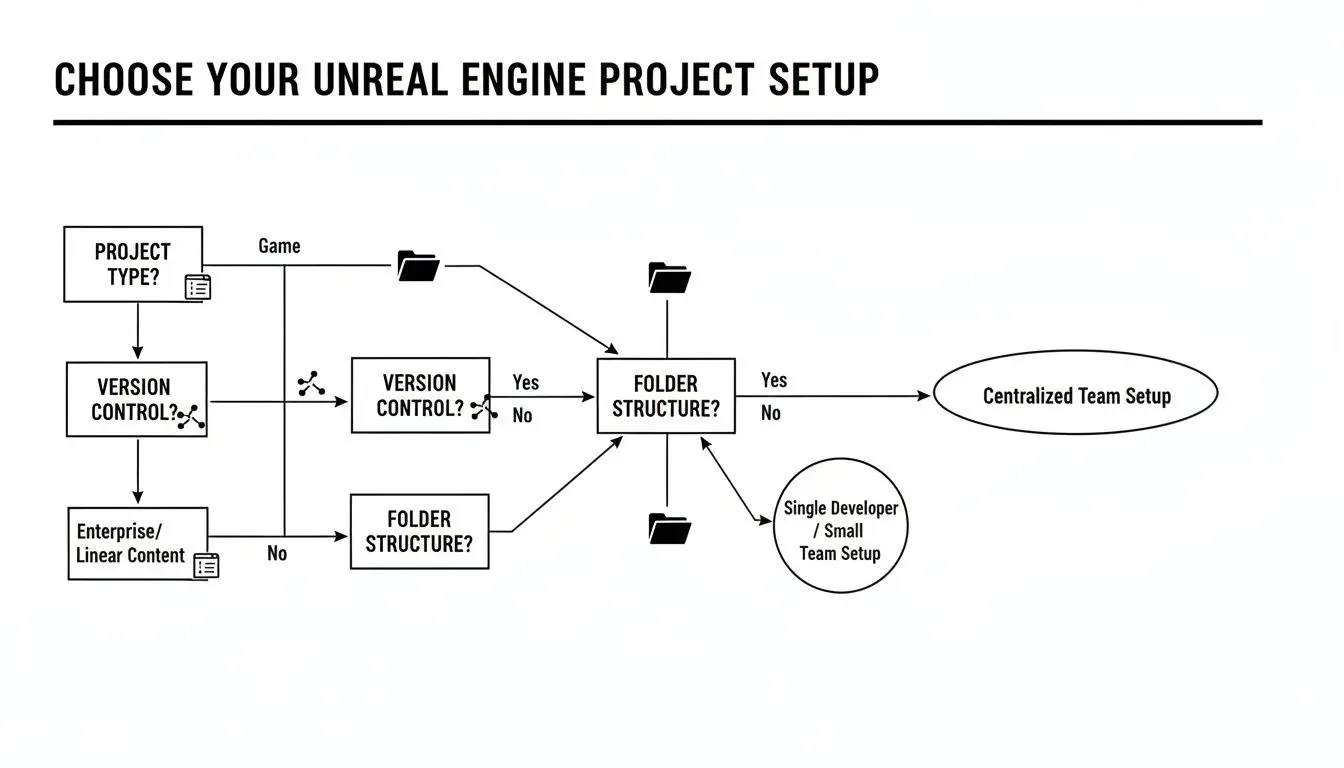
Nailing these decisions early on gives your team a clear path forward, making sure everyone is working from the same playbook from day one. The pipeline really kicks off with how you handle assets coming in from external tools like Blender, Maya, or ZBrush. Getting a smooth import/export workflow is absolutely crucial. One of our go-to tools here is Unreal's Data Tables. They are a complete game-changer for scalability, letting you manage huge sets of data, like item stats or character dialogue, in a simple spreadsheet format. Designers can tweak values to their heart's content without ever needing to bug a programmer.
The Great Debate: Blueprints vs C++
One of the biggest strategic calls you'll make in game development with Unreal Engine is deciding when to use Blueprints versus C++. This isn't a simple "either/or" question. It’s all about picking the right tool for the job. Unreal's visual scripting system, Blueprints, is fantastic for quick prototyping and iteration. It empowers designers and artists to build out complex logic, UI elements, and gameplay events without writing a line of code. This gets the whole team more hands-on, letting them test ideas and build out mechanics at speed. For many of our high-turnaround event games, like the mixed reality _Dance! Dance! Dance!_ experience, we've prototyped almost the entire game loop in Blueprints first to allow for rapid changes based on live player feedback. But when performance is king, C++ is the undisputed champion. Core systems, complex algorithms, or any bit of logic that needs to run every single frame should be written in C++. It gives you raw access to the engine's core, letting you write highly optimised code that Blueprints just can't keep up with. In projects like our interactive VR training simulations, the underlying systems that track user performance and manage complex scenarios are always built in C++ for maximum reliability and speed.
Studio Tip: The best path forward is almost always a hybrid approach. Build your core, performance-critical systems in C++ and then expose key functions and variables to Blueprints. This gives your designers the power to use, modify, and build on top of those solid systems visually. You get the best of both worlds: rock-solid performance and creative flexibility.
Here's a quick decision framework we use to guide our teams on when to reach for Blueprints and when to dive into C++.
Blueprints vs C++: When to Use Each
| Scenario | Recommended Approach | Justification |
|---|---|---|
| Prototyping a new game mechanic | Blueprints | Speed is everything here. Blueprints allow for rapid iteration and testing of ideas without the overhead of compiling C++ code. |
| Building core engine systems (e.g., custom physics, complex inventory) | C++ | These systems need maximum performance and reliability. C++ provides direct memory management and optimisation capabilities. |
| Creating simple, one-off interactive objects (e.g., a light switch) | Blueprints | Quick to implement, easy for non-programmers to understand and modify. The performance impact is negligible for simple logic. |
| Implementing complex AI behaviour or algorithms | C++ | Performance is critical for complex decision-making trees or pathfinding. C++ ensures these calculations don't bog down the CPU. |
| Exposing C++ functionality to designers | Hybrid (C++ with BlueprintCallable functions) | The core logic is fast and robust in C++, while designers can easily call and manipulate these functions within Blueprints. |
| Developing UI/HUD elements and logic | Blueprints (UMG) | Unreal Motion Graphics (UMG) is designed to be driven by Blueprints, making it incredibly intuitive for designers to create and script UI. |
Ultimately, this hybrid model lets each discipline play to its strengths, creating a far more efficient and powerful development environment. The UK video games industry, which relies heavily on powerful tools like Unreal Engine, now contributes a massive £12 billion in Gross Value Added (GVA) annually and supports over 73,000 jobs. Research from the University of Portsmouth shows how Unreal's ability to produce high-fidelity visuals makes it a cornerstone for UK studios creating everything from AAA games to complex XR experiences.
Building for Maintainability
A good pipeline isn't just about what works now; it’s about what you can easily fix and expand six months down the line. This is where modular design becomes your best friend.
- •Create Reusable Components: Instead of making huge, monolithic Blueprints that do everything, break your logic down into smaller, self-contained Actor Components. Got an interactive door? Don't build the logic into the door Blueprint. Create an `Interactable` component that can be dropped onto _any_ object in the world. This makes your systems incredibly modular and easy to reuse.
- •Leverage the Gameplay Ability System (GAS): For any game with complex character actions, think RPGs, action games, or even our advanced training sims, GAS is a beast. It’s a powerful, ready-made framework for handling abilities, attributes, and status effects. It has a steep learning curve, no doubt, but the payoff in creating scalable and maintainable character mechanics is immense.
By focusing on modular components and using established frameworks like GAS, you’re building a pipeline that's not only efficient for launch but also resilient enough for the long haul. This kind of discipline is what separates a fragile prototype from a polished, shippable product.
Optimising Performance for a Flawless Experience
It’s easy to get carried away with beautiful visuals and intricate mechanics when you’re in the thick of game development with Unreal Engine. But if the final experience stutters and lags, all that hard work means nothing. A silky-smooth frame rate isn’t just a nice-to-have; it's an absolute must for any professional product. Performance isn't something you can just bolt on at the end of the project. It has to be a core part of your studio's mindset from day one. This is especially critical on platforms where every millisecond counts. In VR, a single dropped frame can shatter immersion and even cause motion sickness. On mobile, you’re wrestling with tight hardware limits. For a studio, optimisation is all about hunting down and stamping out bottlenecks before they grow into project-derailing crises.
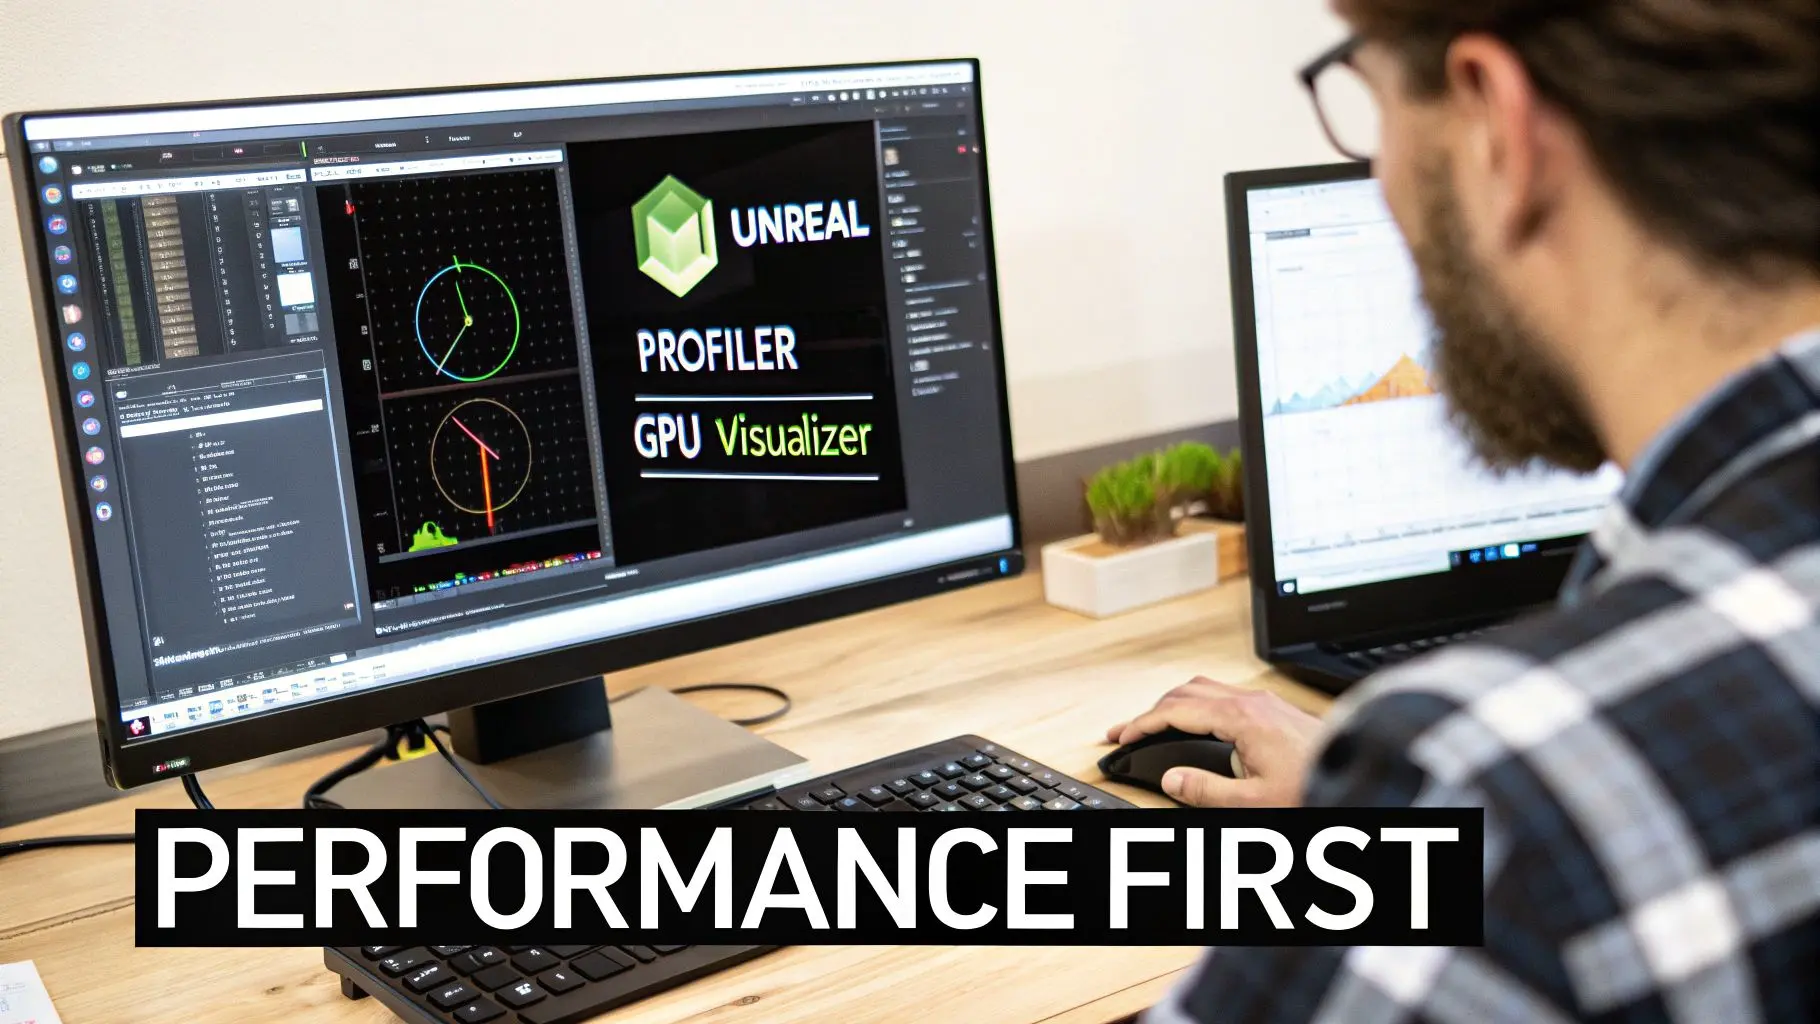
Hunting Down Bottlenecks with Unreal Profiling Tools
You can't fix what you can't measure, and when it comes to optimisation, guesswork is your worst enemy. Thankfully, Unreal Engine is packed with a fantastic suite of diagnostic tools that give you a data-driven look at exactly what's happening under the bonnet. Your first port of call for any CPU-related slowdowns should be the Profiler. It takes a snapshot of your game's performance over a few frames, breaking down exactly which functions and threads are eating up your processing time. If your game thread is spiking, it could be a sign of overly complex Blueprint logic. If it’s the render thread that’s struggling, you might be trying to draw too many objects at once. For anything GPU-related, the GPU Visualizer is your best friend. This tool gives you an incredibly detailed breakdown of how the graphics card is spending its time rendering a single frame. It visually lays out every single render pass, from shadows and the base pass right through to post-processing. If your frame rate plummets when you look in a particular direction, the GPU Visualizer will almost certainly show you why, perhaps an unoptimised material or a costly transparency effect is the culprit.
A standard practice in most studios is to set strict performance budgets early on. For instance, a VR project might aim for a non-negotiable 11.1ms frame time to maintain a solid 90 FPS. Holding regular profiling sessions ensures the project stays within these limits and stops performance from slowly degrading over time.
Smart Asset and Material Optimisation
Nine times out of ten, your assets are the biggest performance hogs. A single poorly optimised mesh or a bloated texture can bring even a monster PC to its knees. This is where disciplined asset management becomes essential. Key Asset Optimisation Techniques:
- •Level of Detail (LODs): This is non-negotiable. Implementing LODs for your models automatically swaps a high-poly mesh for a lower-poly version as it moves further from the camera. It’s a simple concept that dramatically cuts down the vertex count the GPU has to chew through.
- •Texture Streaming and Mipmaps: Always make sure your textures have correctly generated mipmaps and that texture streaming is switched on. This stops the GPU from having to hold massive, high-resolution textures in memory for objects that are barely visible in the distance.
- •Efficient Materials: A material's complexity is measured in "shader instructions." Your goal should be to keep these as low as possible. Steer clear of complex maths or too many texture lookups, particularly for materials that will be used on many objects across a level.
Lighting Strategies: Static vs. Dynamic
Lighting is easily one of the most performance-intensive parts of real-time rendering. The strategy you choose here will have a massive ripple effect on both your game's performance and its final look. Static Lighting (Baked): This approach involves pre-calculating all the lighting and shadow information for a scene and storing it in lightmaps. At runtime, the performance cost is incredibly low, which makes it the go-to choice for platforms like mobile and VR. The trade-off? Nothing can move. Lights can't change colour or intensity, and dynamic objects won't cast proper shadows. If you're wrestling with a complex lighting setup, you might find our guide on setting up MegaLights in Unreal Engine helpful. Dynamic Lighting (Lumen): Unreal Engine 5’s Lumen system is a game-changer, offering breathtaking real-time global illumination and reflections. It allows for completely dynamic environments where light can change at a moment's notice. Of course, this stunning visual quality comes at a serious performance cost, making it best suited for high-end PCs and the latest generation of consoles. The professional approach is very often a hybrid one. Use baked lighting for the bulk of your static environment to keep performance high, then strategically place a few dynamic lights to add life to key interactive props or to light your characters beautifully. This gives you the best of both worlds: great performance and dynamic visual flair.
Developing for XR and Multiplayer Experiences

This is where Unreal Engine really flexes its muscles. Moving beyond standard single-player games, the frontiers of XR (Virtual and Augmented Reality) and multiplayer are where the engine truly shines. Getting these right opens doors to everything from high-footfall, location-based VR attractions to massive, globally-connected competitive games. This is advanced game development with Unreal Engine, and it demands a specialised skillset and a serious understanding of performance. The economic ripple effect of these skills is huge. In the UK alone, 26,000 people work directly in game development, with each pro adding an average of £113,000 in economic value, that's nearly double the national average. A big part of that is down to the sheer efficiency engines like Unreal bring to production. The tech's influence stretches far beyond gaming, too, powering everything from advanced manufacturing simulations to immersive XR training. For a deeper dive, check out UKIE's latest report on the UK games industry's economic impact.
Building Immersive XR Experiences
Making something for VR or AR is a totally different beast. Here, performance isn't just a nice-to-have; it's a hard requirement for user comfort. A rock-solid, high frame rate is non-negotiable if you want to avoid making your players feel sick. If you’re targeting standalone headsets like the Meta Quest, optimisation becomes your number one job. You’re dealing with mobile hardware, which means you need to be aggressive about performance right from the project’s first day. Key XR Optimisation Strategies:
- •Forward Shading Renderer: For most VR projects, you'll want to switch from Unreal's default Deferred Renderer to the Forward Shading Renderer. It's generally quicker for VR and gives you better anti-aliasing options, which is a massive help in cutting down that distracting "shimmer" you see inside a headset.
- •Fixed Foveated Rendering: This is a clever trick that renders the very centre of the user's view in full resolution but lowers the quality in their peripheral vision, where they won't notice it. This can give you a huge performance kick with almost no visual trade-off.
- •Bake, Bake, Bake: We mentioned it before, but for mobile XR, it’s critical. Relying on pre-calculated, static baked lighting is often the only way you'll hit your frame rate targets. Dynamic lighting is just too expensive.
Performance aside, interaction design is everything. In XR, you can't just map actions to controller buttons and call it a day. You have to design physical, intuitive interactions that feel right. This means building responsive, physics-based grabbing systems, giving clear visual cues for interactive objects, and creating locomotion systems that don't make people queasy. We've gone into more detail about the unique challenges and wins of VR game development with Unreal Engine if you want to learn more.
Demystifying Unreal's Networking Framework
Adding multiplayer to your game throws in a whole new layer of complexity. Thankfully, Unreal’s networking framework is a powerhouse. It's built on a secure and robust server-authoritative model, and getting your head around its core concepts is the first step to building a stable online experience. At its core, Unreal networking is all about replication. This is simply the process of the server copying, or replicating, the state of actors and their properties to all the connected clients. The server is the one and only source of truth; clients just see a copy of what the server tells them is happening.
Studio Takeaway: One of the biggest hurdles for new multiplayer developers is wrapping their head around the difference between server, client, and "listen server" modes. Always test your logic in all three. A mechanic that works flawlessly when you test it in a single-player PIE session can completely fall apart in a real networked environment if it wasn't designed with replication in mind from the start.
Core Multiplayer Concepts
To build anything that works online, you need to live and breathe these concepts:
- •Server Authority: The server is the boss. A player's action is sent to the server as a request. The server checks if it's valid, runs the logic, and then replicates the result back to _all_ clients. This is what stops cheating, because clients can't just decide to change their own health or position.
- •Actor Ownership: Each player's controller "owns" their character pawn. This is vital for making sure input goes to the right place. Only the client that owns a pawn can send movement commands for it to the server.
- •RPCs (Remote Procedure Calls): Think of these as functions you can call on one machine to make them run on another. You'll be using RPCs constantly for one-off events, like telling the server a player wants to fire their weapon, or telling all clients to play an explosion sound effect.
Whether you're building a simple two-player co-op feature or a 64-player competitive shooter, a solid grip on these networking fundamentals is absolutely essential.
Packaging and Deploying Your Game for Launch
Getting your game out the door is the final, exhilarating sprint. This is where your project transforms from a development build humming along in the editor into a polished, standalone product that players can actually download and experience. It’s less about creative breakthroughs and more about a disciplined, technical push that demands attention to detail. This whole process boils down to packaging, quality assurance, and navigating the often-tricky waters of storefront submissions.
Dialling in Your Build Settings
Before you can even think about shipping, you need to tell Unreal Engine exactly _what_ to pack. You don’t just hit a magic "make game" button. The Project Settings menu is your command centre for this, and your choices here are critical. A build destined for a high-end gaming PC looks vastly different under the hood from one targeting an iPhone or a PlayStation 5. Here’s the essential checklist to lock down:
- •Target Platforms: Be explicit. Are you shipping on Windows? Linux? Android? Declaring this ensures the engine compiles the right shaders and includes the necessary platform-specific code. No guesswork allowed.
- •Maps to Include: You absolutely must specify which levels make it into the final package. If you don't, you risk shipping bloated builds filled with old test maps, prototype levels, and unused content that will inflate your game's file size.
- •Build Configuration: For a public release, you almost always want a Shipping build. This is the leanest, meanest version of your game. It strips out all the debug tools, console commands, and performance overlays, giving you the smallest file size and the best possible performance. A "Development" build is your go-to for QA teams, as it keeps some of those diagnostics accessible.
Think of it like preparing a show car. You're removing all the workshop tools and diagnostic rigs, cleaning every surface, and making sure only the pristine, finished product is what people see.
The QA Gauntlet: Your Non-Negotiable Last Stand
With a packaged build in hand, the quality assurance (QA) process kicks into high gear. This isn't just about playing the game and seeing if it’s fun, that ship has sailed. This is a methodical, structured hunt for bugs, performance bottlenecks, and anything that makes the player's experience worse. A professional studio pipeline has layers. You start with automated tests, which you can set up right inside Unreal. These can check for things like missing asset references or common crash scenarios. Let a continuous integration server run these overnight; they’ll catch the low-hanging fruit before a human tester ever sees the build. Next comes the manual testing plan. Your QA team should be working from specific test cases, methodically checking every single mechanic, UI button, and game system on all your target hardware. This phase should also include User Acceptance Testing (UAT), where you bring in fresh eyes, people outside the dev team, to catch the kinds of issues you’ve all become blind to after staring at the project for years.
A classic rookie mistake is saving QA for the very end. The truth is, it should be happening constantly. Integrating testing throughout the development cycle means you catch bugs when they’re small and cheap to fix, preventing a terrifying mountain of problems from piling up a week before launch.
Navigating the Storefront Maze
Once you have a clean, polished, and rigorously tested build, you face the final hurdle: submitting it to digital storefronts like Steam, the Epic Games Store, or the console marketplaces. Each one is its own little kingdom with a unique set of rules, technical requirements, and submission guidelines. You’ll typically need to prepare:
- •Store Assets: A whole suite of high-resolution banners, screenshots, and trailers, all formatted to their exact specifications.
- •Build Depots: The actual packaged game files, which need to be uploaded correctly to the platform’s content delivery network (CDN).
- •Metadata: Every scrap of information about your game, from the public-facing description and age ratings to pricing and release dates.
Do yourself a favour and read the documentation for your target storefront _meticulously_. A simple error, like providing an icon at the wrong resolution, can get your entire submission rejected and throw your launch schedule into chaos. Always build in a buffer for the review process, which can take anywhere from a few days to several weeks. Submit early, and use that waiting period to get your day-one patch and post-launch support plans ready. The work is never truly done.
Frequently Asked Questions About Unreal Engine Development
Even the most seasoned producers have questions when spinning up a new project. We get it. Here are some straight-talking answers to the queries we hear most often about game development with Unreal Engine, based on years of being in the trenches. Think of this as a way to sidestep common pitfalls and make smarter decisions, right from the get-go.
Choosing Between Unreal Engine and Unity
This is usually the first big fork in the road for any studio. Honestly, the right engine comes down to your project's DNA and the team you have on the ground. You should lean towards Unreal Engine if your project is all about:
- •Pushing for high-fidelity graphics and aiming for that cinematic, AAA look straight out of the box.
- •Getting your hands on a powerful, built-in toolset, like using Lumen for dynamic lighting or Nanite to handle insane amounts of geometric detail.
- •Needing the horsepower for large-scale games or incredibly realistic XR experiences.
On the other hand, Unity is often the better call when you need:
- •Maximum platform flexibility. It’s a huge plus for mobile games where a lighter engine can make all the difference.
- •To work within a C# ecosystem. Many smaller teams find they can prototype and iterate much faster this way.
- •Projects that aren't chasing photorealism, like many 2D games or titles with a more stylised 3D aesthetic.
The Role of C++ in an Unreal Project
One of the biggest questions we get is: "Do we _really_ need a C++ wizard to build a game in Unreal?" The answer is a bit nuanced, no, but it certainly helps. A lot. You can absolutely build and ship a complete game using only the Blueprints visual scripting system. It's a phenomenal tool for rapid prototyping, building UI, and handling game logic without writing a single line of code. Plenty of great indie titles have been built entirely this way. However, when you're working on something more complex or where performance is king, C++ becomes essential. For things like core game mechanics, sophisticated AI, or custom engine tweaks, C++ is the professional standard. It gives you the raw speed and direct control you need for high-end production.
Common Performance Mistakes to Avoid
It’s almost a rite of passage for teams new to Unreal to hit the same performance walls. Knowing what they are from day one can save you from a world of optimisation pain down the line. The most common mistakes we see pop up again and again are:
- •Overusing dynamic lighting everywhere instead of baking lights for static objects.
- •Building overly complex materials with way too many instructions, which absolutely hammers the GPU.
- •Forgetting to set up Level of Detail (LODs) for models, meaning the engine is rendering high-poly meshes even when they're a tiny speck in the distance.
- •Failing to profile the game regularly. This is how tiny performance hiccups slowly grow into game-breaking problems.
A disciplined approach to performance isn’t optional; it’s a core part of professional development. Profiling your build regularly helps you squash these issues early, ensuring your players get a smooth experience, especially on tricky platforms like VR and mobile.
Dodging these traps is one of the key things that separates an amateur setup from a proper production pipeline. Ready to bring your Unreal Engine project to life with a team that understands production from pitch to delivery?
Studio Liddell has been creating award-winning digital content since 2019. Book a production scoping call with us today.