A Studio Guide to VR Game Development with Unreal Engine
Kicking off a VR project in Unreal Engine isn't just about clicking 'New Project'; it's about laying a rock-solid foundation from the get-go. The choices you make right at the start will ripple through your entire development pipeline, directly affecting performance, which headsets you can support, and ultimately, the player's experience. Getting this wrong can lead to serious headaches and costly delays down the line.
Setting Up Your Project for Peak VR Performance
Think of your initial project setup as the bedrock of your VR experience. A thoughtful configuration here prevents crippling performance bottlenecks and painful production delays later on. In the demanding world of VR development, being smart about efficiency from day one, much like in broader software development, is what separates successful projects from abandoned ones. The opportunity here is massive. The UK's virtual reality gaming market alone pulled in USD 1,376.2 million in revenue in 2024, and it's projected to hit a staggering USD 4,081.1 million by 2030. While hardware currently makes up the bulk of that, software is the fastest-growing piece of the pie, fantastic news for studios building the actual content.
Core Project Configuration for VR
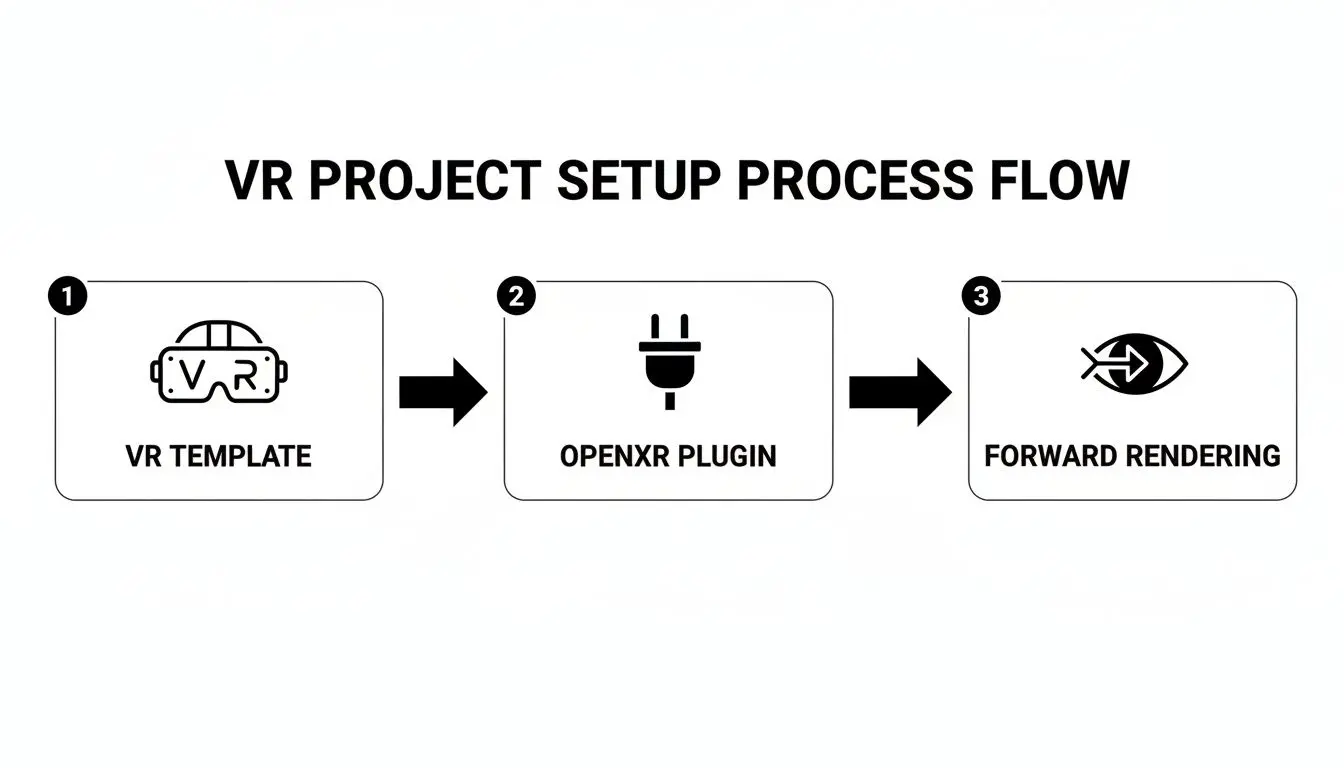
Your very first decision is the project template. Don't start from scratch. Unreal Engine provides a dedicated VR template that comes loaded with the essentials, a VR pawn, motion controller support, and basic interaction systems. It’s a huge time-saver and the perfect launchpad for any professional VR project. With the project created, the next critical task is to configure your plugins for maximum compatibility.
- •OpenXR Plugin: This is non-negotiable. OpenXR is the industry standard for communicating with VR and AR hardware. Enabling this ensures your game can run on a huge range of devices, from a Meta Quest to high-end PC VR kits, without writing custom code for each one.
- •Headset-Specific Plugins: While OpenXR is the universal translator, you'll sometimes need platform-specific plugins for advanced features. Want to use Passthrough or Hand Tracking on a Quest? You'll need to enable the Meta XR plugin for that.
This simple workflow is the starting point for almost any professional VR project in Unreal.
Nailing this process from the outset builds your project on a foundation of performance and broad compatibility.
Essential Rendering Settings
VR is an absolute beast when it comes to rendering. The engine has to draw a unique image for each eye and maintain an exceptionally high, stable frame rate (we're talking 90 FPS or more) to prevent players from feeling sick. Two specific settings are critical for making this happen. First, you must switch from the default Deferred Renderer to the Forward Renderer. The Forward Renderer is significantly more efficient for VR, performing better and playing nicely with the essential anti-aliasing methods required for crisp visuals.
Key Takeaway: Using the Deferred Renderer is one of the most common and costly mistakes we see. It tanks performance. Always switch to Forward Rendering and enable MSAA (Multi-Sample Anti-Aliasing) in your project settings. It delivers sharp visuals without the performance cost or the blurry, ghosting artefacts that other methods like TAA can introduce in VR.
We go into much more detail on performance tweaks in our guide to using Unreal Engine 5 for virtual reality. Getting these settings right under the 'Engine - Rendering' tab is fundamental. It's the difference between a comfortable, visually clean VR experience and a nauseating, blurry mess.
Prototyping Core VR Mechanics That Feel Right
In VR, "feel" is king. If picking up an object feels clunky or moving around feels unnatural, the immersion is instantly broken. This is why rapid prototyping isn't just a box to tick in VR game development with Unreal Engine, it's the heart of discovering what makes your game genuinely fun to play. Before you sink time into complex code and polished assets, you need a sandbox to test and refine your core ideas. Unreal Engine gives you a fantastic combination for this: the visual scripting system, Blueprints, and the heavyweight programming language, C++. Knowing when to use each is the key to prototyping efficiently. The goal here is to build a playable space where you can prove your core concept works and, more importantly, feels great.
Blueprints: The Ultimate Prototyping Playground
When you're first starting out, Blueprints are your best friend. This node-based system lets designers, artists, and even programmers visually build out gameplay logic without writing a single line of code. It’s built for speed and iteration. You can string together complex interactions just by connecting nodes that handle functions, events, and variables. This makes it perfect for quickly testing things like:
- •Locomotion Systems: Want to see if teleportation feels better than smooth locomotion? You can mock up and switch between both systems in a few hours.
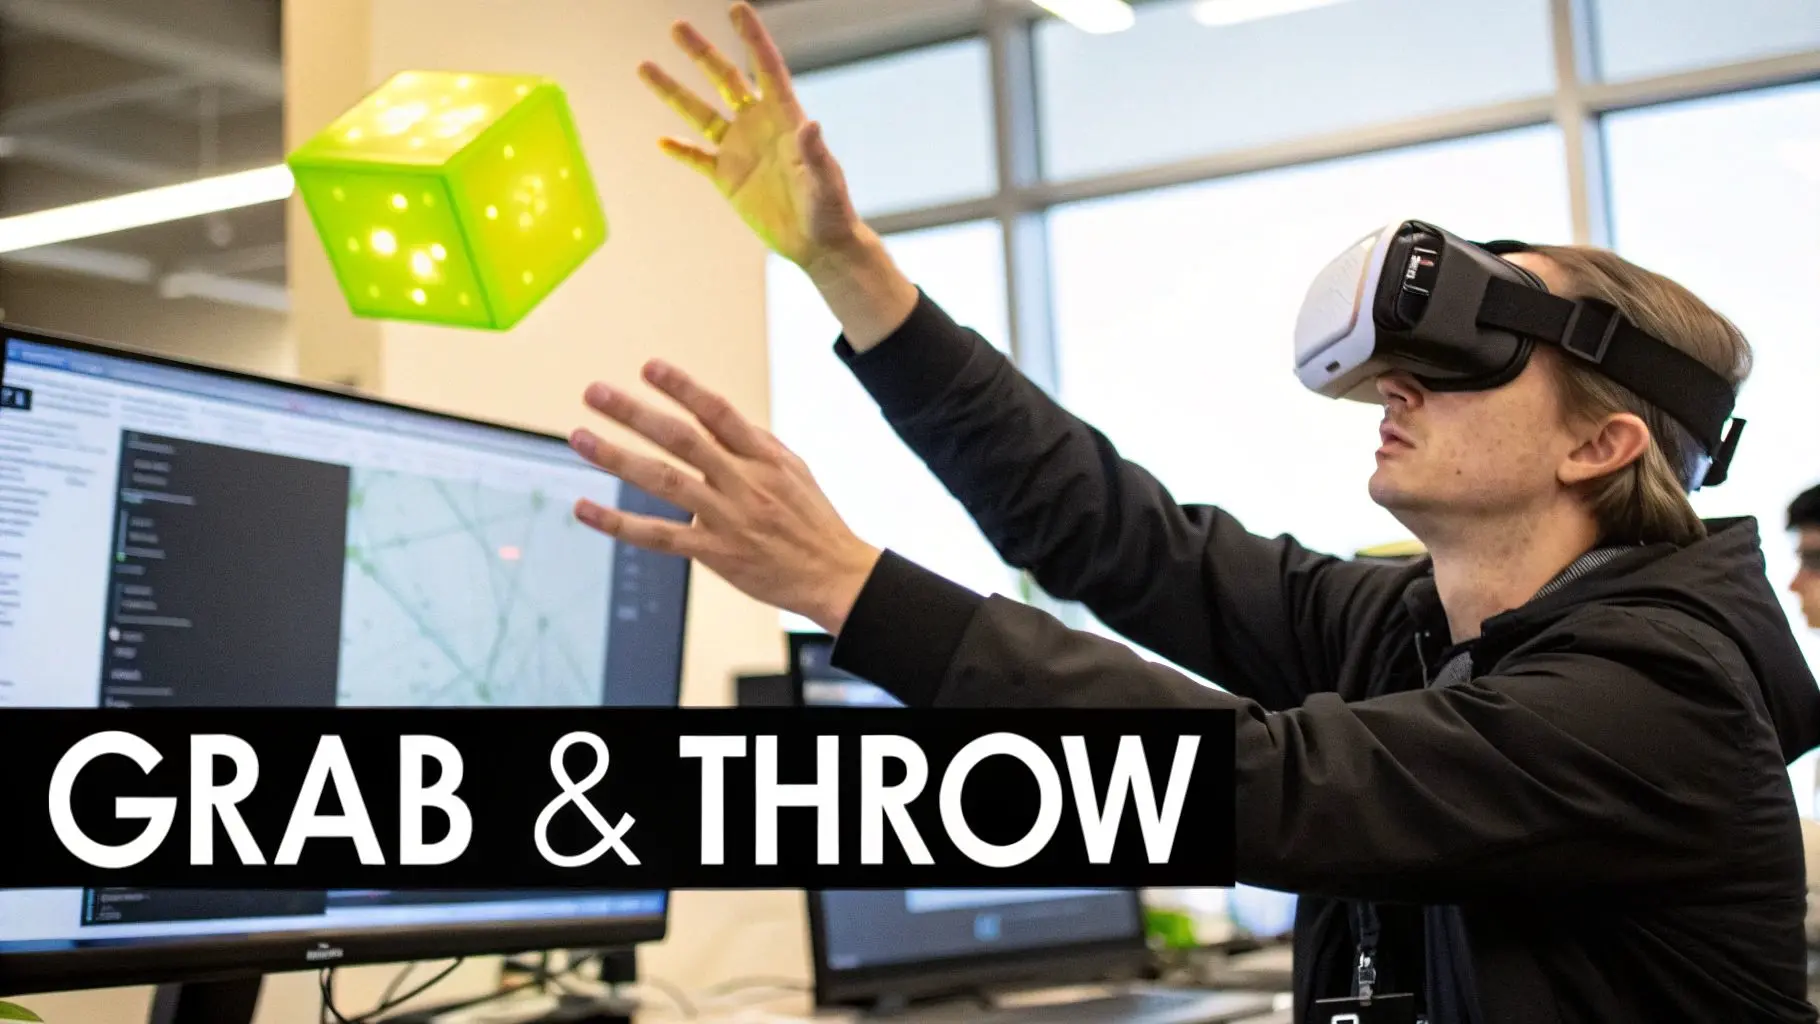
- •Object Interaction: Nailing that satisfying 'grab-and-throw' mechanic is a classic VR challenge. With Blueprints, you can tweak physics, hand poses, and release velocity on the fly.
- •Core Gameplay Loops: Whether you're building a puzzle sequence or a combat encounter, you can map out the entire logic visually to see if the flow feels right for the player.
The real magic of Blueprints is its speed. You can take an idea from your head to a testable, in-VR mechanic in an afternoon. That immediate feedback is what helps you find the fun.
For a higher-level look at how this all fits into the bigger picture, our producer's guide to virtual reality game development breaks down the entire journey from concept to launch.
When to Call in the C++ Cavalry
While Blueprints are brilliant for rapid experiments, they do have performance limitations. For systems that need to be seriously robust or are computationally demanding, C++ is the only way to go. Think of it like this: you figure out _what_ to build in Blueprints, and you lock in _how_ it works with C++. Native C++ code runs much faster than Blueprint logic, which is absolutely critical for hitting the high, stable frame rates that VR demands. It's the language you use to build the rock-solid foundation of your game. This is exactly why most studios use a hybrid approach. The typical workflow is to build a new feature in Blueprints to get the feel just right. Once the design is locked down and everyone agrees it's fun, a programmer steps in to rewrite the performance-critical parts in C++. These new, optimised C++ functions are then exposed back to Blueprints, so designers can still tweak parameters without touching the core code. You get the best of both worlds: fast iteration and powerful performance. The choice between Blueprints and C++ is a strategic one, always balancing development speed against the need for raw power. We've put together a quick table to help you decide which tool is right for the job at different stages.
Blueprint vs C++ for Prototyping VR Mechanics
| Aspect | Blueprints | C++ | Best For |
|---|---|---|---|
| Speed & Iteration | Very Fast. Visual, node-based scripting allows for rapid changes. | Slower. Requires compiling and a deeper understanding of syntax. | Blueprints are unmatched for initial idea validation and quick tweaks. |
| Accessibility | High. Accessible to non-programmers like designers and artists. | Low. Requires specialised programming knowledge. | Blueprints for team-wide collaboration during early prototyping. |
| Performance | Slower. Interpreted at runtime, which can be a bottleneck. | Very Fast. Compiled code offers maximum performance. | C++ is essential for performance-critical systems like physics, AI, or core player controllers. |
| Complexity | Becomes difficult to manage and debug for very large, complex systems. | Highly Scalable. Better suited for building complex, long-term architecture. | C++ for foundational game systems that won't change often. |
| Use Case | Prototyping mechanics, UI logic, simple state machines, level scripting. | Core engine systems, complex algorithms, optimising proven mechanics. | A hybrid approach: Prototype in Blueprints, then refactor key systems into C++ for performance. |
Ultimately, mastering this dynamic is a core skill for any studio serious about VR game development in Unreal Engine. It allows your team to move quickly where it matters most, without sacrificing the performance needed for a truly immersive experience.
Optimising Your Game for a Nausea-Free Experience
In virtual reality, silky-smooth performance isn't just a "nice-to-have", it's the absolute baseline. A single dropped frame or a moment of stutter can instantly shatter the illusion and, even worse, bring on a nasty bout of motion sickness. This makes optimisation a non-negotiable part of the VR game development Unreal Engine workflow, directly impacting whether players feel comfortable enough to stay in your world. The stakes for getting this right are getting higher. The VR gaming market in the UK is growing fast and is expected to hit £500 million by 2027. This growth is fuelled by increasingly powerful hardware like the Meta Quest 3 and PSVR2, which has set a high bar for what players expect when it comes to performance and visual fidelity. If you want to dive deeper into this, you can explore detailed insights on the UK's gaming sector.
Hunting Down Performance Bottlenecks
Before you can fix performance problems, you have to find them. Luckily, Unreal Engine gives you a powerful suite of tools for just this purpose. Your primary weapon here is the Unreal Insights profiler, a standalone app that gives you an incredibly detailed, frame-by-frame breakdown of what your game is doing. You just run the profiler and connect it to your game session. It records everything, from CPU thread activity to GPU rendering times, letting you pinpoint exactly which actors, materials, or bits of logic are eating up your precious milliseconds.
This kind of data is gold. It lets you see exactly where your frame time is going, helping you figure out if you're CPU-bound (too many draw calls choking the processor) or GPU-bound (too many complex pixels to shade).
Smart Rendering Techniques for VR
Because VR requires rendering the scene twice, once for each eye, you're constantly fighting the GPU budget. Fortunately, modern VR hardware and Unreal Engine support some clever techniques to lighten the load without a noticeable drop in quality. Foveated Rendering is one of the most powerful tools in your arsenal. It cleverly mimics how the human eye works, rendering the centre of the player's vision at full resolution while progressively lowering the quality in their periphery. When done well, it’s completely unnoticeable to the player but can deliver huge performance gains, often saving 20-30% on GPU frame time. Another critical area is managing how many objects are drawn on screen at once.
- •Draw Call Reduction: Every unique object with its own material creates a 'draw call' for the CPU. Too many of these will bog things down fast. You can slash your draw calls by merging meshes together or using instanced static meshes for repeating objects like trees or rocks.
- •Level of Detail (LODs): LOD systems are a lifesaver. They automatically swap out high-polygon models for simpler versions when they are far away from the player. Unreal's automatic LOD generation is a great starting point, but creating custom, highly-optimised LODs for key assets can save a massive amount of rendering power.
Pro Tip: Never underestimate the cost of dynamic lighting in VR. While visually impressive, real-time shadows and global illumination are ridiculously expensive. For static environments, baking your lighting into lightmaps is the single most effective way to get beautiful, realistic visuals while keeping your frame rate high.
Optimising Your Art Assets
Your 3D models and textures are often the biggest performance hogs. A single, poorly optimised asset can single-handedly tank your frame rate. It's vital to set a clear performance budget and establish best practices for your art team from day one. Here’s a quick checklist to run through for your assets:
- Polygon Count: Is the mesh as lean as it can be without losing its core shape? Use decimation tools on models that don't need insane detail.
- Texture Resolution: Are you using 4K textures on an object the size of a coin? Match your texture sizes to how large the object will actually appear on screen.
- Material Complexity: Keep your shaders simple. Avoid overly complex material graphs with tons of instructions, as they hit the GPU hard. Using Material Instances instead of unique Master Materials is also a must.
Building Connected Worlds with Multiplayer VR
 A single-player VR experience can be incredibly powerful and personal. But it’s multiplayer that truly turns a virtual space into a living, breathing social platform. The moment you start building shared worlds, however, you introduce a whole new layer of complexity to VR game development in Unreal Engine. You're no longer just crafting one person's reality; you're synchronising a believable, shared one for everyone. There’s a massive incentive to get this right. The UK's gaming market, which climbed to USD 6.8 billion in 2023, is increasingly fuelled by social and connected experiences. A recent report on the UK gaming market highlights how VR and AR tech are key growth drivers, creating fresh opportunities for immersive multiplayer games.
 Understanding Unreal's Networking Framework
At the core of any multiplayer Unreal project is its powerful networking framework. It's built on a classic client-server model, where one machine is the ultimate source of truth. This could be a dedicated server humming away in a data centre, or simply one of the players acting as a host. This server-authoritative model is fundamental. It means the server gets the final say on the state of the game, which is your best defence against cheating and keeps the experience consistent for everyone. In practice, clients send their actions to the server, the server works out what happens, and then it broadcasts the results back to all the clients. The whole process is managed by a system called Replication.Key Takeaway: You don't have to manually code data packets in Unreal Engine. Instead, you simply mark your Actors and variables to "Replicate," and the engine takes on the heavy lifting of automatically synchronising their state from the server to every connected player.This robust system is the foundation for every single networked interaction you’ll build.
Integrating Platform Services
Getting the core networking logic working is only half the story. Players need a way to actually find each other, join games, and talk. This is where online subsystem plugins come in, acting as a bridge between Unreal Engine and services like Steam, Xbox Live, or Epic Online Services (EOS). EOS is an especially compelling choice because it’s completely free and works across different platforms. By integrating the EOS plugin, you get a whole suite of production-ready tools without writing them from scratch:- •Matchmaking: A system for grouping players based on skill, region, or other rules.
- •Lobbies: Pre-game areas where players can meet up before a match kicks off.
- •Voice Chat (VOIP): Absolutely essential for communication and social presence in VR.
- •Friends & Presence: Lets players see when friends are online and easily join their sessions.
Using a service like EOS can save you a phenomenal amount of development time, letting your team focus on making a great game instead of building complex backend infrastructure. If you're looking for inspiration, have a look at some of the top virtual reality multiplayer games and platforms to see what's possible.
Solving VR-Specific Networking Challenges
Multiplayer VR throws up some unique synchronisation problems you just don't see in traditional screen-based games. A player's entire sense of presence is tied to how faithfully their avatar's movements are represented. Any lag or clumsy synchronisation can instantly shatter that immersion. The classic challenge is replicating the subtle movements of a player's head and hands. Just sending the final position of a controller a few times per second isn't good enough; it will look jerky and robotic to everyone else. The solution lies in network prediction and interpolation. This involves making educated guesses on the client-side to smoothly animate the controller's movement between the actual network updates, creating a fluid and believable motion. Physics interactions are another tricky area. If one player picks up a box and throws it, that entire event needs to feel responsive and look correct for everyone in the session. This often means running a simplified, temporary physics simulation on the client's machine for instant feedback, while you wait for the server to send back the authoritative final result. Mastering these VR-specific networking techniques is what separates a clunky multiplayer demo from a truly connected and believable shared world.
From Development to Deployment: Packaging and Submission
After all those long days and late nights of development, optimisation, and testing, you’re finally at the last hurdle: getting your game into the hands of players. This is where you have to navigate the often tricky world of packaging and platform submission. This is a critical moment in your VR game development with Unreal Engine journey. I can't stress this enough, attention to detail is everything here. A single misconfigured setting can get you an instant, frustrating rejection from a digital storefront, sending you right back to square one. Think of this final stage as your pre-launch checklist. Every platform, whether it's the Meta Quest Store, SteamVR, or PlayStation VR, plays by its own set of rules. Each one has a unique list of technical requirements and its own submission process. Preparing your game for deployment isn’t just about clicking a "package" button; it’s about carefully tailoring your build to meet the specific demands of each ecosystem.
Configuring Your Build for Target Platforms
The very first thing on your list should be creating distinct build configurations for each platform you're targeting. Inside Unreal Engine, you'll live in the Project Launcher and Packaging Settings for this. This is where you define everything from texture compression formats to which SDK versions to use. For example, a build for the Meta Quest is a world away from a PC build for SteamVR. The Quest is an Android-based standalone headset, which means its setup is fundamentally different.
- •Meta Quest (Android): You’ll need to point Unreal to the right Android SDK and NDK paths in your project settings. The final output will be an `.apk` file, and you’ll have to generate and manage signing certificates to make sure the app can be installed and updated securely.
- •SteamVR (PC): This is a much more straightforward Windows build. Your main job here is ensuring your `steam_appid.txt` file is set up correctly and that you’ve properly integrated the Steamworks SDK for features like achievements or workshop support.
- •PlayStation VR (PSVR): Deploying to a console like PSVR adds another layer of complexity. You'll need access to Sony's proprietary SDK and have to meticulously follow their technical requirement checklists (TRCs).
Getting these settings dialled in right from the start will save you a massive amount of time and stop you from having to repackage your game over and over again.
Managing Application Signing and Store Assets
Before any storefront accepts your game, it has to be digitally signed. This is a security step that proves you're the developer and that the app hasn't been tampered with. For a Quest build, this means creating a Keystore file and using it to sign your `.apk`. For PC platforms, this usually involves code signing certificates. But it’s not just about the technical build. You also need to get a whole suite of store-ready assets together. And I don't just mean a few gameplay screenshots. This includes:
- •Key Art & Banners: High-resolution images that are perfectly sized for each storefront's specific dimensions.
- •Trailers: Polished gameplay trailers. You’ll often need slightly different versions for different platforms.
- •Store Descriptions: Compelling, localised text that sells your game and accurately describes what it is.
Your store presence is the first impression a potential player gets. Investing proper time into high-quality marketing assets is just as important as squashing that one last bug. It has a direct impact on how many people see and buy your game.
Avoiding Common Submission Pitfalls
I've seen so many promising VR games stumble right at the finish line because of small, avoidable mistakes. Storefronts use both automated checks and human reviewers who will reject builds that don't meet their technical standards in a heartbeat. One of the most common reasons for rejection on the Quest store, for instance, is getting the manifest settings wrong or forgetting dependencies. If you fail to declare the right hardware features (like hand tracking) in your Android Manifest, your build will fail instantly. On the PC side, a SteamVR build that won't launch because it's missing a required C++ redistributable will be sent straight back to you. My advice? Double-check, then triple-check every single platform-specific requirement. Read the documentation from Meta, Valve, and Sony until you know it inside out. Submitting a clean, compliant build the first time is the absolute fastest way to get your polished VR game out of the studio and into the hands of your audience.
Frequently Asked Questions About Unreal Engine for VR
Jumping into VR development with Unreal Engine can feel like stepping onto a new frontier. It’s exciting, but it naturally brings up a lot of questions, even for seasoned developers and established studios. Let's tackle some of the most common ones with answers straight from our experience in the trenches.
Is Unreal Engine a Better Choice Than Unity for VR?
Ah, the classic debate. The honest answer? It really depends on what you’re trying to build. Both engines are absolute powerhouses for VR, but they shine in different areas. Unreal Engine is legendary for its stunning graphical fidelity right out of the box. If you’re aiming for a photorealistic, visually breathtaking experience that really pushes the hardware, Unreal's rendering pipeline often gives you a head start. Plus, its Blueprint visual scripting system is a game-changer for rapid prototyping, letting designers build and test ideas without ever writing a line of code. On the other hand, Unity is often celebrated for its flexibility, a massive asset store, and its C# foundation, which many developers find incredibly approachable. It has traditionally been the engine of choice for mobile VR, where squeezing performance out of less powerful hardware is the name of the game. The right choice boils down to your team’s skills, your target headset, and how visually ambitious you want to be.
What Are the Main Performance Hurdles in VR Development?
The single biggest battle in VR is maintaining a rock-solid, high frame rate, we’re talking 90 frames per second (FPS) or higher. In a normal game, a slight frame drop is a minor hiccup. In VR, it’s an instant immersion-breaker and a one-way ticket to motion sickness for your player. Performance bottlenecks usually come from two places:
- •CPU Bottlenecks: This is often down to too many draw calls. Think of it like this: every unique object with its own material needs an instruction from the CPU to the GPU to be drawn. Too many instructions, and you get a traffic jam.
- •GPU Bottlenecks: This happens when you have overly complex materials, too much dynamic lighting, or textures that are too high-resolution. Remember, the engine has to render the entire world _twice_, once for each eye. That nearly doubles the GPU’s workload compared to a standard monitor game.
Winning this performance war demands a disciplined approach to optimisation from day one.
How Hard Is It to Convert a Non-VR Game to VR?
It’s far more than a port; it's a complete reimagining. Just trying to "add VR support" to a game designed for a flat screen is a recipe for a bad player experience. It almost never works. Core systems have to be torn down and rebuilt from a VR-first perspective. Player movement designed for a thumbstick feels completely different and often nauseating when you're physically "in" the world. The UI is the biggest culprit. A 2D menu floating in space is simply unusable. It needs to be redesigned as a physical, tangible object that the player can interact with using their hands. It’s less of a conversion and more of a ground-up adaptation.
What Skills Are Most Important for an Unreal VR Developer?
Of course, a solid grasp of C++ and Blueprints is the foundation. But to be a successful developer in the vr game development unreal engine space, you need more. A deep understanding of 3D maths and, most importantly, performance optimisation is non-negotiable. You're always fighting against a tight performance budget, so knowing how to wield tools like Unreal Insights to hunt down CPU and GPU hogs is an essential skill.
But just as critical is a sharp sense of user experience (UX) designed specifically for immersive tech. You have to develop an intuition for what feels natural, comfortable, and believable to someone wearing a headset. It's a completely different discipline from designing for a screen, one that’s all about anticipating player comfort in a three-dimensional, physical space.
At Studio Liddell, we bring years of high-end animation and real-time development experience to the table, creating immersive VR experiences that truly captivate. Whether you're building a complex training simulation or the next hit VR game, our team has the technical and creative expertise to bring your vision to life. Ready to build something amazing? Book a production scoping call and let's discuss your project.