A Strategic Guide to Android Push Notifications
Android push notifications aren't just simple pop-up alerts; they're your most direct and powerful line of communication with your audience. When you get them right, they can completely reshape a user's relationship with your app, driving engagement sky-high and making a real dent in your retention figures.
Why Push Notifications Are a Developer's Direct Line to Users
In the cut-throat world of mobile apps, getting someone to download your app is only the first hurdle. The real challenge is keeping them around. This is where Android push notifications give you a serious edge, offering an immediate way to re-engage users, shout about new content, and deliver genuine value straight to their lock screens. It’s the key to turning casual downloaders into a loyal, active user base. This strategic advantage is even more pronounced on the Android platform. Here in the UK, Android push notifications boast an incredible opt-in rate of 91.1%, which completely overshadows the 43.9% we see on iOS. For a market where Android commands a 50.1% share (as of Q1 2024), that’s a massive opportunity. For a studio like ours, creating immersive apps and games for major brands, this high opt-in rate is an invaluable asset. We've seen firsthand that push-enabled apps can retain users at nearly double the rate of those without.
The Android Advantage in User Opt-Ins
That huge gap in opt-in rates isn't just a fluke; it's baked into the design of the operating system. Android’s permission prompts are far less intrusive than on iOS. Often, notifications are enabled by default, leaving it up to the user to opt-out later. The result? A much larger, more receptive audience right from day one. This infographic lays it bare, showing the stark difference in default user acceptance between the two platforms.
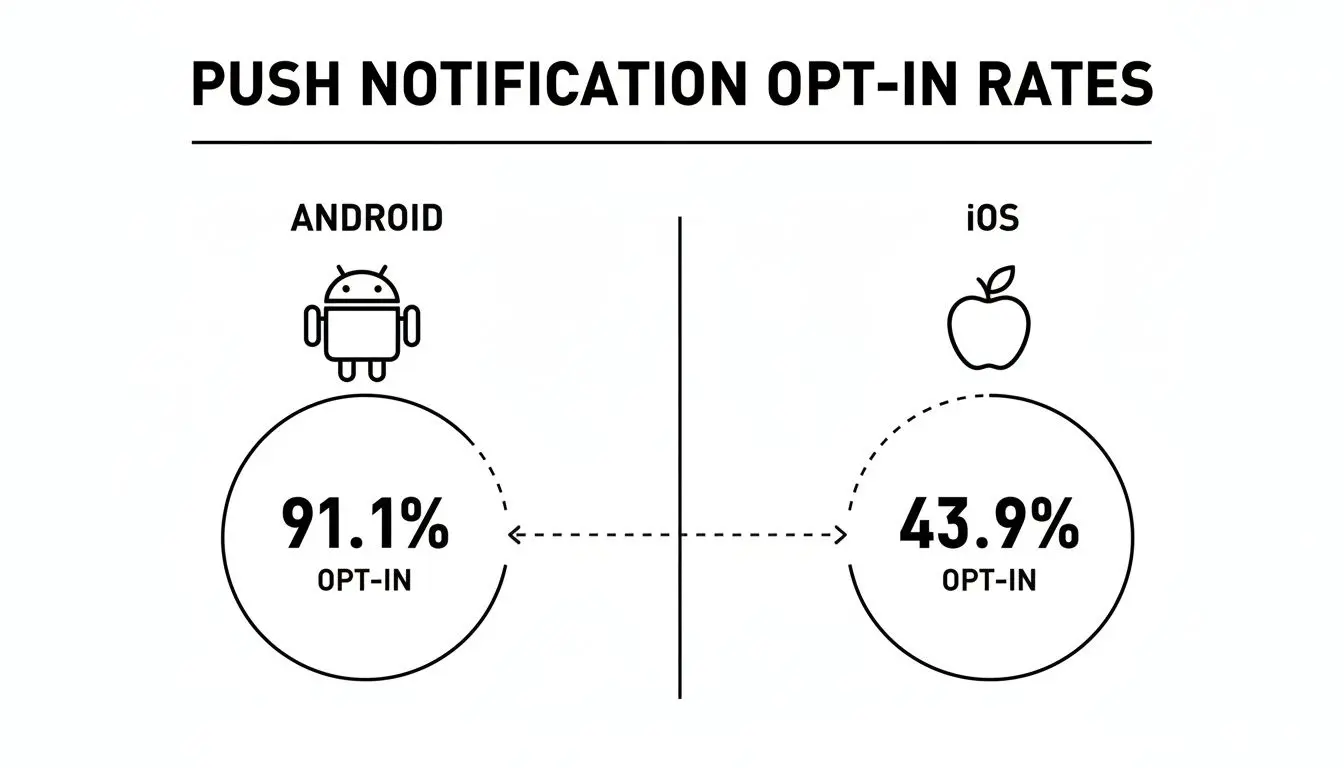
This data proves that as an Android developer, you start with a massive head start, a powerful tool for communication from the moment your app is installed.
Android vs iOS Push Notification Performance
To put it in perspective, let's break down the key performance differences you can expect in the UK market.
| Metric | Android | iOS |
|---|---|---|
| Opt-in Rate (UK) | 91.1% | 43.9% |
| Permission Prompt | Opt-out by default | Opt-in required |
| Initial Audience Reach | Very High | Moderate |
| Average Click Rate | ~4.6% | ~3.4% |
The numbers speak for themselves. The Android ecosystem gives you immediate access to a broader, more engaged audience right out of the gate.
Turning Engagement into Tangible Value
Of course, a high opt-in rate is just the beginning. The real magic happens when you pair it with a smart notification strategy, one that respects the user's time while hitting your own business goals. When used thoughtfully, these notifications are a critical part of any plan on how to improve customer retention. Just think about the benefits:
- •Massively Increased Retention: Sending regular, valuable content or timely reminders can almost double your long-term user retention. It’s a game-changer.
- •Longer Session Times: A quick heads-up about a new animated episode or a game update can pull dormant users right back into the app, boosting active session duration.
- •Driving Key Actions: You can gently nudge users towards specific actions, like completing their profile, trying a new feature, or making an in-app purchase.
By treating each notification as a piece of valuable communication, not just another alert, you can build a much stronger, more profitable relationship with your audience.
Ultimately, a solid push notification system is a cornerstone of your wider user engagement framework. It all fits into a bigger picture, which you can explore further by reading about how to build a https://studioliddell.com/news/a-strategic-content-plan-the-engine-of-modern-user-acquisition. A thoughtful approach here ensures every single message adds value, strengthening the user's connection to your app and delivering results you can actually measure.
Integrating Firebase Cloud Messaging in Your Android App
To get started with android push notifications, you need a solid connection between your server and your users' devices. This is exactly where Firebase Cloud Messaging (FCM) steps in. As Google's own cross-platform messaging solution, it's pretty much the industry standard for Android. Best of all, it offers a robust, free-to-use service that handles all the complex delivery infrastructure for you. Think of integrating FCM as laying the groundwork for your app's entire communication strategy. It involves linking your Android project to a Firebase project, pulling in the necessary software development kits (SDKs), and adding a bit of code to manage incoming messages and device registration tokens. This is the crucial first step to enabling the targeted, timely interactions that keep users coming back. If you're interested in how this fits into the bigger picture, our complete guide to app development in the UK offers a great overview of the whole journey from concept to launch.
Setting Up Your Firebase Project
Before you even think about writing code, you need to get your project set up in the Firebase console. This will be your central command hub for managing all of your app's Firebase services, including push notifications. It's a straightforward process:
- •Create a New Project: First, pop over to the Firebase console, sign in with your Google account, and hit "Add project." Pick a name that makes sense for your application.
- •Add Your Android App: Once the project is ready, you'll see prompts to add an app. Click the Android icon. You'll be asked for your app's package name, make sure this matches the `applicationId` in your `build.gradle` file perfectly. Any typo here will cause headaches later.
- •Download the Config File: Firebase will then generate a special configuration file for you, `google-services.json`. This little file contains all the keys and identifiers that connect your app to your Firebase project. Download it and drop it straight into your Android project's `app` directory.
That configuration file is the secret sauce. Without it, your app simply won't be able to talk to any Firebase services.
Adding the FCM SDK to Your App
With your project configured on the Firebase side, it's time to integrate the FCM library into your actual Android app. We'll do this using Gradle, Android’s build automation system, which means adding a few lines to a couple of `build.gradle` files. First, in your project-level `build.gradle` (or `build.gradle.kts`) file, you need to declare the Google services plugin. ```kotlin // Top-level build.gradle.kts plugins { // ... id("com.google.gms.google-services") version "4.4.1" apply false } ``` Next, jump into your app-level `build.gradle.kts` file. Here, you'll actually apply that plugin and add the FCM dependency itself. ```kotlin // App-level build.gradle.kts plugins { // ... id("com.google.gms.google-services") } dependencies { // ... // Import the Firebase BoM implementation(platform("com.google.firebase:firebase-bom:33.0.0")) // Add the dependency for the Firebase Cloud Messaging library implementation("com.google.firebase:firebase-messaging") } ``` Once you've added these lines, just sync your project with the Gradle files. Android Studio will handle the rest, downloading and integrating the necessary libraries. This makes all the FCM APIs available for you to use in your code.
Key Takeaway: I can't recommend using the Firebase Bill of Materials (BoM) enough. It cleverly manages the versions of all your Firebase libraries, making sure they're all compatible with each other. Trust me, it saves you from a world of pain dealing with version mismatch headaches.
Retrieving the Device Registration Token
For FCM to know where to send a message, every single installation of your app needs a unique identifier. This is known as the FCM registration token. Your app needs to grab this token when it first launches and also listen for any time it gets refreshed. You can fetch the current token with a simple call to `FirebaseMessaging.getInstance().token`. ```kotlin FirebaseMessaging.getInstance().token.addOnCompleteListener(OnCompleteListener { task -> if (!task.isSuccessful) { Log.w(TAG, "Fetching FCM registration token failed", task.exception) return@OnCompleteListener } // Get new FCM registration token val token = task.result // Log and send to your server Log.d(TAG, "FCM Token: $token") // sendTokenToServer(token) }) ``` This token is absolutely essential, it's the unique address for sending a notification to that specific device. Your backend server will need to store this token, usually linking it to a user's account, so you can target your messages precisely. With this setup complete, you're officially ready to send your first test android push notifications. The easiest way to do this is directly from the Firebase console's "Engage" section. Go on, give it a try
Crafting Notifications That Drive Real Engagement
Anyone can send an android push notification. That’s the easy part. The real challenge, and where the most successful apps pull away from the pack, is getting a user to actually appreciate and act on it. It’s about moving beyond generic broadcasts to craft messages that feel personal, timely, and genuinely helpful. Think of it less as an interruption and more as a value-add at the perfect moment. The payoff for getting this right is massive. When you stop talking to everyone and start talking to someone, using real user data and behaviour to inform your messaging, engagement naturally skyrockets.
This is the goal: creating messages that are visually compelling and contextually relevant enough to make someone stop scrolling and pay attention.
Beyond the Title: The Power of Personalisation
Personalisation is so much more than just slotting in a user's first name. True engagement comes from showing you understand their journey with your app. Did they just grind through level three of your game? Send a message congratulating them and teasing the next big challenge. Did they spend five minutes browsing a specific category of shoes? Let them know the moment a related item goes on sale. This level of detail transforms a notification from potential spam into a genuinely useful service. You can build this kind of specific messaging using a few key data points:
- •In-app behaviour: What a user has (or hasn't) done.
- •User attributes: Their location, language, or stated preferences.
- •Purchase history: Past orders or, even better, items they’ve abandoned in their cart.
Segmenting your audience this way ensures every notification has a purpose. The data backs this up, Android push notifications in the UK see an average reaction rate of 10.70%, which is more than double the rate on iOS. These results are amplified by smart tactics; personalisation can boost click-through rates by up to 400%, and advanced targeting can lift them by 300%. For a deeper dive into the numbers, you can discover more insights about push notification performance.
Using Rich Media and Actions to Capture Attention
Let's be honest: a wall of text is easy to ignore on a busy lock screen. This is exactly why modern Android notifications support rich media elements that make your messages far more interactive and visually appealing. Here are a few tools in your arsenal:
- •Images and GIFs: A strong visual conveys a message instantly. Announcing a new season of an animated show? A GIF of the main character is far more powerful than text alone.
- •Action Buttons: Give users immediate, useful options. Instead of just saying "New episode available," add buttons like "Watch Now" or "Add to Watchlist" right in the notification.
- •Deep Links: This is absolutely critical. When a user taps your notification, don't just dump them on your app's home screen and make them hunt for the content. A deep link takes them directly to the specific product, video, or game level you were talking about. This frictionless experience is key to conversion.
The Firebase Console gives you a straightforward interface for composing these rich notifications, even letting you preview how they'll look on a device before you hit send. It's a great way to build engaging messages without needing to write complex server-side code for every single campaign.
Real-World Examples of High-Engagement Notifications
Theory is great, but seeing these principles in action is what makes them stick.
Gaming App: A generic "Come back and play!" is lazy. A much better approach is, "You're only 100 points from unlocking the Crystal Sword! Jump back in to claim your reward." It’s specific, creates urgency, and reminds the user of their goal.
Education App: Instead of a simple "Daily lesson available," get personal: "Ready to master French verbs, Alex? Your next 5-minute lesson on the passé composé is ready when you are." This acknowledges their specific learning path and makes it feel tailored.
B2B App: For an analytics app, a message like, "Your weekly sales report is ready. You saw a 15% increase in leads from the UK" is worlds better than "New report available." It delivers immediate value right on the lock screen and encourages a click to see the full details.
By applying these strategies, you shift your mindset from interrupting users to actively helping them. Each notification becomes a valuable touchpoint that reinforces your app's utility, builds loyalty, and guides users toward the actions that matter most.
Mastering Android's Technical Notification Landscape
The Android ecosystem is a wild and wonderful place. Its sheer diversity is a huge strength, but for developers, it’s also the source of many headaches. Unlike a closed-off system, Android runs on an untold number of devices from countless manufacturers, each layering their own software quirks on top. This fragmentation means getting your android push notifications delivered reliably is less of a straight line and more of a maze. Successfully landing a message on a user's device takes more than a simple API call. It requires a deep-down understanding of the operating system's features and the often-baffling "optimisations" added by manufacturers. This is one of those areas where your initial choice between native vs cross platform mobile development can really come back to bite you, as a native approach often gives you more direct control to tackle these platform-specific hurdles.
The Essential Role of Notification Channels
Ever since Android 8.0 (API level 26), Notification Channels have been a non-negotiable part of the process. This was a massive shift, taking control out of the developer's hands and giving it directly to the user. Before this change, if a user got annoyed by your marketing pushes, their only real option was to nuke all notifications from your app, cutting off a vital line of communication. Channels fix this by forcing you, the developer, to sort your notifications into clear categories. Think of it like this:
- •Transactional: The important stuff. Order confirmations, delivery updates, password resets.
- •Promotional: Your marketing messages, special offers, and new feature announcements.
- •Social: Things like direct messages, comments on a post, or new friend requests.
By setting up these distinct channels, you empower users with fine-grained control. They can happily mute your promotional pings while ensuring they never, ever miss a critical account alert. This isn't just a "nice-to-have" anymore; it's a hard requirement. If you don't define a channel, your notifications simply won't show up on modern Android devices.
Handling Foreground vs Background Delivery
One of the most common tripwires for developers is figuring out how Firebase Cloud Messaging (FCM) messages behave depending on the app's state. It’s a classic "it works on my machine" problem until you realise the logic completely changes when your app is in the background. When a user is actively using your app (it's in the foreground), your app’s `onMessageReceived()` callback is triggered for both notification and data messages. This gives you full control to handle the payload and decide how, or even if, you want to display a notification. But when your app is in the background, things get tricky. A standard "notification" message is automatically grabbed by the Android system and popped into the notification tray. Tapping it just launches your app. A "data" message, however, still wakes up your app's service and calls `onMessageReceived()`, letting you process the payload and create a custom local notification.
The real pro-tip here is to lean towards sending data messages whenever you can. This ensures your `FirebaseMessagingService` is the single source of truth for handling incoming payloads. It gives you consistent control over building and displaying the notification, no matter what the user is doing.
Battling Aggressive Battery Optimisation
Here’s where the real fun begins. The single most frustrating challenge in the Android notification world is wrestling with the aggressive battery-saving features built into the OS and cranked up to eleven by manufacturers like Xiaomi, Huawei, and OnePlus. Android features like Doze Mode and App Standby Buckets are designed to save battery by restricting what apps can do in the background, including network access. While the intention is good, the result is that your FCM messages can get stuck in limbo, sometimes delayed by hours. To fight this, you can set the priority of your FCM message to `high`. This is a strong signal to the system to wake the device from Doze Mode and deliver your message right away. But even that isn't a guarantee. Some manufacturer ROMs are so restrictive they will kill your app’s background process without a second thought. In these extreme cases, your only real option is to educate your users and gently guide them to manually whitelist your app from battery optimisation in their device settings. It’s an annoying extra step, but for ensuring your critical alerts get through, it's often a necessary evil.
Android Version Notification Handling
Keeping track of notification changes across Android versions is critical for ensuring your app behaves as expected for all users. What worked on Android 7 won't fly on Android 13.
| Android Version (API Level) | Key Change/Requirement | Developer Action |
|---|---|---|
| Android 13 (API 33) | Introduces a runtime permission (`POST_NOTIFICATIONS`) for showing notifications. | You must request this permission from the user at runtime. If denied, your app cannot send any notifications. |
| Android 12 (API 31) | Introduces notification trampolines restrictions, blocking services/broadcasts from `startActivity`. | Ensure tapping a notification directly opens an Activity. Customise notification content with `MessagingStyle` and `CallStyle`. |
| Android 10 (API 29) | Introduces Settings Panels, allowing users to control settings directly from your app. | Implement a settings panel for notification controls to prevent users from leaving your app to manage channels. |
| Android 8.0 (API 26) | Notification Channels become mandatory. All notifications must be assigned to a channel. | Create and register notification channels before posting any notifications. Categorise your alerts logically for better user control. |
| Android 7.0 (API 24) | Introduces bundled notifications and direct reply. | Group related notifications together using `setGroup()`. Implement `RemoteInput` to allow users to reply directly from the notification. |
As you can see, the trend is clear: Google is consistently giving users more direct control over what they see. As developers, our job is to adapt by building more transparent and user-friendly notification systems.
How to Avoid Notification Fatigue and Keep Users Happy
Sending too many irrelevant android push notifications is the fastest ticket to getting your app uninstalled. A modern user's attention is precious, and if you bombard them with pointless alerts, you'll burn through their goodwill in no time. The goal isn't just to broadcast messages; it's to start valuable conversations. This whole process starts with a simple idea: respect the user. A notification that buzzes at 3 AM or pushes a product they have zero interest in isn't just an annoyance, it actively damages your brand. A great strategy is built on empathy, backed by solid data, ensuring every single alert feels helpful, not intrusive.
Finding Your Ideal Sending Frequency
There’s no magic number for how many notifications you should send. The "right" frequency is completely tied to your app's purpose and what your users expect from you. A news app might fire off several timely alerts a day, while a gaming app might only ping users every few days to announce a special event. Flooding users is a classic mistake. In fact, a staggering 78% of users will abandon an app within the first week if they feel spammed. The trick is to watch how your users behave. Start tracking engagement metrics against your sending frequency. Do your open rates plummet after the second notification in a single day? Does one user segment respond better to morning alerts than evening ones? This data-driven approach helps you find that sweet spot between staying top-of-mind and becoming a nuisance.
Empowering Users with a Preference Centre
One of the best tools in your arsenal for fighting notification fatigue is a user preference centre. Instead of a blunt, all-or-nothing toggle, a preference centre gives users fine-grained control over exactly what kinds of notifications they want to see. This one feature flips the entire dynamic: you stop pushing messages at them, and they start pulling the information they genuinely want. Think about organising your preference centre into logical categories:
- •New Content Alerts: Perfect for users who want to know the second a new animated series drops or a game update is live.
- •Special Offers & Promotions: For the bargain-hunters who want a heads-up on your next sale.
- •Account Activity: Essential for security updates, subscription renewals, and other critical alerts.
- •Community Updates: For social features like new comments, direct messages, or friend requests.
When you let users opt into topics they actually care about, you pretty much guarantee every notification is a welcome one. It’s a win-win that builds long-term trust and drastically cuts down your opt-out rate.
When users feel they are in control of the conversation, they are far more likely to remain engaged. A preference centre is a clear signal that you respect their time and attention.
Advanced Tactics for a Smarter Strategy
Once you've nailed the basics, you can layer in more advanced tactics to really fine-tune your approach and keep your users happy. This is where good notification strategies become great ones. First up, A/B test everything. Don't just guess what copy or timing works best, test it. Pit a straightforward headline against one that uses an emoji. Try a few different calls to action to see what drives clicks. You’d be surprised how small tweaks can lead to major lifts in engagement, and testing takes all the guesswork out of it. Next, implement quiet hours. Nobody appreciates their phone buzzing with a special offer in the middle of the night. Give users a "do not disturb" window they can set themselves. If that's not feasible, at the very least, avoid sending any non-critical notifications between 10 PM and 8 AM in the user's local time zone. It's a simple courtesy that goes a long way. Finally, you need to go deeper with your analytics. Tracking open rates is just scratching the surface. What happens after the click? You can learn more about utilizing analytics to understand customer behavior and how this data can reveal which notifications are actually driving valuable actions versus which ones are falling flat. This insight is gold for refining your segments and personalising your messages for maximum impact.
Your Android Push Notification Questions Answered
Even with a solid strategy, the world of Android push notifications can throw a few curveballs. I’ve seen developers and marketers run into the same tricky questions time and again, so let’s clear up some of the most common ones.
What Is the Difference Between FCM and Providers Like OneSignal?
This comes up a lot, but the distinction is actually quite simple. Think of Firebase Cloud Messaging (FCM) as the engine. It’s Google’s free, core messaging service that’s baked right into the Android OS. It provides the fundamental transport layer, the pipes, that get a message from your server to a user's device. It’s the essential, raw power. Services like OneSignal, on the other hand, are built on top of FCM (and Apple's APNs for iOS). They take that raw engine and build a whole car around it. This "car" gives you a user-friendly dashboard, advanced controls, and a whole suite of powerful features right out of the box, including:
- •Advanced User Segmentation: Easily build complex audience segments without having to write your own server-side logic.
- •A/B Testing Dashboards: Run experiments on your notification copy, timing, and visuals to see what actually works.
- •Detailed Analytics: Get rich insights into delivery rates, open rates, and conversion events.
- •Simplified Multi-Platform Support: Manage both your Android and iOS notifications from a single, unified interface.
In short, FCM is the essential plumbing. Platforms like OneSignal provide the taps, sinks, and water heater that make it easy for anyone to actually use the water.
Why Are My Notifications Not Delivered on Some Devices?
This is easily the most frustrating issue developers face, and nine times out of ten, it boils down to aggressive battery optimisation. While stock Android has features like Doze Mode, certain manufacturers, especially Huawei, Xiaomi, and OnePlus, add their own heavy-handed software layers. These systems are notorious for force-stopping background apps to squeeze out more battery life. When your app's background process is killed, it can no longer receive FCM messages. This leads to delayed or completely missed notifications. There's no single magic bullet, but you can fight back:
- Use High-Priority Messages: When you send a message through FCM, set its priority to `high`. This is a strong signal to the Android system to wake the device up and deliver your message immediately.
- Educate Your Users: For genuinely critical notifications, you might need to guide users to manually "whitelist" your app in their device's battery settings. A simple in-app flow that detects the device manufacturer and shows a quick guide can work wonders.
- Test on Physical Devices: Emulators will not show you this behaviour. It is absolutely critical to test your notification delivery on actual physical devices from these specific manufacturers to understand how their software is treating your app.
How Do I Implement Deep Linking from a Notification?
Deep linking is non-negotiable for a good user experience. When someone taps your notification, you need to take them directly to the relevant content, not just dump them on your app's home screen. The implementation involves attaching a `PendingIntent` to your notification. This intent is what gets triggered when the user taps the alert. Inside this intent, you specify which `Activity` to launch and, crucially, you can bundle extra data with it, think a product ID, an article slug, or a specific screen identifier. Your receiving `Activity`, in its `onCreate()` or `onNewIntent()` method, then just needs to check for these extras. It reads the data and uses it to load the right content. Simple as that.For modern app development, the best and most robust approach is to use Android's Navigation Component. You can define deep links directly in your navigation graph, which dramatically simplifies handling incoming intents and getting the user to the correct destination in your app.
What Key Metrics Should I Track for Push Campaigns?
To really understand the performance of your Android push notifications, you need to look way beyond simple delivery receipts. A successful campaign is measured by user action, not just by whether the message arrived. Focus on tracking these four essential metrics:- •Opt-in Rate: This is your starting point, the percentage of users who have granted your app permission to send notifications. While this was historically high on Android, monitoring it is vital now that the runtime permission on Android 13+ is in play.
- •Click-Through Rate (CTR): This is your measure of immediate relevance. It’s the percentage of users who saw a notification and actually tapped on it. A low CTR is a clear sign your message isn't compelling enough.
- •Conversion Rate: This measures real business impact. Of the users who clicked, what percentage completed your desired action? This could be making a purchase, watching a video, or trying a new feature.
- •Uninstall Rate: This is your critical feedback loop. If you see a spike in uninstalls right after sending a campaign, it’s a massive red flag. You’ve likely crossed the line into spammy territory and need to pull back, fast.
At Studio Liddell, we build engaging digital experiences that connect with audiences on a deeper level. From immersive XR apps to captivating animations, our team has the creative and technical expertise to bring your vision to life. Explore our full range of services and see how we can help you build your next project.